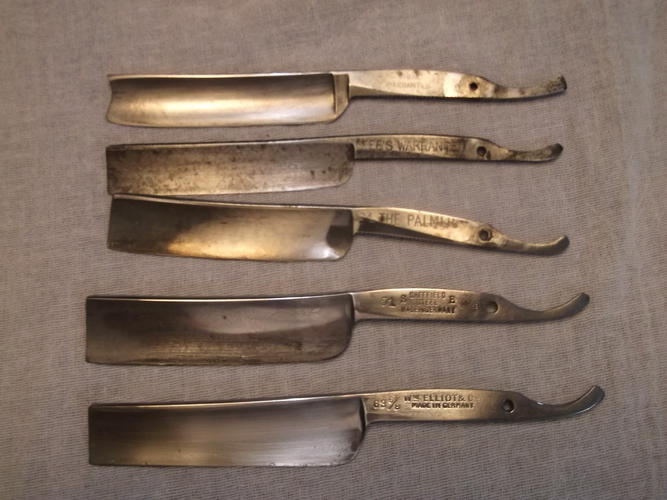
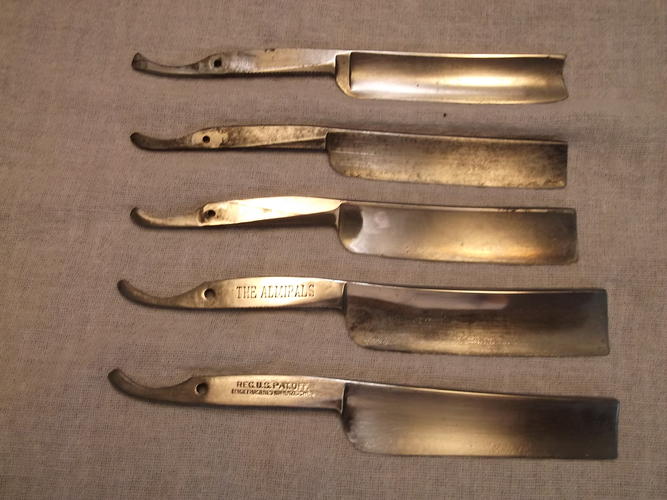
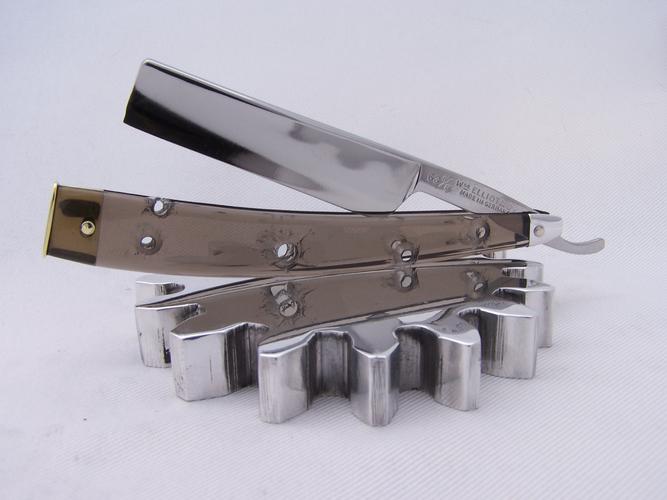
So here it is in pictures thanks to 10pups.Attachment 172394Attachment 172395Attachment 172396Attachment 172397Attachment 172398
And yes I know the toe is thinner than the heal .It came to me that way and I didnt want to throw it away.
Printable View
So here it is in pictures thanks to 10pups.Attachment 172394Attachment 172395Attachment 172396Attachment 172397Attachment 172398
And yes I know the toe is thinner than the heal .It came to me that way and I didnt want to throw it away.
very cool, I like the scale shape and the bolster at the pivot.
Cool, not sure if yours is one of 'em, but Zak and ScienceGuy had a thread devoted to razors that were made that way at the factory. So it is possible yours is just as it was made.Quote:
Originally Posted by ultrasoundguy2003
Damn brand new & bug bites already LOL
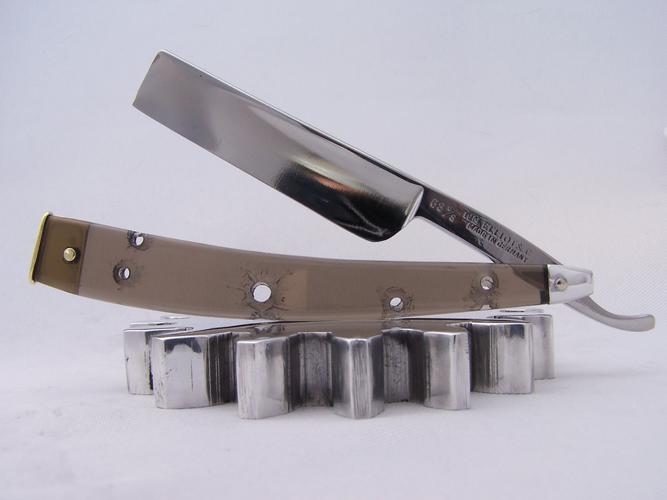
I really dig the bullet holes
did you engrave the blast around them also or etch it somehow?
are the bolster and that 'T' wedge made by 10Pups or liberated from another source?
very nice looks like a fun razor & good conversation starter
Nice job 10pups!
I think that is going to be a BEAR to keep clean though...:shrug:
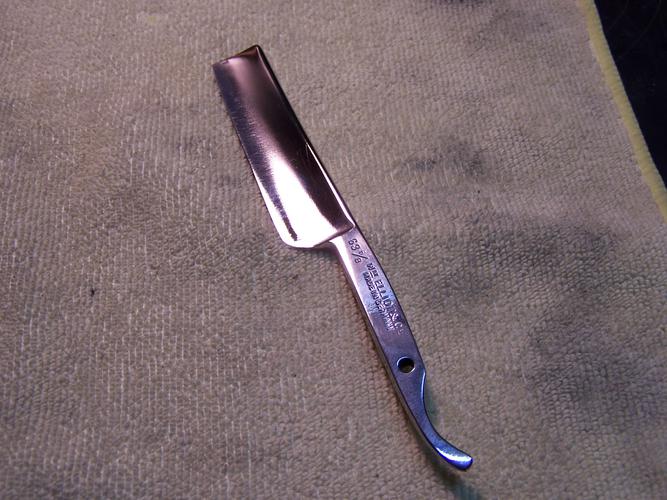
See 10Pups has been taking pity on me. So I sent him blades I wasnt going to get around to restoring, and he goes and makes that Elliot all shiny. Its all his work we will have to get him to weigh in. As I recall he said he made it all from scratch. I just wanted it to look real. So one side is clean and it blasts on the way out. 10Pups then took it and ran with it.
Very cool! I like that originality. Can't wait to see more :)
We had a lot of fun with this. The wedge is forged into shape out of brass plate and then detail shaped with files and sand paper. The bolster on the pivot is aircraft aluminum I shaped by making a die on a cut off bolt. Then I laid the sheet of aluminum onto a lead bar and hammered the bolt into it. Cut it out of the sheet with a scroll saw and then lots of filing and sanding there too. Then the gauge of the sheet was so thick I had to set it down into the acrylic to flush it out, more sanding. Bullet holes are easy. Drill with a small dia. then counter sink which ever side the bullet came out. The cracks are made with a diamond burr in a Dremmel. I used 3 different shapes.
I hope it's not too hard to keep clean. One thing I noticed when I buffed it all out is that there is plenty of holes to reach the inside of the scales :<0)
Not sure how the blade got this shape but it's not a Sheffield like Zak's or Wolfpack's . It was a very different shave. Had me confused some when I tested it. May have been factory maybe somebody did a regrind on it back in the day. The spine measured out the same all the way down so it's not honed out.
So...A man takes and blows some @4's at a set of scales and it's custom? :D
I suppose it is. I heard tale about an up-and coming country star. He hung pants out on the line and shot them with a shotgun.
Signed em and sold out. Lots of different sizes too!
So how did you do the bulletholes? The Sheffield razors which Jimmy refers to, made with swoop and taper, were made almost 2 hundred years ago. IMO, this one is modern and has been honed this way. Seems too straight, almost frowning.
It's different! A bottom heel bolster to match the top!
Lucky the blade was open when it took the blast! :D
:tu
Thank you I was able to find that thread because of you. Now I did learn something new today. You are very correct about it coming from the factory and it explains why the spine looks so not ground down.Quote:
Originally Posted by JimmyHAD
I could be wrong, but it seems obvious by looking and dating, by looking at the tang and shoulder, spine, lack of wear on the spine. I would say it was reground at some point to this taper we see. Someone either wanted it tapered, or screwed up, chipped it, and made it that way. I think I see a frown. Needs some profiling? I think I see 6/8 on the tang? There you have it! Should be a good shaver!Quote:
Originally Posted by ultrasoundguy2003
You are probably spot on. All I know is its a great shaver. Now I will have to research profiling and go look at the blade to see if I see what your referring to as for a frown . You are also correct on the 6/8 on the tang. See the first pictures.Attachment 172430 in the center above that pink box?
It was a little worse for wear. And I am thankful to all who pointed me in the right direction.
I sanded it to its beginning images but at that time that was as far as my skill set would go.
Since I got all this help, I bought a buffer.
If it shaves good, it IS! Be careful with that buffer, now! :hmmm: Direction of rotation! Think about what you do before you do it. Safety glasses! Speaking from experience! :)
Good point. I am staring at the box. Still a little gun shy. 10Pup.Quote:
Originally Posted by sharptonn
has given me a stern warning from his experiences also. So yes all points well taken.
Edge down. Always! :D
See I didnt get that memo. Thats huge. I was told not to get my fingers between the blade and the wheel. Cold water, and use 4 inch wheels on the 6 inch buffer so that I could get closer to the spine. Oh and Never Ever put a blade on the wheel above midline/halfway. Pay attention to the direction of the spin.I will now go back and reread my emails and stay in the library awhile longer.
I checked for frown but know what you mean about how it looks that way. It does have a ding in one of the holes. Well placed shot :<0) It also had 1 thin spot on the spine just above that ding. Couldn't get it all out without burning through the blade and changing all the geometry. We decided to leave it and run with it as it was. With all that was wrong with it, in the end, that blade cut against the grain on my chin better than anything else I have tested.
I cant stop starring at this hot rod . Thank-you 10Pups:chapeau. You put a ton of attention in this one. It showsQuote:
Originally Posted by 10Pups
Indeed, it should deliver a scything stroke without even trying! :D
And that is NOT a guarantee that things won't go South faster than a cat can lick his butt. A buffer can grab the spine and take it away from you, break it all to pieces, and throw the pieces back at you at light speed.Quote:
Originally Posted by sharptonn
I don't use my buffer on my razors. In the past, I've had, gun parts, knives, and motor cycle parts grabbed, broken, and launched.
NEVER stand directly in line with your buffer wheel either.
Don't ask me how I know. :p
Don't forget, Wullie! Beer and buffers don't mix! :nono:Quote:
Originally Posted by Wullie
Just got brave enough today to take it out of the box. Applied all the advise and tried it on a Bowie Knife. Just to get the feel for what this tool can/will do. Yeah felt that grab.
No launch but got my attention. Not brave enough to take a straight to it yet. Dont stand in line ... Priceless will save that tidbit.
http://i658.photobucket.com/albums/u...it/Shocked.gifQuote:
Originally Posted by sharptonn
Since when?