Wellll I started experimenting today with anodizing titanium. I watched all the tubes on both heat and electro and decided doing it my oven could wait. There is no scale for what temp makes what color with the heat method and I was looking for a blue. The oven seemed like an experiment in itself.
First I had to get a mirror polish so I went back to the belt sander and dressed up the edges and proceeded to go my usual route to mirror. 400g belt, to 600g belt to 800g belt. Then I go to compounds starting with black on sisal which does a great job on razor blades after grease-less , by the way. The green , white and blue to get everything perfect. Okay so first thing I noticed is flaws in the finish of titanium are very hard to see. Compounds or finger prints or the swipe of a towel leaves marks the look exactly like old grit scratches. In the end I called my finish "good enough" which is not my usual "perfect". I spent 4 times as long on these knowing full well titanium is abrasive resistant. It's one of it's better qualities. I had had enough, which goes against my patient nature but ,what can I say.
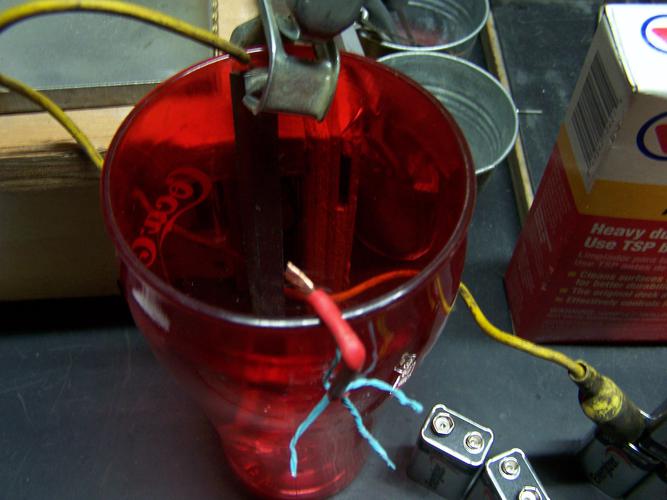
I hooked up 3 9v batteries in sequence (27v)
Attachment 232194
Used a piece of tool steel for the negative piece that goes in the jar. It was as long as the scales and just as wide so I figured that would do it. About 2 1/2 tablespoons (measured Rachel Ray style) of TSP for the electrolyte.
Attachment 232195
Now the test pieces were not clean or sanded or anything but I saw what I wanted to see. Purple comes quick with 3 batteries and dark blue with time. With 4 (36v) I got a nice light blue (less purple hue) better....quick. I did the square second piece to make sure I had it right.
The first was anodize over anodize and so that left a doubt.
Attachment 232197
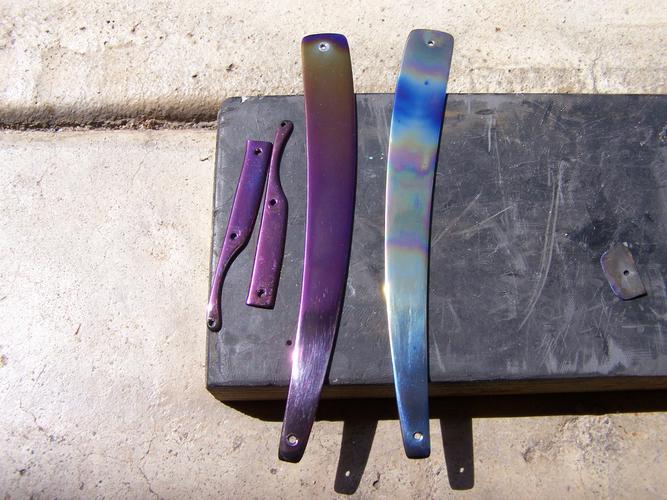
So I made a little hanger out of copper wire to hold everything in the jar at once. My thinking was they would all come out the same that way. I left the scales together at the wedge end. I made sure everything was clean by wiping it down with denatured alcohol and dropped it all in. I hooked up the positive lead and watch the bubbles start coming up. Most of these were from the negative bar and the stainless steel screw I used to test pin the scales together at the wedge end. After what seemed like forever (after watching the you tubes) I pulled out the pieces to see not much color and mostly purple around the edges. I added another battery to the power supply and let things sit longer. Still not much color. 5th battery and walked away for a smoke and when I came back I got the purple and gold you see on the 3 pieces. The show side of course had some areas that looked like they were grey and not anodized. DANG. I took some Maas and wiped it down and a lot of the color disappeared. Hmmm not very good as far a longevity goes. I took it to the buffer and then hung it by some wire and went at it with a torch a couple of times.
This pic shows the final. Sort of. It does have a light blue hue to the whole piece with the spots showing much better.
Attachment 232198
This was the first torch experiment.
Attachment 232199
I loved the blue part that has the waves to it but good luck duplicating it. Maybe after doing a 100 scales I could get it down. After this first set I am not to anxious to get to the next set :<0)
More experiments to come until I am satisfied with the finish. May go to a satin finish and then color. Still haunted by the not so great mirror finish.
