
Results 1 to 10 of 12
 6Likes
Thread: First attempt at a "rescale"
 LinkBack URL
 About LinkBacks
-
01-07-2013, 10:26 PM #1Senior Member


- Join Date
- Oct 2012
- Location
- Boston, MA
- Posts
- 384
Thanked: 45 First attempt at a "rescale"
Hello all,
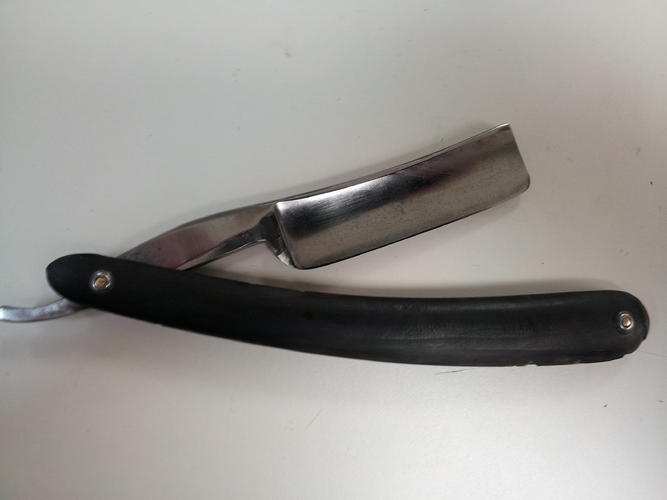
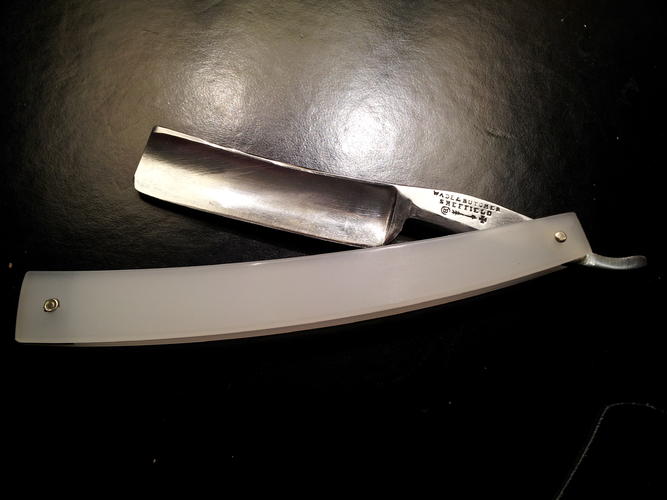
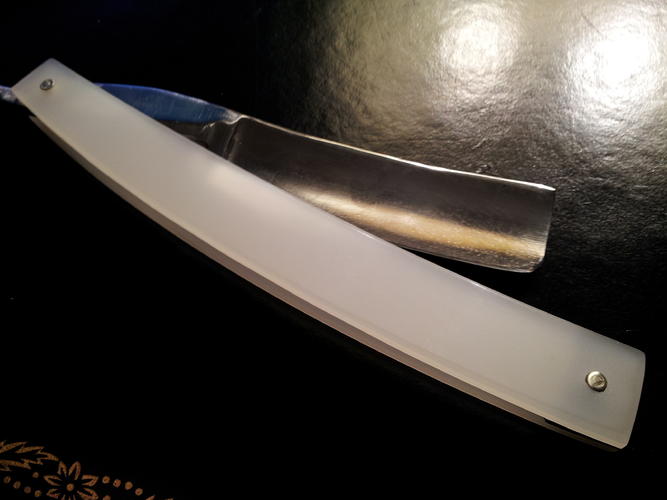
so recently, I have acquired an old Wade & Butcher 13/16" half-hollow. This razor must be pre-1891 as it only has "Sheffield" stamped on the tang, and not "Sheffield, England" which came later. Anyway I am currently learning how to repin/rescale razors, so I figured it might be interesting to put a slightly modern twist on an old razor. I picked up these scales from a vendor in Canada and went ahead and slapped 'em on this old W+B...There is a "before" pic and a few "after" pics. I must admit; after getting the scales on, I don't know how well the "vintage-meets-modern" thing worked out..What do you think?
 -JP-
-JP-
-
The Following User Says Thank You to jpcwon For This Useful Post:
Geezer (01-08-2013)
-
01-07-2013, 10:32 PM #2Senior Member

- Join Date
- Dec 2012
- Location
- Perth, West Australia
- Posts
- 1,431
Thanked: 497
Oooh, very tasty !!....I like it

-
01-07-2013, 10:40 PM #3Senior Member
- Join Date
- Dec 2012
- Location
- Carey OH, Fort Drum NY, Currently in Afghanistan.
- Posts
- 126
Thanked: 10
I say it looks classy good choice on the scales. Way better than those old beat up looking ones.
-
01-07-2013, 11:33 PM #4Junior Member

- Join Date
- Dec 2012
- Location
- Columbus oh
- Posts
- 19
Thanked: 2 First attempt at a "rescale"
Man those scales look awesome does the vendor you got them on have a WS to buy stuff from I'm looking to get in to restoring and collecting older blades and am looking for a good place to buy scales and such things needed
Steven
-
01-08-2013, 01:21 AM #5Senior Member
- Join Date
- Oct 2012
- Location
- Boston, MA
- Posts
- 384
Thanked: 45
Dont know if they have a website or not. I just went on Ebay and searched for 6/8" razor scales and found em!
The more I look at it the more I like it, actually..thanks a lot for the feedback!
-
01-08-2013, 01:32 AM #6Senior Member

- Join Date
- Jul 2012
- Location
- Long Island, NY
- Posts
- 718
Thanked: 142
Next time you should consider trying your luck at a home made pair, im sure you would suprise yourself with the result. I like the scales though, not exactly classic, buy classy none the less. Thumbs up!
-
01-08-2013, 01:51 AM #7Junior Member
- Join Date
- Dec 2012
- Location
- Columbus oh
- Posts
- 19
Thanked: 2 First attempt at a "rescale"
Jpc yea man they look good great find all have to check eBay out.
Joe what's a good way to make your own scales is there a tutorial on SRP?
Steven
-
01-08-2013, 02:27 AM #8Senior Member
- Join Date
- Jul 2012
- Location
- Long Island, NY
- Posts
- 718
Thanked: 142
There are many kicking around the web and on SRP. A couple that come to mind are undreams restoration and rescaling video series ( if you havent watched them i would recommend setting aside an hour or so and watching them all) also Charlie Lewis has a vid or two on making scales from scratch. I know those are on you tube. in a nut shell this is what you do. Originally Posted by Wallens05

Step one- trace the blade your looking to rescale on to a peice of paper with a pencil, then you can draw a rough scale shape around the blade to your taste ----- or ------ you can trace the scales you are looking to replicate on to paper then cut out the shape you traced inside the lines
step two- Choose a material with a starting width no greater than 1/8" thick. Ideally each side of the scale should be approx 3/32", use 3M double sided carpet tape to adhear each half together of the scale material. Be mindful that the sides of the material you want facing out and be sure to make sure they are facing the direction you would like them to face on either side, as if it was the finished product.
step three- transfer the template/stencil you made on to the scaling material, cut the outline with a band saw or scroll saw INSIDE the lines you drew.
Step Four- start with heavy grit sand paper and start shaping your cut outs in to the desired shape you are looking for
step five- once nearly completely shaped and smooth, start working your way through finer grits until smooth
step 6- make a wedge that is the correct size for the blad you are looking to mount
make sure the wedge is slightly over sized
step 7- drill your pin holes in the correct spots using a 1/16" drill bit
step 8- mock pin blad in scales, do any finalk shaping, shape the wedge to proper size
step 9 finish the scale material appropriatly- each dif material requires a dif method of finishing
Step 10- pin, polish, enjoy.
-
01-08-2013, 02:54 AM #9Junior Member
- Join Date
- Dec 2012
- Location
- Columbus oh
- Posts
- 19
Thanked: 2 First attempt at a "rescale"
Thank you for the video suggestions I will be sure to watch them. And the quick how to what would you say the easiest thing to mold and work with would be? Originally Posted by JoeLowett
Steven
-
01-08-2013, 03:11 AM #10Senior Member
- Join Date
- Jul 2012
- Location
- Long Island, NY
- Posts
- 718
Thanked: 142
I would say horn or a very hard wood such as rosewood. Also stabilized wood is a good choice. The reason its best to start with a harder material is bc it taken longer to mess up so to speak. It not like your going to mess up the shape of a horn scale just by slipping with a peice of sand paper. Plush there is very little /o advanced finishing needed, just sand to 2000 grit and polish. You can use metal polish such as mothers to polish horn to a mirror shine. I find that floor / furnature wax works realy well on hard wood.


 Reply With Quote