
Results 11 to 20 of 29
 62Likes
 LinkBack URL
 About LinkBacks
-
11-20-2016, 10:41 PM #11'with that said'


- Join Date
- Aug 2010
- Location
- Walla Walla in WA State USA
- Posts
- 11,156
Thanked: 4230 I would say that they are not 'great' for knives as they are Excellent For Knives!
 Originally Posted by Geezer

 Our house is as Neil left it- an Aladdins cave of 'stuff'.
Kim X
-
11-20-2016, 10:47 PM #12
I spent a lot of my high school off time with one by my meat cutting block at a shop and summers in a kitchen as a sous chef. Got the upgrade to chef after honing the chef's Prime Rib knife to hair popping. Proved I was trainable.
~Richard
-
11-21-2016, 05:23 PM #13Warrior Saint

- Join Date
- Oct 2008
- Location
- TN Mountains- Thank You Lord!
- Posts
- 989
- Blog Entries
- 1
Thanked: 101
I remember seeing one of them unceremoniously thrown to the ground when I was at Roosy Rhodes in PR in 99. Apparently one of the Mess Specialists at one point had put veg oil in the housing and all over the stone and it had gelled up and got rancid and nasty on it. It got thrown out and I almost cried. It looked new other than what the moron had put it through. Originally Posted by cudarunner
cudarunner and MikeT like this.Situational Awareness, Threat Assessment, Risk Management - Stay Alert, Stay alive
-
05-15-2019, 06:36 PM #14'with that said'
- Join Date
- Aug 2010
- Location
- Walla Walla in WA State USA
- Posts
- 11,156
Thanked: 4230 Finally!
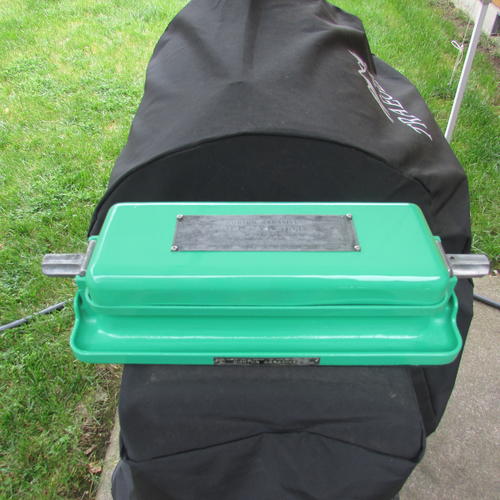
Well I finally got my restore of this Norton Tri-Hone Finished. I'm a bit ashamed that it's been about three years since I started. I have a modern one so this project has been sitting on the back burner just waiting for O'l Cuda to get off his dead ass and on his dying feet and finish it up.
I initially thought that the original color was pretty much a very light lime green (See the original pics). However after taking the stones off of the chassis I found that either A: the oil had preserved the color and it was much darker OR B. the oil darkened the color. I went with A.
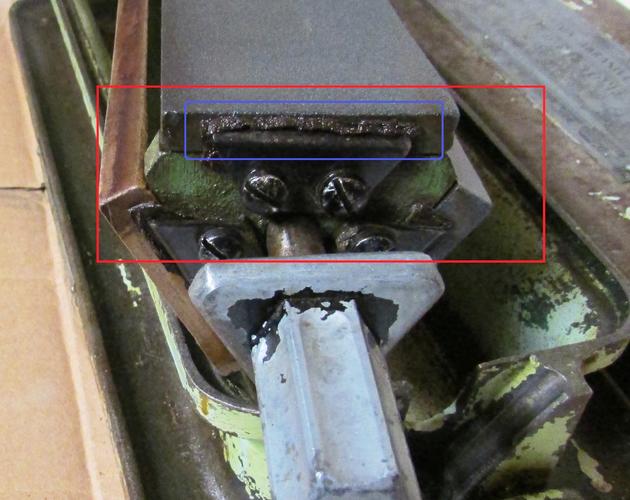
Here's a pic of the chassis: The area in the red box is to show the color I found. The blue box is to show the original leather pads.
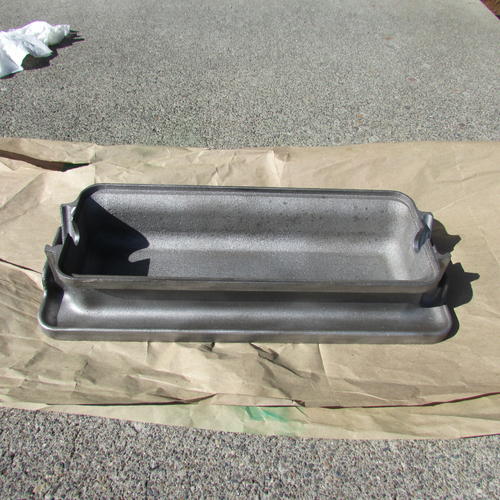
I had some left over lye water from cleaning up some cast iron but it was in a 3 gallon bucket however I could soak 3/4's of it at a time so I just kept changing ends. This took about a week and a half. Then I made my own acid tank using a 5 gallon plastic bucket and lye with 1.5 lbs of lye to 4 gallons of water. I let it soak for about a week to 10 days. Then after a good rinsing I used a friend's glass beading booth to clean it up.
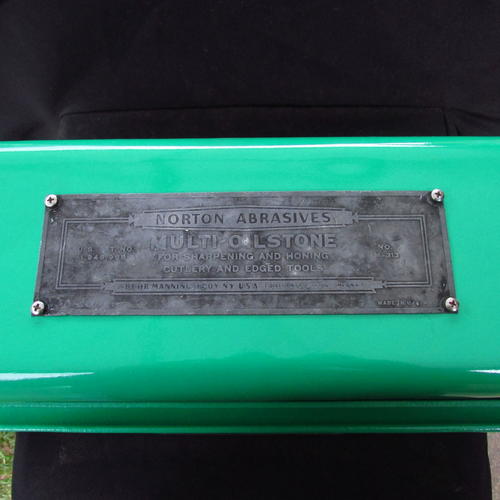
I had cleaned up the plate on both the base and the cover. I was able to re-use the pins at the base but wasn't able to come up with pins for the top/at least not without either bending the top (I worked so hard to get the dents out) OR scratching the paint so I used some small stainless steel nuts and bolts with a drop of blue LocTite to make sure they stayed put.
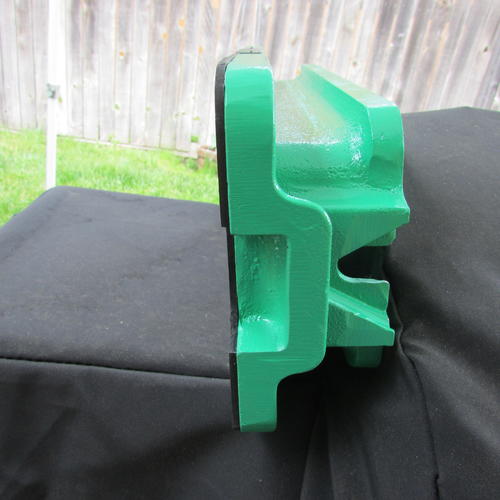
I used an etching primer from VHT and a primer paint from RUST-OLEUM (Spring Green).
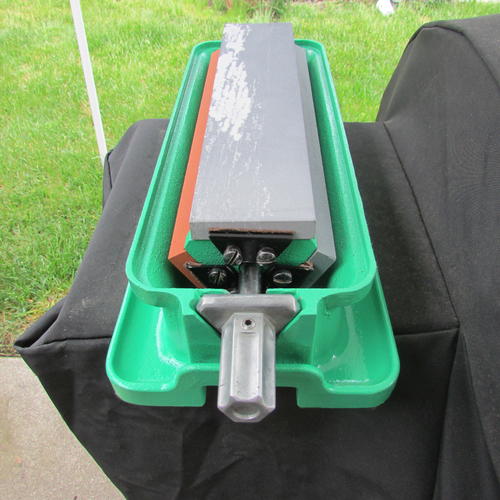
I believe the unit had the original stones and while the Fine India was in pretty good shape the coarse crystolon was broken and the medium crystolon was well worn.
Since I rarely ever use the coarse crystolon I didn't replace it instead I bought a new medium crystolon, a Fine India and a Hard Arkansas (White not Black)
The original had a sandpaper glued to the bottom. It was made by The Minnesota Mining and Manufacturing Company (3M). While I could have reused it I went with an 1/8" thick styrene butadiene rubber pad so it wouldn't scratch any counter tops or table tops.
The original leather pads were crumbling so I made new ones from some upholstery leather I had here at The Boars Nest. I don't know what they had used to coat the handles black with but even with a good de-greasing, scuffing and the etching primer the paint rubbed right off so I cleaned the paint off and buffed them up a bit.
So here's the finished project.
Thanks for looking Our house is as Neil left it- an Aladdins cave of 'stuff'.
Kim X
-
-
05-15-2019, 07:32 PM #15The First Cut is the Deepest!

- Join Date
- Feb 2010
- Location
- Upper Middle Slobovia NY
- Posts
- 2,736
Thanked: 480
It took a while, but damn, looks great!
cudarunner and MikeT like this.
-
05-15-2019, 07:56 PM #16'with that said'
- Join Date
- Aug 2010
- Location
- Walla Walla in WA State USA
- Posts
- 11,156
Thanked: 4230
Thank you. Originally Posted by Magpie
The actual 'Physical Labor' wasn't all that much. I had spent a lot of time trying to figure out how to make reproductions of the brass rivets for the top plate and I finally lost interest so to the shelf in the garage in a box went all of the parts.
I used to keep my modern Tri-Hone right beside the box so I'd see it every once in awhile and think that 'I need to get back to that' but there always seemed to be something else that was more important so it just sat.
I have decided that if the paint doesn't hold up that when my buddy comes up from the San Diego area I'll strip it back down and have him take it home as there is a really nice powder coating outfit right where he lives and then just have them re-due it in a similar color. They have samples that he could bring home and send to me to choose from. Shipping would be a bitch but doable. (I don't have a bathroom type scale so tomorrow I'm taking it down to my buddy Ski to show him and I'll weigh it there (Ski is the one who gave it to us).
I'm pretty sure that the handles are either cast aluminum or just pot metal as they aren't magnetic so I don't think they would survive the heat needed to melt and set the powder coating to make them black.
While the stainless steel nuts and bolts aren't original I do think that if someone hadn't seen an original that they would pass as OEM.Our house is as Neil left it- an Aladdins cave of 'stuff'.
Kim X
-
05-16-2019, 03:26 PM #17Junior Member
- Join Date
- Nov 2018
- Location
- New Jersey
- Posts
- 22
Thanked: 15
My Goodness Roy that looks fantastic!!!! Wow 😮!! I am in awe of your before and after pics. Kathy
cudarunner likes this.
-
05-16-2019, 11:03 PM #18
Good job, Roy
cudarunner likes this.If you don't care where you are, you are not lost.
-
05-16-2019, 11:18 PM #19'with that said'
- Join Date
- Aug 2010
- Location
- Walla Walla in WA State USA
- Posts
- 11,156
Thanked: 4230
Originally Posted by Leadmeknot
Thanks to both of you. Originally Posted by rolodave
I got the unit from my buddy Ski. Well actually my son got it from Ski and I traded my son my modern version for the cast iron.
When my son and his girlfriend got an apartment of their own he didn't take his Norton and I asked him 'why' and he said they didn't have the room so his has stayed here.
I took the restore to Ski's today so he could see it and he was impressed. He's got a pretty good memory and after a bit of thinking he's sure that he got it from when he was working at the Colfax WA Safeway and that would be about 45-50 years ago (Ski started working at Safeway when he was 16 years old). However he didn't have a clue how old it actually is.
I am pleased with how it came out. If the paint doesn't hold up I'm leaning toward having the stamped steel cover, the chassis and the base powder coated.
And of course since I've got it put together I had an idea on how to make brass pins to replace the SS screws pop into my head today Well maybe later.
  Our house is as Neil left it- an Aladdins cave of 'stuff'.
Kim X
-
05-17-2019, 12:59 AM #20'with that said'
- Join Date
- Aug 2010
- Location
- Walla Walla in WA State USA
- Posts
- 11,156
Thanked: 4230
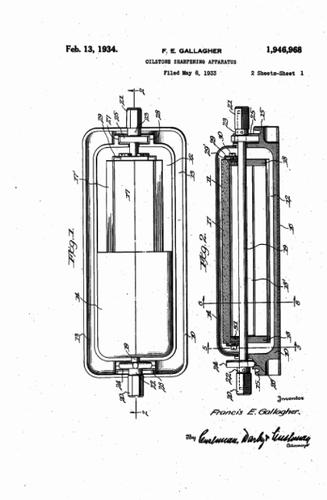
I did some research and found this bit of info. The patent was filed in 1933 and apparently granted in 1934. I'd found the patent number on the top plate but I have no idea of how to determine when it was actually manufactured as I can't see any dates or codes. In fact parts of the stamping are just plain worn off. Oh Well.
 Our house is as Neil left it- an Aladdins cave of 'stuff'.
Kim X


 Reply With Quote


