looks good.
Obvious you didn't burn the house down but that you got a little hot while soldering it.
Printable View
looks good.
Obvious you didn't burn the house down but that you got a little hot while soldering it.
Revive an old, but ongoingly relevant thread.
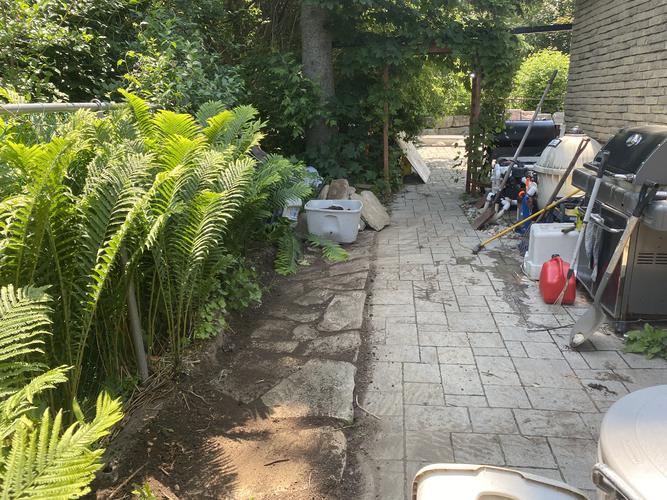
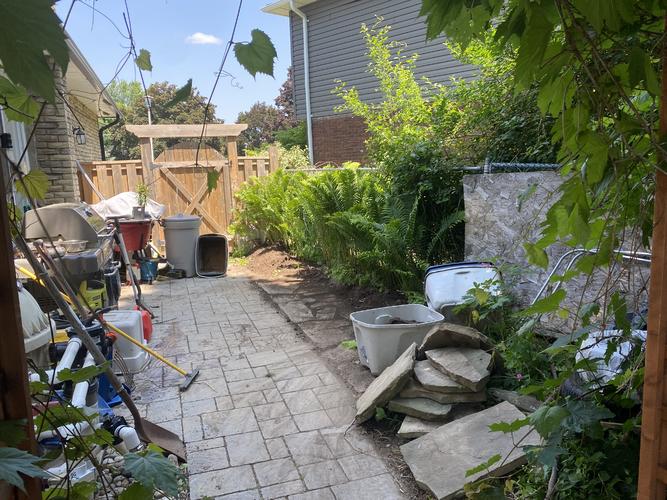
Expanding the side yard so I can move the BBQs over against the fence as my next stage in yard beautification.
Continuing to repurpose the flagstone that used to be the pool deck allows for a stable bbq platform that will later in the season also hold a 12 three sided shelter over the Qs.
Attachment 348345
Attachment 348346
Not done, but moved a hell of a lot of dirt to get this far. Going as far as the gate, and to the pine tree rootbed.
I forgot all about this thread.
I managed to get more insulation up in the garage. So the walls are covered now. Next is to blow in the attic and if all goes right install a heater in the garage.
Oh, and the wife wanted a couple of electrical outlets were there wasnt any so last month i did that little honey-do. Easy enough when you have a fish tape.
And last week I ran Ethernet cable around the house to my radio room. Sweaty job climbing in thd attic but cooled down when I had to go into the crawl space.
Reminds me, I need to get up and floor the attic.Quote:
Originally Posted by Gasman
The wife has promised I can have a section to store old computing equipment and a wee workbench if I floor it and sort out all the crap up there. I may be getting the bad end of this deal.....
But on the plate now is a new fence for the front garden, that is almost done, just to add the front slats.
Geek
I am not a handy person. Moving out is the only home improvement I’m capable of.
Attachment 348496Quote:
Originally Posted by OCDshaver
:rofl2::roflmao
Attachment 348532
Got the fence done, needs a topper, but looking not too bad.
Geek
Turns out I'm getting the DIY thingy. Till now I've not really been a DIY guy lol.
The wife was complaining the thermostat wasn't working, so today I opened it up, it looks like the kids, when doing handstands against the wall, have kicked it and broken it. I kinda patched it for today, bought a new one that's I'll fit tomorrow.
My biggest new job though is I'm going to learn to plaster and do the living room walls. Our pupper took to pulling at the wallpaper and made a few holes in the wall when she was more boisterous. Currently stripping the wallpaper. This will be the biggest DIY job I've ever done lol so let's see how it goes.
Geek
I spent a couple days trying to finish my garage. One wall packed with insulation and covered with 1/4" sheeting. Painted. Now Im trying to get the shelves back up between going to work.
nice honey do’s that score ya points with the misses gents.
I restored a pool lounger this aft, and spent the evening bbq’ing up some of my son’s fav’s for his birthday.
Cooling off this weekend finally but still sunn enough to be outside enjoying it.
Cheers.
So I got to plastering one wall. This was the problem wall as it was in a bit of a mess under the paper.
Now, I wouldn't go as far as to say I did a great job, but I did certainly a passable job, definitely good enough to paper the wall with the patterned wallpaper the wife wants.
The first pic is a not so great before as the sofa is in the way, behind the sofa was a badly blocked off coal fire.
So badly done you could see it through the previous paper, and it irked me.
I did do it last week but made a total horses rear of it, so did it again. Learning a bit every time.
Geek
Attachment 349427
Attachment 349428
I finally got someone to give me a decent price and had insulation blown in above my garage. In the dead of the summer heat i can tell its cooler in the garage and the wife thinks it may have helped a little in the house too. Cant wait to see how warm it is in the winter. I plan on getting a portable propane heater that i can kick on just to take the harsh cold out. Maybe even be able to work in garage when it zero outside.
While I have blown in insulation in the ceiling and the wall next to the house is insulated my garage the opposite wall (also with a garage) isn't insulated so in the winter it's still pretty damn cold.
I do hope that it will at least be 'comfortable' for you Jerry. :tu
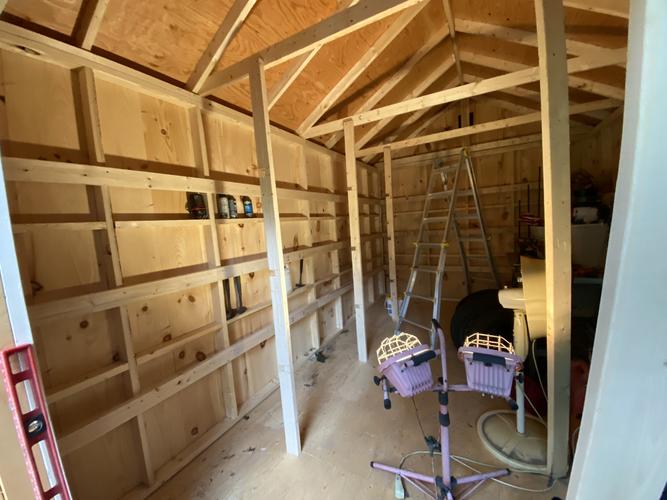
Working on the shelves for that shed I built before winter sets in.
Attachment 349456
and now I know what the VW feels like when really loaded down.
New roof truss supports needed, as well as 2x4 supports along the side and rear wall.
Will be three rows of shelves, 24 vertical spacing, 23 deep. Along one side, and the rear wall.
Plus all the room above.
Attachment 349457
Will carry on tomorrow with it after work.
All part of the reorganization so I can carve out space for some smiths work in the spring.
I am so useless with home improvement stuff that actually impressed my wife by cleaning the dryer exhaust and attached a new piece of duct between the dryer and the ceiling. Feeling confident, I think I’ll try my hand at replacing lightbulbs this week.
Have her spin the ladder for you!Quote:
Originally Posted by OCDshaver
Dont feel lonely. I have known people who dont even own a hammer and screw driver.
One guy i work with i asked if he had a DVOM/ multi-meter in his truck i could barrow as the battery in mine died. He Said "No. But if I did have one Id just give it to you because I wouldnt know what to do with it".
Sad:gaah:
I can relate to that guy with ease. I did not own, or use, a hammer or screwdriver until I was 47 years old.Quote:
Originally Posted by Gasman
I was in the Accounting/Computer world, lived in an apartment, and had no need for tools. Then life took a major turn and
now, I have more tools than I have space for, including a multi-meter which I use occasionally!
Think it so easy? Let see you do it wise guy. How do you change lightbulbs?Quote:
Originally Posted by 32t
I come by it through genetics. My father might have been worse than I. But I can honest admit it. He thought of himself as handy. But some of the worst memories of my childhood involved him fixing things. I remember one day in particular. A small leak from the kitchen sink. He got under there with the tools he had and disassembled everything. Then couldn’t get it back together. Then he sent my mother to the plumbing supply asking for the exact same parts. The only difference was that there was about 50-75 years between those dates. While she was gone, he stayed under the sink staring at the mess with a flashlight and smoking cigarettes like he worked for Phillip Morris. When the new parts didn’t fit, he resorted to tightening them down with such force that he bent them so out of shape that the inevitable plumber had to do major work to repair. It cost him twice as much and fifty years later I’m still talking about it.Quote:
Originally Posted by Gasman
Quote:
Originally Posted by OCDshaver
That remark was relating to an old joke.
I replace many lightbulbs a week and most of them don't twist in anymore!
The newer LEDS are actually a pain because they are obsolete when they are installed many times so parts are hard to get. Many times it is easier to replace the whole fixture but then if you have one oddball fixture in a room it is sure noticable.
LEDS certainly last longer but they are not lifetime.
His problem was sending your mother to the store. I am sure that she did her best But how could she know and communicate his problem?Quote:
Originally Posted by OCDshaver
Never send someone else to the store to try to fix your mistakes.
This is hilarious!! What a memory:) It must have really been something when you were younger.Quote:
Originally Posted by OCDshaver
The things we remember LOL
My father was pretty handy but one fun story regarding him is when he wanted to replace the seed discs on a planter. We had a used planter he wanted to take parts off. The one side came off easy and he spent over an hour on the other until my brother came by and he had it off in a few seconds. One side is right hand threads and the other was left handed!
Not realy home improvement but I have thought about this many times over the years and if I run into trouble with something I am not emberassed to ask someone for a different point of view.
The internet sure has changed the ability to get a different point of view.
Quote:
Originally Posted by 32t
See, and I thought changing the bulbs would be an easy win.
Well, he had to. Who was going to guard that situation and smoke all those cigarettes?Quote:
Originally Posted by 32t
You should have seen him sharpen knives. He would take fine cutlery and ruin it. I didn’t know the first thing about sharpening anything back then. But you don’t have to know how to do something to know when it’s being done wrong. His stones were so dished out it even looked terribly wrong to me as a 12 year old. The knives started out like new, but dulled (my mother loved a glass cutting board) and then they would end up il-shaped and scratched all over…..and still dull. In the end he’d blame the knife. Always the wrong knife for the job. He was always on the hunt for “a good knife”.Quote:
Originally Posted by 32t
And that is fun with sites like this.
This is a razor forum but If I have trouble sharpening my knife some one will answer.
Even if I am having trouble with or want to brag about my drywall or car.
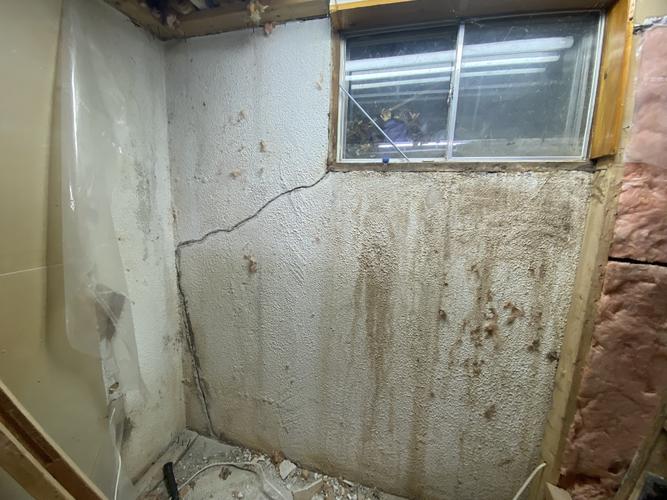
Finally digging into that leaking foundation issue, and had to remove the finished walls and studs in the basement to really access the situation.
After finding the crack, and spending the greater part of the day opening it up to receive the repair, I found lower on the wall a previous repair that stopped short of the issue and probably is why Im dealing with it now.
Attachment 349795
Attachment 349796
Sica makes a foundation repair product that uses both hydraulic cement, and expansion PU adhesive to facilitate a stronger repair that penetrates through to the wall exterior.
Figured Id give that a go, and leave the drywall off a season or two to ensure the repairs solid before I redo the wall.
Home repair like this will be a new one for me. Hopefully Itll work.
Will post up some WIP shots as well.
Cheers.
Attachment 349808
The kit uses T fittings you glue to the cleaned crack where the Ts are evenly spaced.
Attachment 349809
Hydraulic cement over the lot.
Attachment 349810
Once cured, inject the foam, after filling the voids with water, starting at he bottom, and working your way up as the foam advances to the next T.
Attachment 349811
Can see a few spots the pressure lifted off the new cement, but i can trim that all once dry.
Attachment 349812
Heres hoping it works a treat.
Had a little left in my kit and another small foundation crack to deal with in the house exterior.
Same process, but more visual as to the results.
Attachment 349885
Note the foam you see is oozin up from below ground level, and from the very top where the foundation ends.
Optimistic this stuff will work as advertised.
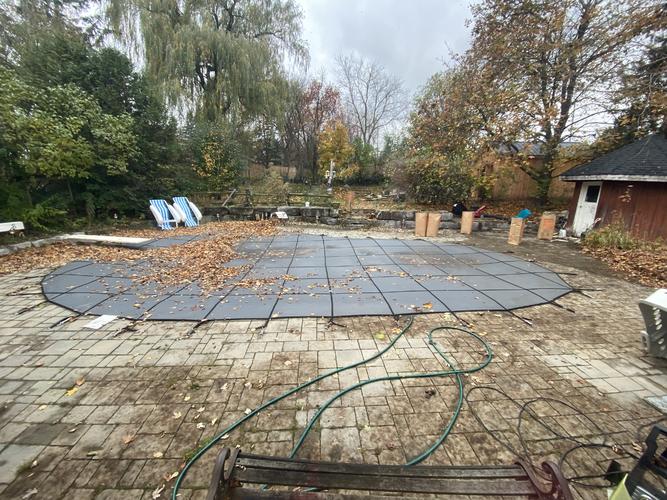
Fall raking, in wide angle view..
Attachment 350045
Almost done. 6 more bags to go..
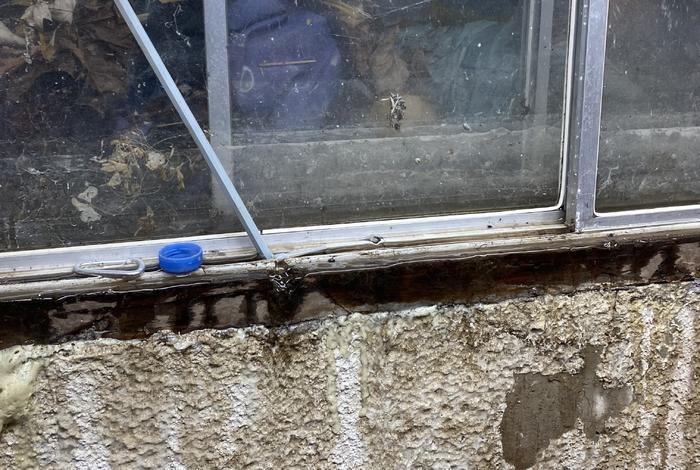
first good rain of the fall and I go down expecting a dry basement.
Nope, water coming in still. Can’t believe I missed this before but look at the window.
Attachment 350157
Bubbling through that split in the lower frame like a hose.
But look at the water line I missed before on the window pane itself!! It’s like 3” high or more.
Somehow that window well gets either more rain that the other, or doesn’t drain the same. Either way I need to make a cover for it, like a wooden seat or something. Next sunny day in fact.
Luckily caught this before the flood left the one room but damn. Never ends. At least the foundation repairs are dry!
New window and possibly some new drainage in the spring.
You can get a window well cover at least temorary cheap.Quote:
Originally Posted by MikeB52
https://www.google.com/search?q=base...hrome&ie=UTF-8
But without seeing everything a trench at least for the winter and spring would help.
Been using the same guy for windows over our three homes in this town and while hes semi retired now he still wants to pick up work so is doing our 4 windows for a fair price, IMO.
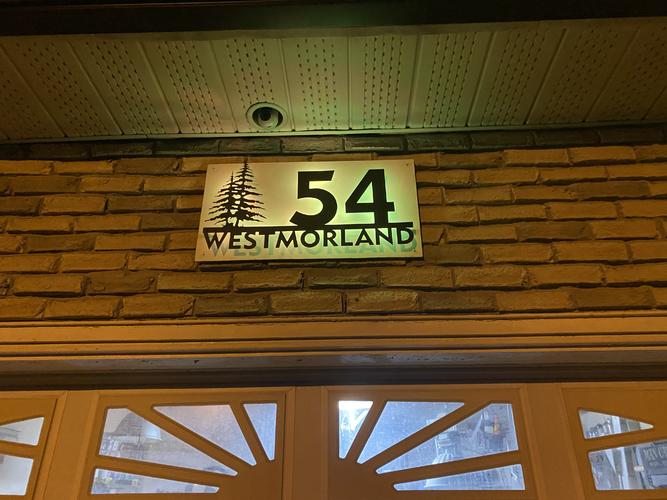
As another upgraded I ordered a new house sign off Etsy from a local artisan with a CNC laser cutter.
Ripped this out of 16 gage steel and back lit it.
Attachment 350199
I added the wood frame and stand offs, and it looks pretty spiffy on the joint.
Adds some light where I removed the pot light for the surveillance cam last year. And can change colours via a remote.
Easy to see from the street now, which is always safer..
Attachment 350200
Think Im almost done the honey dos before the snow sets in.
:tu
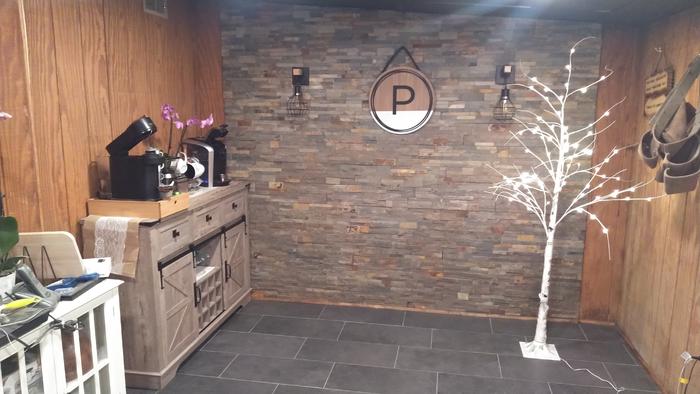
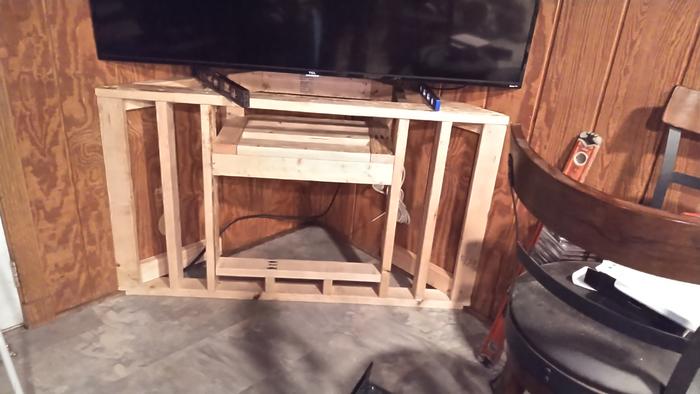
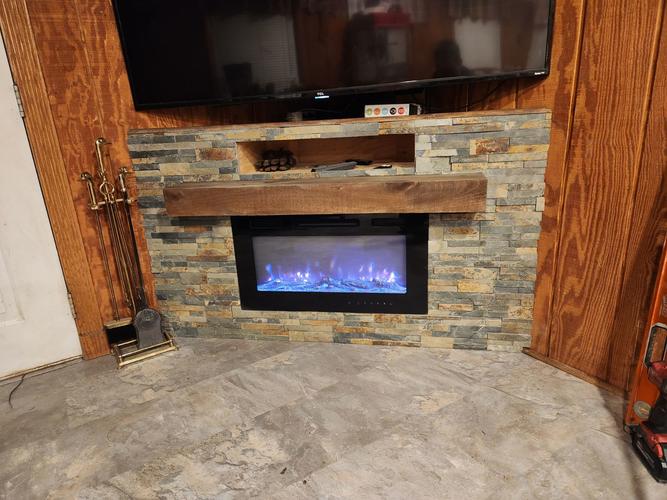
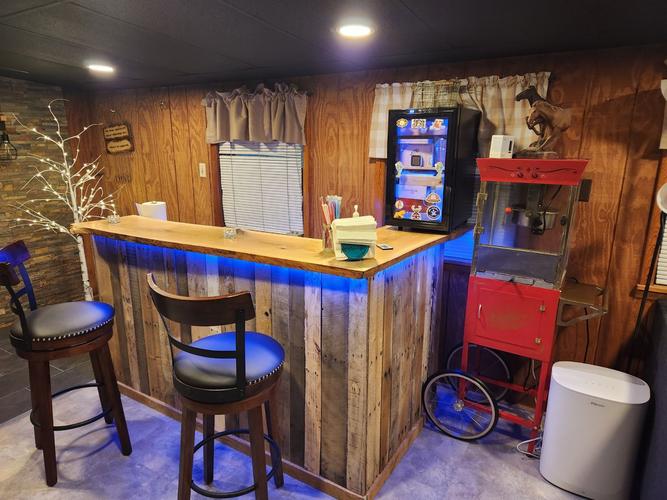
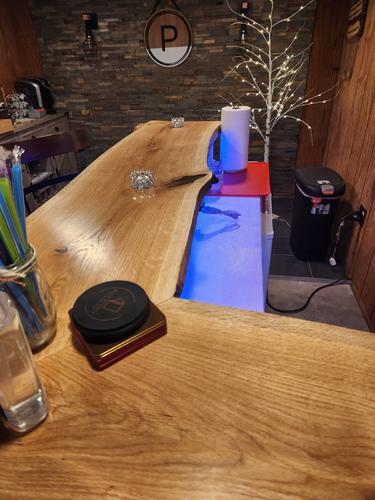
Remodeled my den. Started by putting in a subfloor, ended with a live edge bar build
All work was done by me. This started in Oct happy to see it end.Attachment 351873Attachment 351874Attachment 351875Attachment 351876Attachment 351877Attachment 351878Attachment 351879Attachment 351880Attachment 351881Attachment 351882
Sweet.!! Bourbon please.
C'mon over !! Now how'd you know it was a bourbon bar ?? :rofl2::beer1:Quote:
Originally Posted by outback
Only a bourbon man builds a live edge bar. :beer2:
Touche!!! :beer1: