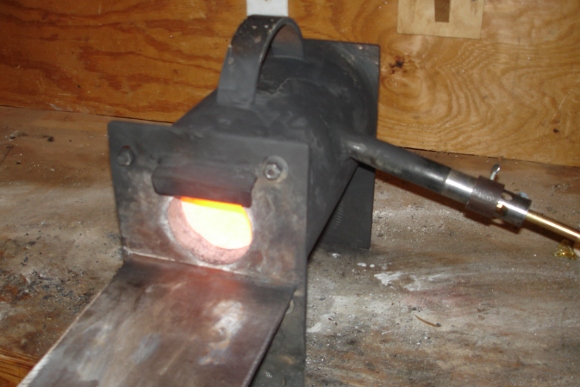
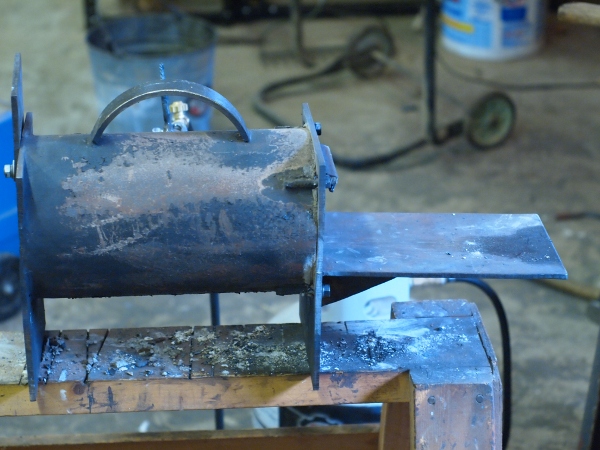
I finally finished my new forge. I downsized a little bit from my last forge. The new forge heats up quickly and runs smooth. It is a 6 inch pipe with ceramic wool and clay on the inside.
Charlie
Attachment 67997Attachment 67998
Printable View
I finally finished my new forge. I downsized a little bit from my last forge. The new forge heats up quickly and runs smooth. It is a 6 inch pipe with ceramic wool and clay on the inside.
Charlie
Attachment 67997Attachment 67998
That looks nice!
So, you made this your self? Well, I shouldn't be surprised at what you can do with a bit of steel and some time:)
So now we will be presented with even more beautiful Custom razors?
with this being so fast and all? ;)
I see you added a handle. That means you can take your forge on-the-go and heat treat on location :-)
Great work Charlie. Always love to see you tinker.
Simple, neat and efficient, the sign of a great design. It makes me soo envious, if only I had some space to put one up. Can't wait to see what comes out of it.
I wish I could say the design were mine. The forge is really me following other peoples work and making the best out of the materials and tools I have on hand. I am happy that people both in person and on the internet are so willing to share information.Quote:
Originally Posted by str8fencer
Charlie
I joined a local blacksmith group, I put the handle on so I could carry it with me to some of the meets. There are some talented blacksmith artist that I would like to learn from. Watching those guys hammer and move metal is humbling.Quote:
Originally Posted by Maximilian
Charlie
Great looking build!
Awesome Charlie ! Like the simplicity & efficiency in all your stuff :tu
Sublime work Charlie. Your talent never ceases to either impress me or make me feel spectacularly inferior.;)
I wanna be like Charlie!
PM sent on the forge...Would like to make one like this. Could I talk you into a tutorial on how you made yours & where you obtained your wool & mud?
Scott
I second the request for a tutorial sir! This would awesome to have in my repituar.Quote:
Originally Posted by shooter74743
Thanks for the encouragement, my forge works well but if I built again I would change a few things.
I would not weld the burner to the shell (I would have a mount so I could move around the burner and let a little air in between the burner and the shell) and I would use a lighter gauge metal for the outside shell. There are a lot of how to build forge tutorials all over the web, I am not going to reinvent the wheel by doing another one. I built my forge with a mish mash of ideas from the net and what I remembered of the small forge that was in Mike Blues shop. Thanks to some advice from Mike at the MO meet my forge is working better. I ended up opening up the air-intake holes and putting on a choke tube on the outside of the burner. I also removed the regulator and am running straight off of tank pressure (This made a great deal of difference in the way the forge works).
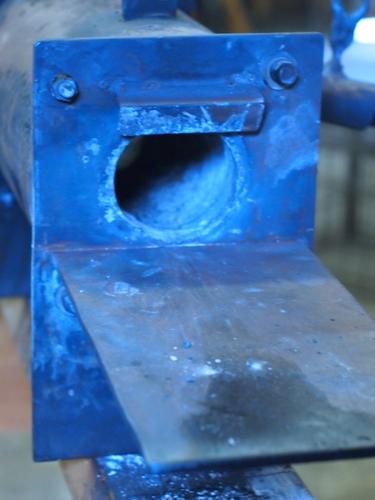
There are some things I really like about this forge, I like the size of interior chamber, about 4 round by 11 works well for me while forging razors. I think around a 6 8 shell is about right. I also like the large front porch and the steel lining that reinforces the openings. I am also happy with the way the flame comes in tangent to the interior chamber and swirls around the heat seems pretty well distributed.
I have bought ceramic wool and satenite clay from High Temperature Tools & Refractory
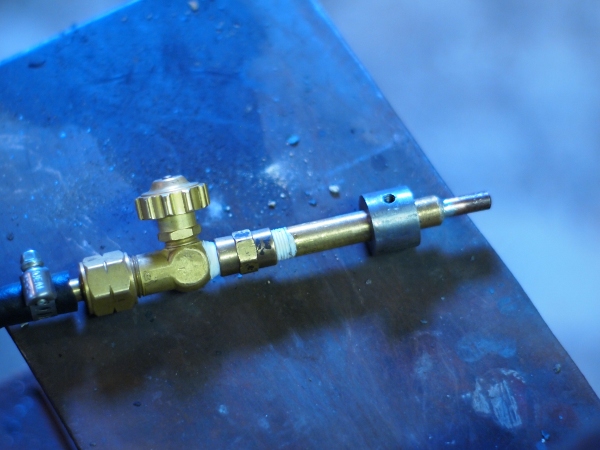
I used these two links for ideas to rig together my burner A simple homemade propane burner Gas burners for forges, furnaces ... - Google Books
I had a small hole .025 (if I remember right) drilled in a 1/8 brass pipe cap for the jet, recently I changed that out for a mig tip (about the same size hole). The mig tip seems to be working a little better.
This is the second forge that I have made, I am definitely not an expert just a stubborn tinkerer. I have read a lot about forges on the British Blades Forums.
Charlie
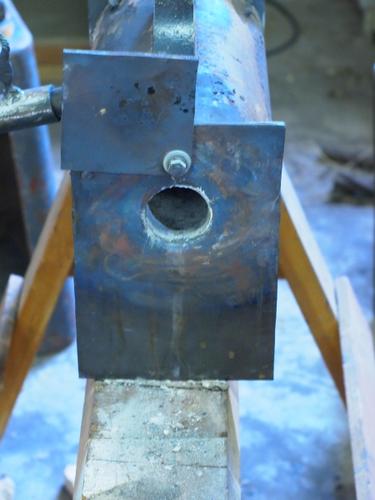
Thank you for the additional information...but do you think you could show a few more pics showing all of the sides? I've got a good visual on the body of the forge, but am hung up on the burner end. What size of mig tip did you use? The size is usually stamped on them (I have a few around since I have a mig myself). On the ends of your forge, is the back solid or does it have a hole in it? My thoughts were to build mine like yours, but have bolt on ends to be able to rebuild the wool and mud.
OK, Charlie, so how's it on heating horseshoes? :hmmm:
:nj
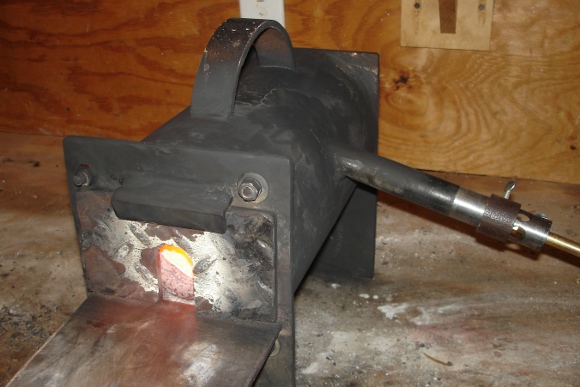
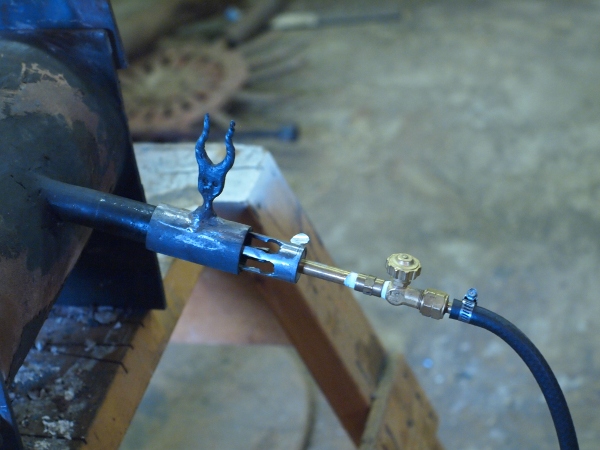
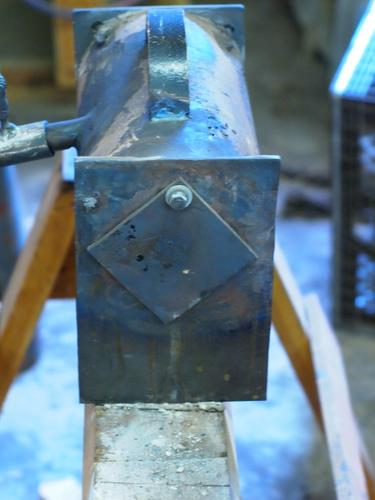
Here are some more pictures. The tip is a .023. The front is bolted on the back is welded on.
Charlie
Attachment 78227Attachment 78228Attachment 78229Attachment 78230Attachment 78231Attachment 78232
I thank you so much Charlie. One last question and I'll leave you be for a little while...do you use any sort of regulator from the propane bottle? I have read a bit and have heard reference to regulating with a low pressure regulator like an acetylene regulator to get the fuel pressure right for the proper btu/heat...or is the torch shutoff you are using working fine for you?
Again thank you for your assistance. I think I'll plan on bolting both ends to repack easily, but pretty much a carbon of yours.
The pressure is straight from the tank no regulator, I regulate the flow with the needle valve the pressure is from the tank.
Charlie
This style of venturi burner works better with a lot of pressure behind the orifice. The high speed gas jet entrains air via vacuum as it is sent down the pipe. Internal turbulence will mix the air/gas and the magic happens at the burner end. Getting the right balance of air and gas has been calculated. Ron Reil was one of the first to publish a good deal of it. The balance is achieved by orifice size against the size of the air holes against the diameter and length of the tube. If you make the air holes too big, a choke tube is handy.
MIG tips are useful as they are already threaded, but the size of the orifice can be a little off. They might be designed for an 0.035 wire which means they may be 0.040 to allow the wire to pass through without dragging. I drill all mine. Even so, if you are observant and realize you may have a little more gas than you want, you adjust the air intakes and off you go. I'd recommend starting small and working up though.
The rest of the business of running one of these is no different than tuning a wind instrument. ;)
I have been doing some research on building my own forge. Running straight from the tank sounds like a great money saving idea beside the fact that it works better. I am wondering about the safety factor in doing this. Like Charlie's valve is hooked up with a hose clamp. That kinda scares me. He is still around so I assume it has worked so far but I think I would use a little more secure fitting and I am wondering if there are any other concerns like hose pressure etc. I may be wrong but I understand the propane tank pressure can be as high as 250psi.
I have had the same thoughts, but have not acted on them. I do have a ball valve right at the tank so I can turn off quickly.Quote:
Originally Posted by 10Pups
Charlie
You could mount a excess flow valve for extra safety!
That would help keep the ball of flame down to about a 25 ft. diameter and then it would taper down to about 6 ft' long at the end of a whipping hose. Well, that is the picture in my demented head. Nobody bends safety rules more than I do and I will say I have been very lucky in my life. I think I will try this direct tank hook up in my first design but I am going to go with this hose. >> Gas Regulator Replacement Hoses I have had a lot of equipment with various types of hoses and pressures and I will tell you that crossing apples with oranges in this case is not a good idea at all. If you run a petroleum product through a hose that is not rated for it the hose will slowly deteriorate from the inside and you won't see it coming. If you look at the pressure ratings on the 2 types of hose on that site you will get a better picture of what I am saying.Quote:
Originally Posted by Lemur
I did check on the tank pressure and it can be from 100 to 200 psi. Propane Regulator Facts , High pressure and low pressure propane , propane 101
And Charlie, I am keeping my fingers crossed for you !
I really like the forge, maybe you can make a youtube video on it. I think its great to come to this site and see all the writes up.