
Results 61 to 65 of 65
 81Likes
Thread: Stabilizer correction
 LinkBack URL
 About LinkBacks
-
02-26-2021, 02:11 AM #61Home of the Mysterious Symbol


- Join Date
- Dec 2019
- Location
- New Orleans LA
- Posts
- 805
Thanked: 115
Probably wasn't the same razor. I did I think 8 of them. Whatever was in the box. Belt was probably 1k and was very worn. I don't do GDs one at a time. I usually do a box of 10 at one go.
-
02-26-2021, 02:50 AM #62Senior Member


- Join Date
- Dec 2018
- Location
- Gainesville, FL
- Posts
- 5,911
Thanked: 598
That was the side facing him that was marked. Why would you not mark the side facing you?
 Looks good.
STF likes this.Iron by iron is sharpened, And a man sharpens the face of his friend. PR 27:17
Looks good.
STF likes this.Iron by iron is sharpened, And a man sharpens the face of his friend. PR 27:17
-
02-26-2021, 03:42 AM #63Senior Member

- Join Date
- Apr 2012
- Location
- Diamond Bar, CA
- Posts
- 6,553
Thanked: 3215
Here is how I do it.
First draw your circle so that you move the corner, (where the straight edge ends and begins to turn) at least a ¼ inch forward of the front part of the stabilizer, towards the toe. A quarter or large washer works well for most heels. I cut a little more if the edge needs reprofiling, like a Gold Dollar, because you will remove a 1/16 th to 1/8 inch from the edge and that will move the corner back towards the stabilizer.
On some razors, especially wide ones, it just looks better. If you fill in the part that will be cut off with a black sharpie, it will give you a good preview of what it will look like once cut. You can then make adjustments to find a radius that is pleasing. WD 40 will remove all the ink if you need to make a change.
Then cut the 45-degree cut, the red line. I use a 140-grit diamond plate. Once you touch the line stop and cut the blue lines, clipping the sharp corners.
All that is left are tiny points, just smooth those points by rolling the plate or file into a curve. This method gives you the most control with out the risk of slipping and damaging the edge.
It will work with a belt sander or Dremel tool and sanding drum. Just be careful with heat. Cut from side to side, perpendicular to the edge not parallel with the edge, more control.
Usually, the metal is so thin a Diamond plate or Diamond file will easily do it by hand. For me it is too hard to try to shape and remove a lot of steel to a line. Working the flats is easier and gives more control.
The whole process just takes 5 minutes.

-
-
02-26-2021, 05:51 AM #64Senior Member
- Join Date
- Apr 2012
- Location
- Diamond Bar, CA
- Posts
- 6,553
Thanked: 3215
The heel reprofiling is something that should be part of regular honing maintenance. If done regularly, the amount of reprofiling is minor a few strokes with a diamond plate in minutes.
It is so pervasive that I look at the first 10 razors in the BST with stabilizers and all except 1 could benefit from heel reprofiling. But not wanting to imply that there was anything wrong with razors that were up for sale, I decided not to post photos.
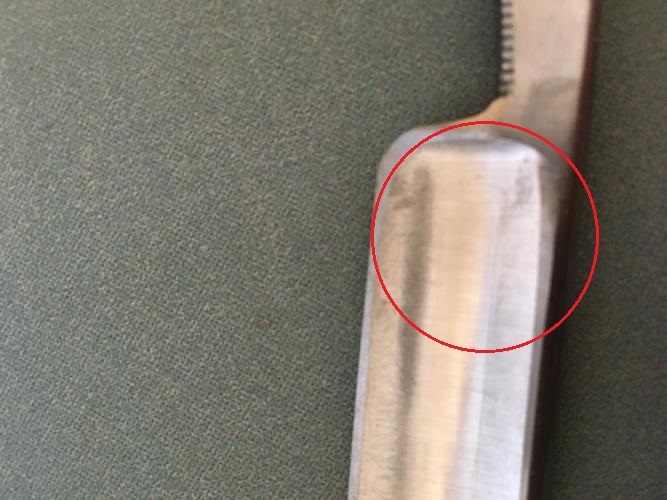
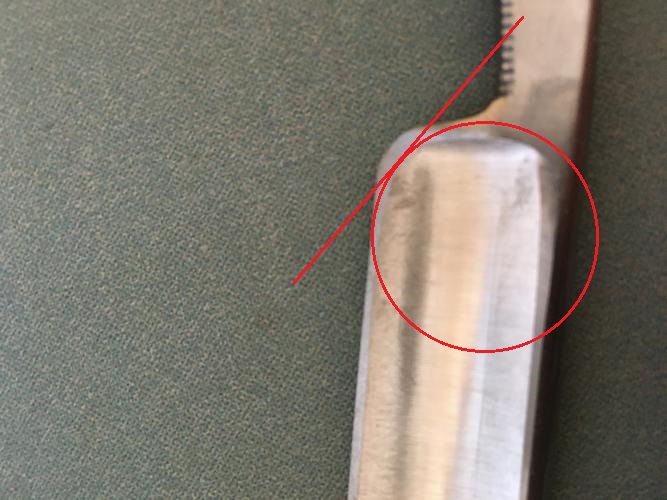
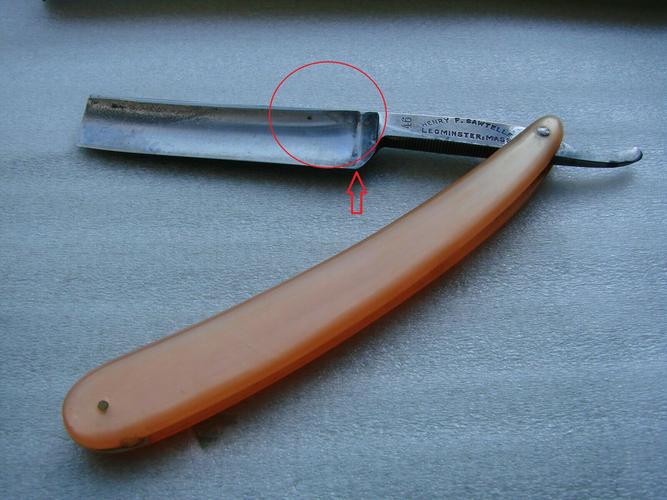
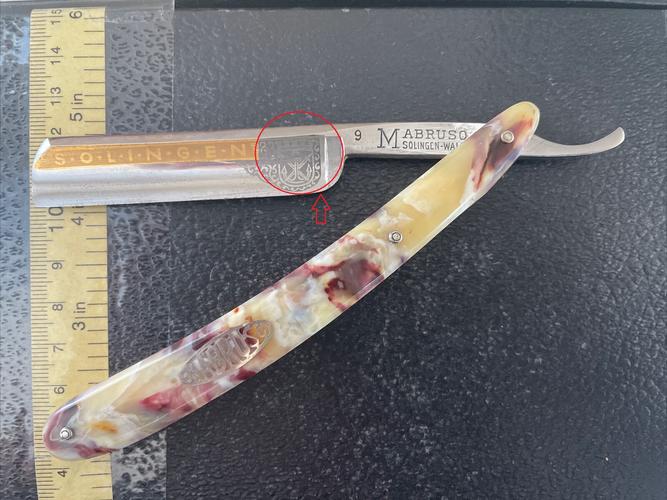
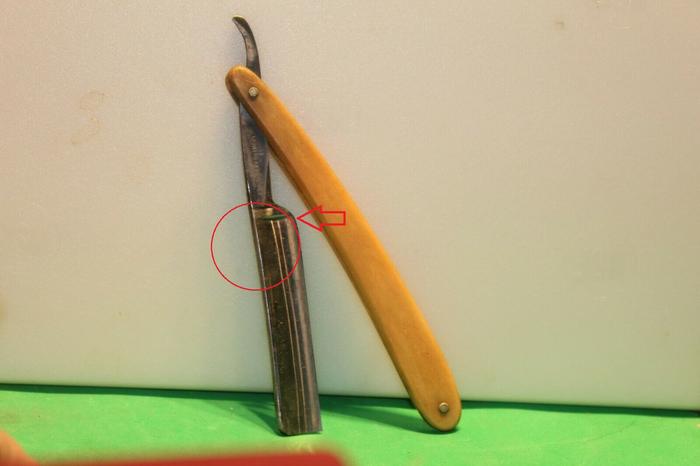
So, I went to eBay and copied the first 10 photos of razors for sale, again 9 of the first 10 razors with stabilizers, were in need of heel reprofiling. Here are photos of the first 4 of them.
Any of them could be reprofiled in minutes. Most a few strokes would make honing much easier. Some as you can see are misshaped simply because they have never been corrected and the owner compensated with more pressure.
The red arrow is where the edge ends, note how the corner is moved forward, (circle).
I reprofile almost every razors with stabilizer that I hone, for most it is just a few quick strokes on a diamond plate.
As you can see for some the correction is minor and of course most could be honed without correction. But for some the damage has been done, still they could be repaired. Correction would make honing much easier.

-
02-26-2021, 03:37 PM #65Senior Member
- Join Date
- Dec 2018
- Location
- Gainesville, FL
- Posts
- 5,911
Thanked: 598
That came out a little snarkier than I intended it. My apologies. I probably shouldn't post stuff while watching the hockey game. I get a little caught up in the friendly spirit of the competition. You should hear the stuff I shout at the television. Originally Posted by PaulFLUS
 Iron by iron is sharpened, And a man sharpens the face of his friend. PR 27:17


 Reply With Quote