
Results 21 to 30 of 54
 227Likes
 LinkBack URL
 About LinkBacks
-
01-20-2014, 03:55 AM #21Incidere in dimidium


- Join Date
- Mar 2012
- Location
- Val des Monts, Quebec
- Posts
- 4,065
Thanked: 1439 Thanks man.
 Originally Posted by Substance


It's very soft and can be worked with woodworking tools. Things to watch out for:
- it's very dusty. Working soapstone will result in a lot of talcum-like dust that gets into and onto *everything*!
- there are fault lines in the stone. If you don't pay attention, it will break on you in a heartbeat. The good news is that epoxy works well on it. There was actually a fairly big break on this stand that was epoxied together. I know it's there and if you look at it closely, you can see the repair, but it holds well.Substance likes this.
It was in original condition, faded red, well-worn, but nice.
This was and still is my favorite combination; beautiful, original, and worn.
-Neil Young
-
01-20-2014, 04:11 AM #22No that's not me in the picture

- Join Date
- May 2013
- Location
- Los Angeles South Bay
- Posts
- 1,340
Thanked: 284
Yeah I love that Cangooner. Looks natural but superbly functional. I still need to make a stand for my kamisori so I'm trying to soak up ideas...
I love living in the past...
-
The Following User Says Thank You to RoyalCake For This Useful Post:
Cangooner (01-20-2014)
-
01-20-2014, 07:59 AM #23Scheerlijk

- Join Date
- Feb 2013
- Location
- The Hague, the Netherlands
- Posts
- 1,184
Thanked: 164
Nice stand, Cargooner! Aren't you scared of hitting the edge on it when grabbing the kamisori or putting it down?
I want a lather whip
-
The Following User Says Thank You to Laurens For This Useful Post:
Cangooner (01-20-2014)
-
01-20-2014, 08:33 AM #24Senior Member

- Join Date
- Jan 2014
- Location
- Brisbane, Australia
- Posts
- 673
Thanked: 79
Ive worked with soapstone before, and its just like a hardwood (easy to sand etc).
Great stand by the way
Originally Posted by Substance
-
01-20-2014, 11:13 AM #25Incidere in dimidium
- Join Date
- Mar 2012
- Location
- Val des Monts, Quebec
- Posts
- 4,065
Thanked: 1439
Depends how it is used. If you placed the blade in vertically that could be an issue, but I slide it in horizontally and the edge stays well clear of the stone. Originally Posted by Laurens
It was in original condition, faded red, well-worn, but nice.
This was and still is my favorite combination; beautiful, original, and worn.
-Neil Young
-
01-20-2014, 11:32 AM #26
I think os has some magnets mounted as a razor holder for his kamisori's Originally Posted by RoyalCake
Bread and water can so easily become tea and toast
-
01-23-2014, 05:43 PM #27Senior Member

- Join Date
- Jan 2011
- Location
- Roseville,Kali
- Posts
- 10,432
Thanked: 2027
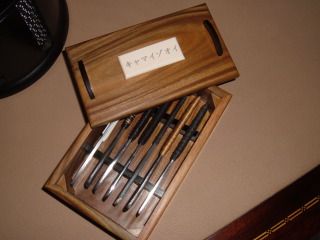
Box for a seven day set of Kamis,Real lignum,ebony, ivory.
 CAUTION
Dangerous within 1 Mile
-
01-28-2014, 01:46 AM #28Member
- Join Date
- Apr 2009
- Posts
- 36
Thanked: 1
Wow, a lot of interesting stands and holders.
-
01-28-2014, 02:18 AM #29Member
- Join Date
- Jan 2014
- Location
- Orange County, NY
- Posts
- 60
Thanked: 10
Attachment 153337
Cangooner, This is simply gorgeous.
If you would, I'd love it if you could provide a "How to" for working by hand with soapstone. I lack power-tools but have tons of hand tools. I'd love to put them to use!DoughBoy68 and Cangooner like this.
-
The Following User Says Thank You to salvat36 For This Useful Post:
Cangooner (01-28-2014)
-
01-28-2014, 03:53 AM #30Incidere in dimidium
- Join Date
- Mar 2012
- Location
- Val des Monts, Quebec
- Posts
- 4,065
Thanked: 1439
Thanks for the kind words. I'm afraid I take a very impressionistic approach that isn't easily explained: I look at the stone until I see what I'm trying to make, and then remove all the bits that don't belong. Originally Posted by salvat36
The good news is that soapstone is beautiful material to work with and is *very* easily worked without power tools. Chisels, files, knives, hand saws, maybe a drill, and sandpaper are really (IMHO) all that is needed for most soapstone projects. I'd guess that 80% of my actual stock removal is done with one of two carving knives. One is a fixed blade knife with a curved blade ("Chip Knife #4 here), the other kind of like a beefed up xacto knife that I also use (mostly) with curved blades (This guy here).
That's purely personal preference drawn from carving tools I already had, so they may not be ideal for everyone. But they work for me. Other than that, normal woodworking rasps/files work great. Big chunks can be sawn off with a hand saw or coping saw. I'd recommend using a saw for removal of large chunks of stone as soapstone's natural fault lines can change your plans in a hurry if you try to carve out big pieces with a chisel!
I was never taught how to carve, so I generally recommend the same approach that I took and which I enjoy. Grab some material. Grab some tools. Make something.
Oh, and in terms of finishing the thing once it's done, two things have worked well for me:
1) rubbing on mineral oil
2) melting on beeswax
I think I prefer the beeswax finish, but that's purely subjective.
It was in original condition, faded red, well-worn, but nice.
This was and still is my favorite combination; beautiful, original, and worn.
-Neil Young


 Reply With Quote

