
Results 11 to 20 of 26
 31Likes
Thread: My first restoration attempt.
 LinkBack URL
 About LinkBacks
-
12-04-2015, 04:12 PM #11

I would just fix it.
That is just me though.
-
12-04-2015, 04:18 PM #12Incidere in dimidium


- Join Date
- Mar 2012
- Location
- Val des Monts, Quebec
- Posts
- 4,065
Thanked: 1439
Me too. Originally Posted by Chevhead


It was in original condition, faded red, well-worn, but nice.
This was and still is my favorite combination; beautiful, original, and worn.
-Neil Young
-
12-04-2015, 06:01 PM #13Senior Member
- Join Date
- Oct 2015
- Location
- Vermont
- Posts
- 167
Thanked: 8
One more question if you guys don't mind.... so there's uneven hone wear on the spine making an uneven bevel when I'm honing. On one side it goes from left to right, thin to thick, and reverses on the opposite side. Any ideas about how to correct this?
-
12-04-2015, 06:03 PM #14
Rolling X strokes.
-
The Following User Says Thank You to Chevhead For This Useful Post:
Dramadon3151 (12-04-2015)
-
12-05-2015, 02:10 AM #15the deepest roots


- Join Date
- Feb 2011
- Location
- Seattle
- Posts
- 1,221
Thanked: 169
drilling it out a little more round and then using a spacer definitely works, I've used this method before. The only tricky part is grinding down the width of the spacer to fit within the width of the razor shank.
-
12-05-2015, 05:09 AM #16Senior Member

- Join Date
- Apr 2012
- Location
- Diamond Bar, CA
- Posts
- 6,553
Thanked: 3215
Or just pin it tight, it will be just fine.
Tons of razor are punched just like that and have worked for years.
If do you cut a 1/16 ID tube to epoxy in the hole, cut it with a small tube cutter, hack saw or Dremel cutoff wheel with tube taped to a piece of wood, with a piece of 1/16 in rod in the tube to keep from smashing it. Tape keeps you from losing it.engine46 likes this.
-
The Following User Says Thank You to Euclid440 For This Useful Post:
Srdjan (12-09-2015)
-
12-05-2015, 01:16 PM #17Senior Member

- Join Date
- Jan 2013
- Location
- Communist State of California
- Posts
- 1,461
Thanked: 463
Yup. Lots of Sheffields were just made with bigger holes. A tiny bit of play doesn't bother me once the pins are snug. I have "Fixed" a handful of blades with too much play. Hard to say if it would be an issue from that picture though. I would test fit the scales first and see how it feels. Originally Posted by Euclid440
-
12-05-2015, 06:23 PM #18Senior Member
- Join Date
- Apr 2012
- Location
- Diamond Bar, CA
- Posts
- 6,553
Thanked: 3215
It is an interesting dilemma. I used to epoxy in a tube or peen with brass rod and drill the pin holes tight and found it caused more alignment problems than it solved. Getting the hole… straight can be a problem… Straight to what?
Now I just make a larger pin hole (3/32nd) and taper the outside of the scale hole and the collar and leave all but the very large holes alone.
I do the same on the wedge and do not glue the wedge to the scale or glue one side only to the scale. I also dome the collars and that creates a small cup for the peened pin head, making more downward, that outward pressure… I think.
This give bit of wiggle room so I can align the blade better, once it is aligned well and snug, then tighten the pin tapping one side then the other and the same to the wedge making sure nothing moves.
The pivot hole size does not need to be that tight and once peened tight will not move, and can be tighten and adjusted if needed.
For me it makes alignment way easer, and I don’t have any forward and back movement, it is a non-issue.
You guys that are making your own razors, are you drilling 1/16 in pivot holes?Srdjan likes this.
-
12-07-2015, 09:25 PM #19Senior Member
- Join Date
- Oct 2015
- Location
- Vermont
- Posts
- 167
Thanked: 8
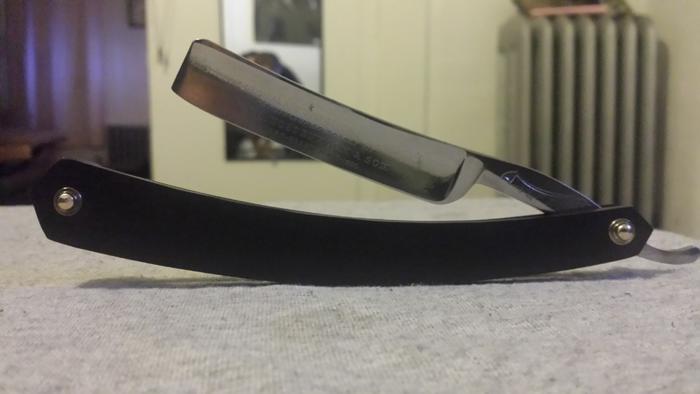
Here is the mostly finished product guys. Thanks for all your guidance with this. Everything seemed to go fairly well! More importantly I had fun doing it. I still have to gone it up and shave with it...I was good to sell it once it was finished, but I think I'll keep it around for a while!
-
12-07-2015, 10:12 PM #20
Those are the words of a man starting RAD. Go ahead, ask me how I know this.... Originally Posted by Dramadon3151

edit: Oh yeah, looks good!
Ed


 Reply With Quote