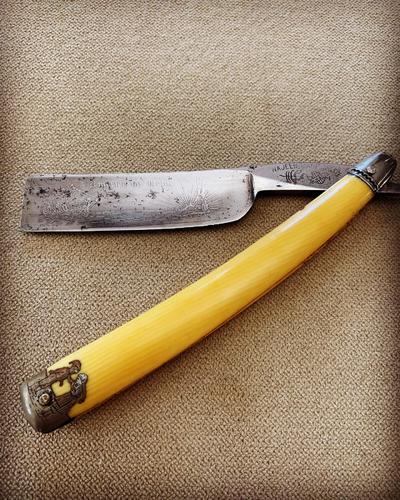
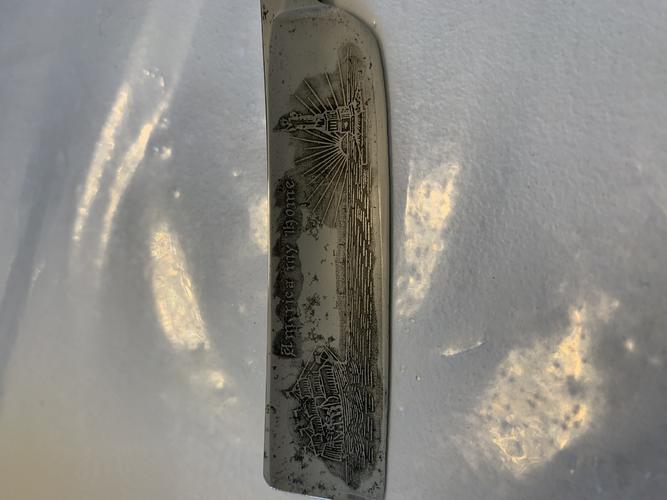
Just got this guy the other day. Not sure it can be polished without removing the etching but I can live with that if not. I’m stoked on it being my first Vintage razor. Any thoughts?Attachment 341577Attachment 341578
Printable View
Just got this guy the other day. Not sure it can be polished without removing the etching but I can live with that if not. I’m stoked on it being my first Vintage razor. Any thoughts?Attachment 341577Attachment 341578
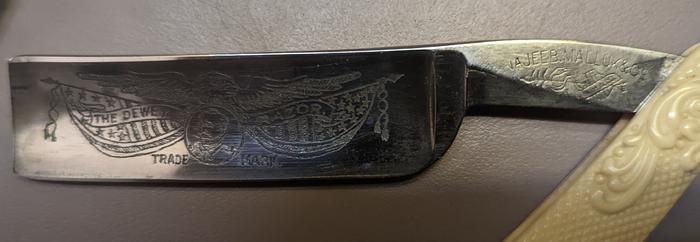
Nice. I have a Najeeb Malluk, "The Dewey Razor." It is an excellent shaver.
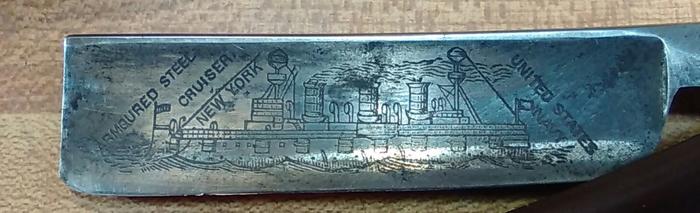
It looks like that etching is very salvageable. NO SANDING on that though. You'll lose it forever if you do.
That’s cool you have a Najeeb too! I’ll have to check that out! So you think I could get away with just a light polish on the etched side, I think I read I could use some Maas I believe it was maybe?Quote:
Originally Posted by PaulFLUS
Polish is fine. If it is shave ready keep polish off the bevels and edge as it will kill an edge. Nice razor btw. I dont have that name in my collection. Looks like a 13/16 or 7/8 to me.
Thanks for the advice, the edge is in good shape so I’ll protect it forsure. I think it’s a 6/8, it doesn’t seem much bigger then my Dovo’s that are 5/8 but I could be wrong.Quote:
Originally Posted by Gasman
Nice. Should be a good shaver. The pics look like there is some chipping towards the heel? Might just be my screen though.
I think 13/16 looks about right. That's what mine is. Here's a couple of pictures.
Attachment 341586
Attachment 341587
It looked to me like it might have a little chipping at the heel also but maybe the pic is just pixelating. Even if it is it's okay. That can be fixed.
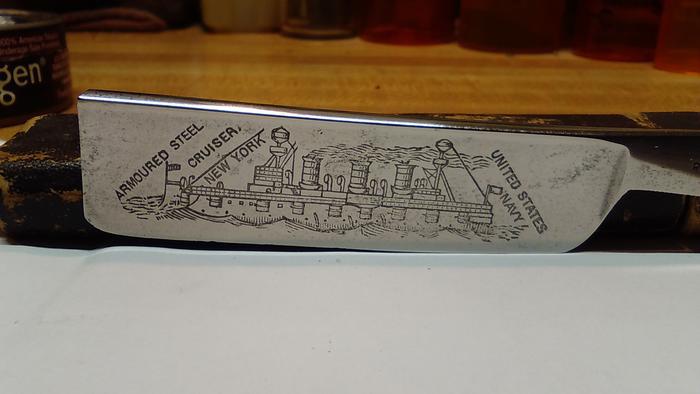
The best thing I've used is 3M Marine Metal Polish and Restorer. It is safe for etching but it will polish a blade up like a greased nickel in a Billy goat's hiney. Put a little bit on a sock or a piece of an old tee shirt and rub for a few minutes and it will shock you how much it cleans it up.
Edit: just to avoid glory grabbing, Mike (Outback) turned me on to the 3M. He probably turned most of us on to it.
Credit where credit is due Mike.
Attachment 341588
Sweet I’ll pick some up and give it a go! The blade is good the picture just has some pixelation. Either the pins are loose or the scales are warped however. The toe of the blade catches the inside of the scale sometimes when you close it.Quote:
Originally Posted by PaulFLUS
I tried to get some of that marine metal polish or some blue magic but all I could get was autosol, hopefully it will work OK.
I purchased my container through Amazon Canada. Not cheap, but a little goes a long way.Quote:
Originally Posted by STF
Nice looking razor.!
Yes..a careful cleaning with 3M should clean that up pretty good.
3M will remove some etching, if rubbed hard and long. Always test a small spot with a q- tip. If the etch is actually a stamp/engraving, there shouldn't be a problem, but it will lighten the black, within the letters. So don't use a rag, use something like paper, or a piece of leather from an old belt. Anything without loose fibers that can get into the etch/engraving.
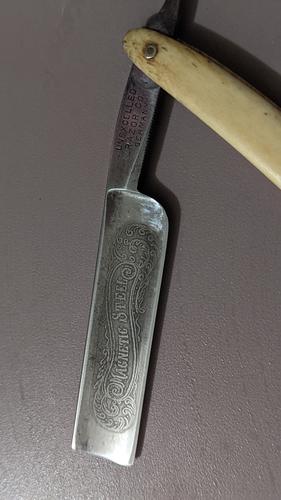
Your razor would go well with the one I just finished. Its engraved into the metal. Light high grit sanding, and 3M brought it back.
Attachment 341594
Attachment 341595
Wow! That razor looks amazing! Thanks for the tips, hopefully I can get a similar result.
That etching looks fairly defined but it (3M Marine) will lighten the dark parts. You can darken it with some gun blue then relieve the high part with some film. That is a rather advanced technique though. There are some threads about it. Geezer made a good one. I'll see if I can find it.
Here ya go. Gnaw on this one for a while. It will really advance your game and improve your results.
https://sharprazorpalace.com/worksho...ml#post1422751
Can’t argue with those results! You have any more links to how to use the lapping film and gun blue? Hate to be a total noobie but don’t want to get ahead of myself.
Attachment 341938Quote:
Originally Posted by PaulFLUS
The bluing really does help the etching pop! Is that all the blue you can get off or do I need to go to .5 micron or something else? Or did you kinda have to settle with some bluing?
I personally never could get the bluing to work right. Good luck. Hopefully someone chimes in to help.
Yeah it’s been a challenge but it’s all new to me but it’s been fun learning the ropes. Even if it doesn’t come out perfect I’m still pretty happy with my first project.Quote:
Originally Posted by Gasman
I think it might help you to look at this link:
https://www.wikihow.com/Acid-Etch-St...cid-Etch-Steel
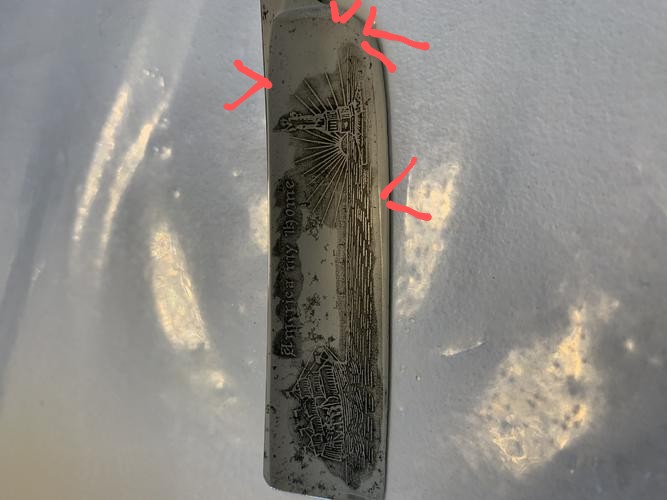
In your case the etching has already been done but it might help you to see how it is done to begin with. What I mainly see is that you have surrounded the resist with the acid, in this case gun blue, but have left the majority of the etch untouched. At least that is what it looks like from what I can see. The etched part is like a frame or window around the resist. The arrows show the edges of the etch.
Attachment 341940
The link I sent explains it pretty well. You need to fill the whole "window" with the bluing and leave a darkened background behind the raised part. Use something hard like a dowel rod or deep well socket that will go the whole way across the etch preferably as close to the angle of the curve of the hollow as you can. Wrap the lapping film as tightly around the rod as you can get it so it will hit the high part of the resist and the unetched part of the blade outside the etch. You want it to skip over the etched part. Try to keep the bluing inside the window as much as possible as any you get outside will have to be removed recessing the high part a certain amount. You don't want to create more work for yourself than possible.
Here is an example on one I did.
Attachment 341941
You don't really want to get it off, at least not most of it. You want it darker but it doesn't look right unless you get the whole etch. It looks too dark because it doesn't create a framed picture but it will lighten up some with a little more work. You can also use a heavy paper instead of film like packing paper or a paper bag.Quote:
Originally Posted by Thehorndog88
Appreciate the help man, that does help make sense of everything. I’ll have to try again and see how it goes.