
Results 61 to 70 of 98
 318Likes
Thread: An idea for a contact grinder.
 LinkBack URL
 About LinkBacks
-
03-15-2019, 10:00 PM #61Member

- Join Date
- Mar 2016
- Location
- Canada
- Posts
- 68
Thanked: 7
Man if i had access to a CNC id be all over that.....fast, accurate and the ability to do just about everything shy of finish grinding......
-
03-15-2019, 10:50 PM #62Captain ARAD.


- Join Date
- May 2011
- Location
- Pacifica, CA
- Posts
- 2,474
Thanked: 2226
I'm really looking forward to you getting your setup running! Another member up north has offered his HT services in the interim. It's gonna depend on how long it takes me to actually jump on the grinding. I keep rethinking my approach! Originally Posted by jfk742

It's where I want to be, but the learning curve is substantial! Originally Posted by 6cuda6
Geezer likes this.-Zak Jarvis. Writer. Artist. Bon vivant.
-
03-15-2019, 11:12 PM #63Captain ARAD.
- Join Date
- May 2011
- Location
- Pacifica, CA
- Posts
- 2,474
Thanked: 2226
Out of curiosity, I just checked the Roberts razor I'm shamelessly copying.
It looks like the grind on it was done on the flat side of the stone for roughing, then hollow after heat treat. It's slightly concave. It's also not the traditional T shaped rattler. It's maybe three times thicker just under the lip of the spine than at the edge.Geezer likes this.-Zak Jarvis. Writer. Artist. Bon vivant.
-
03-15-2019, 11:47 PM #64Captain ARAD.
- Join Date
- May 2011
- Location
- Pacifica, CA
- Posts
- 2,474
Thanked: 2226
Also, I’ve mentioned it a couple times, but this is the RSO I made to see if my drum sander setup was up to the task.
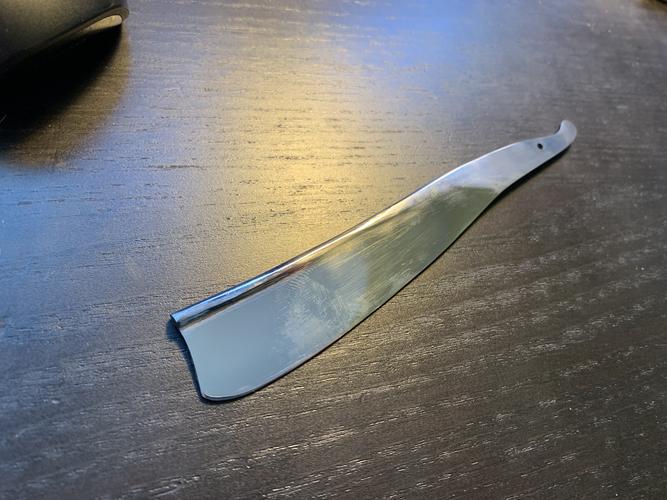
Completely unusable for a variety of reasons, not least of which being it’s made from steel I found in a castoff bin and was part of a very large sheet.
But the spine is wrecked and the thickness is wrong and it’s not thick enough for the blade width. But, it told me this was at least a semi-viable venture and it cost nothing to do.-Zak Jarvis. Writer. Artist. Bon vivant.
-
03-16-2019, 12:05 AM #65Senior Member


- Join Date
- Mar 2015
- Location
- Akron, Ohio
- Posts
- 11,939
Thanked: 4300
Well its a sweet looking replica of what's to come, Zac.
I really dig those ol 1700 razors.Mike
-
The Following User Says Thank You to outback For This Useful Post:
Voidmonster (03-16-2019)
-
03-16-2019, 12:07 AM #66Captain ARAD.
- Join Date
- May 2011
- Location
- Pacifica, CA
- Posts
- 2,474
Thanked: 2226
Originally Posted by outback
This one's actually from the very early 1800's and persisted for quite some time -- 1830's at least. But it wears its lineage right on the sleeve and isn't much of a break from the past at all.-Zak Jarvis. Writer. Artist. Bon vivant.
-
The Following User Says Thank You to Voidmonster For This Useful Post:
outback (03-16-2019)
-
03-16-2019, 02:15 AM #67Senior Member

- Join Date
- Jan 2015
- Location
- Pinole, ca
- Posts
- 1,526
Thanked: 339
Did you try setting a bevel on the rso? Only reason I ask is it will show you where you need to grind more, was super helpful for me to get my bevel and those the steel behind the edge even and any waves out of the hollows, or flats in your case.
Voidmonster likes this.
-
The Following User Says Thank You to jfk742 For This Useful Post:
Voidmonster (03-16-2019)
-
03-16-2019, 03:31 PM #68
IF you are not yet using a peck type feed on your drill, try it. What that does is brings swarf to the surface and allows a cooler drilling. Ok, "peck drilling" is setting the down feed to retract every so often and the go back to depth and finishing the holes. A little bit more time but less damage to the work pieces. Some CNC mills have the sotware to do it installed by the maker. Often use in PC board fab and electronics work. Originally Posted by Voidmonster
YMV ~RichardVoidmonster likes this.Be yourself; everyone else is already taken.
- Oscar Wilde
-
The Following User Says Thank You to Geezer For This Useful Post:
Voidmonster (03-16-2019)
-
03-16-2019, 05:43 PM #69Captain ARAD.
- Join Date
- May 2011
- Location
- Pacifica, CA
- Posts
- 2,474
Thanked: 2226
I didn't try that. More likely than not, it's pretty screwed up. I took a couple large bits out of the spine at the beginning of the grinding and somehow they just kept sliding the wrong way -- which was the major inspiration for my jig idea. Originally Posted by jfk742
I really should have thought of that. All the work was done on my extremely manual drill press, which unfortunately has only 4 speeds "slowest, not as slow, pretty fast, and fast as it'll go". Presumably the original pulleys had rated speeds, but the drill was born well before I was and I suspect the manual was lost before I showed up too. I've been thinking about replacing the replacement motor with a DC induction motor from a treadmill and adding a tachometer. It'd be very nice to have continuously variable speed and a tachometer. I've killed so many drill bits working on metal. Originally Posted by Geezer
 -Zak Jarvis. Writer. Artist. Bon vivant.
-
03-16-2019, 05:57 PM #70Member
- Join Date
- Mar 2016
- Location
- Canada
- Posts
- 68
Thanked: 7
Have you tried a Dremmel in the press they make? It can really be slowed down and it should chuck up those tiny bits well....
32t and Voidmonster like this.


 Reply With Quote
