Where do I start? do I need to disassemble sand and polish or is there some kind of solvent I should use first? also can it be done with out taking the scales off?
Thanks in advance.
John
Printable View
Where do I start? do I need to disassemble sand and polish or is there some kind of solvent I should use first? also can it be done with out taking the scales off?
Thanks in advance.
John
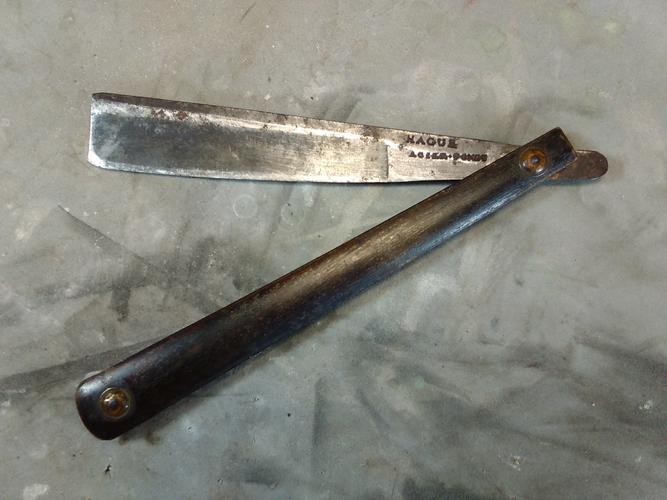
It’s likely that your best approach is not always the easiest. It looks like you should take the scales off, scrape it with a single edge razor blade, then give it a good scrubbing with 0000 steel wool and WD-40. Then post some very clear close ups, and the next steps will be more apparent. Maybe set the bevel after to see if you have good steel to proceed with sanding and polishing. You could be super lucky and just step to polishing. It’s really hard to tell with that much crud and those pictures.
I went at it with some blue wenol metal polish on a paper towel and was kind of amazed how much it cleaned. But I think I am going to send it off to be restored an honed. I am not very goo at taking pictures. but here are the results.
Blades are difficult to take pictures of. It actually looks pretty good. I would say it’s worth sending out.
I'll second that, Rez. Seems the cleaner they get, the harder it gets to photo them.
I agree. Take apart, and a light restore should be on call.
There's always tons of gunk in the pivot.
Nice looking blade and good luck.
If you want to keep it original and are comfortable removing scales and can hone then go for it, would be a nice project but if your not then weigh the cost of restoration to what you paid and it’s worth.
You can do a lot under the scales near the pivot with unwaxed dental floss and WD-40 graduating to a metal polish like 3M Marine Metal Polish. That stuff on a rag will do just short of miracles with a blade in that kind of condition, at least from what it looks like in the pictures. Also for between the scales I often squirt some WD-40 and let it sit for a few minutes then use lava soap and a fingernail brush to scrub it out. Some really foul looking crud will come out of there a lot of times. On the pictures, there are some really good threads on photographing somewhere here. I'll see if I can find a link and repost.
Also, check out the what are you working on thread in the workshop forum. Tons of good information there. Outback is a master on restoration of this type as are many others who post there.
Try browsing through the threads here. This should help you with picture taking.
https://sharprazorpalace.com/photo-college/
Being you are new to SRP (at least your at the right place) I bet you don't know how to hone. This is a decent-looking razor. I don't feel it's anything special but a good razor that you could give new life and learn to use. You have done a basic cleaning so you can see what is what. The heal is going to need a little reshaping and you will never get all the rust out of the pivot without unpinning and repinning. So if you want to take on this challenge, go for it. We have all the info you need to do it. Then send it out for honing so you can start to enjoy it and learn to use it.
IMO, Being as new to this as you are I'd contact one of the members here (send out a PM) and send it to him for fixing up because at this point you need to know if it will take an edge before spending any more time on it. So a bevel set needs to be done. From there, you can decide if you want to go all out on it or just make it a fine "user grade" razor.
This is the problem with new guys buying old razors without knowing what you are buying or getting into. We have all done it. Hey, you got to start somewhere. It's easy to pickup razors for a low cost then find out what you bought is junk and not worth fixing. WORTH is another thing. Its worth is what you are willing to pay for it. I have razors I feel are worth hundreds and others not worth the time it took to hone them. But I still took them apart and restored them for the challenge as I wanted to learn to collect and restore. I'd recommend sending it out at this point unless you want to learn to remove pins and take a chance on the steel holding an edge. You could do a great job of cleaning and repinning then send it out. This is your choice, the next step. But weigh the costs of fixing it up by contacting someone who does this. You might find the cost of the job is not a big deal. OR jump in and get to removing pins. you're going to need pinning material, tools, time, hones, time, and time. Ha. But it can be fun. So think about what you want out of this way of shaving/hobby. Collecting and learning to restore, or just having a few nice razors and a great shave!
Posted this in the other thread, meant to post it here.
I start any cleaning with a good spray down with WD40, scrape off any active rust with a single edge razor blade, then 000 steel wool.
Clean between the scales with a paper towel wrapped wood coffee stir stick. It may take repeated applications of WD40 to get clean.
Now you can look at what you have. For most dull blades, a light sanding with 600 W&D, wrapped around a wine cork, followed with 1k will leave a smooth finish that will polish well with any good metal polish and a paper towel.
You will be amazed what 15-20 minutes of sanding will do for a metal polish hand finish. Most scales will polish up with good metal polish. Make sure to sand in both directions, there are tons of post on hand sanding.
You can clean the tang pivot with a coffee stir stick wrapped with W&D or steel wool and a brass brush.
Professional restoration is all about time. Unless the razor is rare, unique or has personal value, most are not worth the cost of professional restoration.
Clean, hone and use them. A lot of “restoration” can be done with simple hand tools and time.
In a attempt to unpin I broke one of the scales. Oh well live and learn.
Poop happens.Quote:
Originally Posted by Audels1
Post a photo of the break and we might be able to offer repair possibilities.
You can also buy new black horn scales for not very much if you think the repair might be beyond your ability.
It’s not as simple as it seems. That’s exactly how I got into making scales. We have all broken scales, at least those of us who have unpinned scales have.
at this point repair is not an option the peace went flying across the room never to be found. LOL. I do have a set of black horn scales but thy are so much bigger than this razor.Quote:
Originally Posted by DZEC
The funny part is I removed the scales of 2 of the razors I did care to keep and thy came off fine..No not the one I wanted to keep.:mad:Quote:
Originally Posted by RezDog
Taking off scales can indeed be a PITA, I usually drill the pins out with my drill press, works mighty fine.
Or I don't remove the scales at all if I don't really have to.
I only restore what I have to to have a functional razor, nothing more.
I kinda like it that way too.
You know when you'll get really mad? when it happens to ivory scales. Dammit.
Sounds like you can now get the blade cleaned up really nice and learn to make scales. Remember that the wedge is a wedge shape. Not a spacer. I learned to make scales out of exotic hardwoods. Its harder to do than Horn. But buying black horn and making your own is fun too. Go for it!
I started with a batch of 10 and ended up with 6 broken scales (some came broken) and I had only bought 5 sets of replacement scales. But, I was able to fix at least 7 of them. But naturally, the ones I could not save were the one for the blade I was most curious about and one of the fancier scales. So, I definitely feel your pain. But, most of my issue is just learning how much you can try to force things (not much) to try to get the scales off.Quote:
Originally Posted by Audels1
But there is a ton of information for every step of the process. There is the library that has some detailed wiki type posts, but also learn the advanced search function. And, obviously, you can post questions in the forums and get tons of advice.
I've learned a lot from this forum, and the members. Once I got my feet wet in the restoration pool, I waded out a bit deeper n deeper, till I started swimming in my own style of restoration tricks.
It always, and still does bother me when I read a post about a guy discarding the original horn scales, because they had bug bites in them, or look shotty. Then throw on a set of cheap,acrylic scales.
Horn is simple to repair, and keeping the razor dressed in its first shoes, is a must, for me.
As found.
Attachment 332207
After.
All original, but the pins.
Attachment 332208
*shivers*Quote:
Originally Posted by outback
That's horrific indeed
In my defense, the ones that were unusable were plastic or rubber :).Quote:
Originally Posted by outback
That's the bad part about plastic. Non fixable..
Aww, that's a good pic. The one scale was a mere shell, at the wedge.Quote:
Originally Posted by TristanLudlow
Attachment 332209
Man, go away for a day or two and you miss a lot. Sucks about breaking the scale but at least now you have been initiated.
You'll get a lot of different opinions on about any subject and you know what they say opinions are like. The trick is to find what opinion fits you best. Everyone who has posted is right from one point of view or another and I would take each comment as sound advice. Your job is to weigh how you want to proceed. You could send it out for work or you could pick it up on your own. It is a harder road to pick it and and do it yourself but it can be a great satisfaction. Only you know whether you have the intuition and aptitude to read and watch videos and possibly be tutored and pick it up or if you need more of an apprenticeship. I have taken on apprentices for decades in my trade and there are some who learn quickly like a sponge and can apply it easily. There have however been a few that just couldn't grasp it . It's not a value judgement. It is just a product of learning style and inclination. None of us know you beyond what you tell us but if you are brave as you seem to be then just know that some mistakes can really hurt. Be prepared to learn and move on. Also remember the carpenter's adage: measure twice, cut once.
To prevent breaking scales when unpinning, file the pin head flat, mark a center with a sharp punch and drill the pin slowly with a sharp drill bit, pin vise, drill press or hand drill slowly. A pin vise will drill a pin surprisingly quickly and it is almost impossible to mess up a scale with.
Once you drill past the head, lift the scale off the pin. Do Not try to drive the pin through the pivot, you will break a lot of scales if you do, most pivot pins are bent and will break the bottom scale when punched through. It does not take much of a bend to break the bottom scale.
Lift the top scale off the pin and lift the blade off the pin. If the pin is bent cut near the bottom scale. Do the same for the wedge side.
Horn scales can easily be made with just a few hand tools and a blank is inexpensive.
Really? My little drill press comes on Saturday and now I learn about a pin vise? HAHAHA.Quote:
Originally Posted by Euclid440
I am guessing that the benefit of the pin vise is that your drill bit is going slowly so if you do slip off the pin you will do little or no damage to the scale?
The whole trick is to drill the hole in the center of the pin, directly in the center.
Get a sharp punch, I ground down a small craftsman Philips screwdriver, the one that the shank is a little larger than 1/8 in. I ground it to a sharp point and hardened the point.
File a small flat on the pin and mark the center of the pin, if you goof, file off a bit more pin and try again. Once you are sure you are in the center, mark the hole deeper with a bit larger center punch.
It is much easier if you make a cradle with a strip of wood with a hole that will accept the pin and collar on the back side so the razor sits flat on the wood cradle. Once you mark the center use the cradle to drill your hole, if using a drill press or hand drill. If you need to, you can duct tape the razor to the cradle or cradle and razor to the bench.
Pins are brass or Nickle silver and soft and easy to drill with a pin vise and a sharp/new drill bit. Or you can start your hole with a pin vise and once the hole is established use the drill, it will not pop out of the hole if you go slow.
Some guys like to hold the razor in hand and push it up to the bit, on the drill press. I have tried both ways and they work. The key is a good deep center punch hole, sharp bit and go slow.
I use a pin vise when I want to save the scales and the collars, or the scales are not replaceable. It literally takes a minute to drill a pin with a pin vise.
I have shaped a set of black horn scales. The original set and the pivot point in the blade are 3/64 so that is what I made the holes in the scales. I have some brass rod in 1/16 and 3/64 left over from another project but am having a hard time finding the washers for for them locally.
What would be the best online resource for them? also do i need to use spacers in-between the scales and the blade?
Thanks John
microfasteners.com is often recommended on this site. I ended up using amazon.com because the shipping was going to a blot compared to what I was buying.Quote:
Originally Posted by Audels1
I'll leave the spacer question to people with more experience.
Often referred to as thrust washers
https://www.ebay.com/itm/17344343558...332c%7Ciid%3A1
This is what I have been buying.
I did look on amazon. What search term should I use to find them?Quote:
Originally Posted by planeden
I found them on micro fasteners and then searched Amazon for what they were called. I think it was 00 for the outer washers. In the workshop library there is an entry for where to buy stuff and I think it also gives you the part numbers.Quote:
Originally Posted by Audels1