This thread is to try and sum up some best practices when photographing your razors.
The SRP community has a few photographers in its ranks and I hope they can contribute their knowledge.
Printable View
This thread is to try and sum up some best practices when photographing your razors.
The SRP community has a few photographers in its ranks and I hope they can contribute their knowledge.
Using a light box
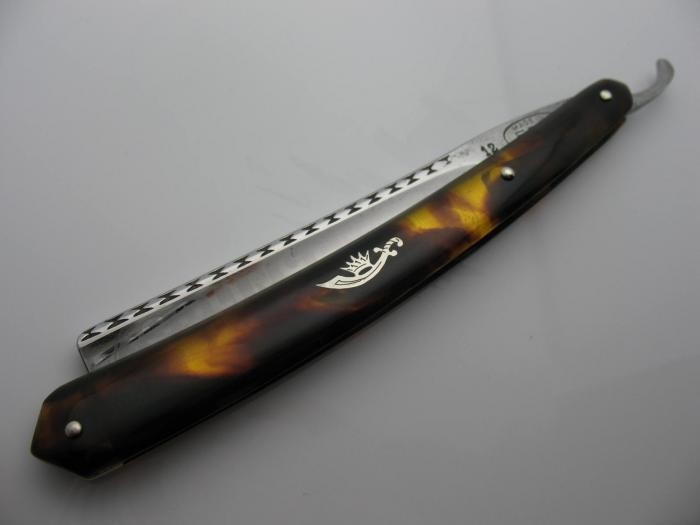
I bought a cheap light box to try and get a consistent background and lighting. Unfortunately one of the bulbs burned out and I had to use an overhead incandescent (regular light bulb) light.
This cast an orange shade to all of my pictures. The first photo is unedited.
The second photo was edited with the photo editor 'The Gimp.' Although there is an orange cast, I know that the walls are supposed to be white. So I went to the option
Colors -> Levels;
and chose 'Pick White Point.' I selected the whitest point on the white wall. Much better, although the blue background is a bit rich.
What do you guys think?
1. Use natural light when possible.
2. Use a tripod or other stable object to steady the camera.
3. Be aware of your camera's minimum focal length and/or its autofocus habits. My point-and-shoot wants to focus on whatever's three feet away rather than what I'm holding right in front of it. My SLR won't let me get any closer than 8" from my subject. Solution: back up, shoot the object so it's in focus, and then crop and enlarge the picture with your photo editing software.
4. Be kind to dial-up users. Attach rather than embed photos in posts, and keep file size reasonable.
Many digital cameras have a macro-function, usually designated by a flower symbol: http://www.hp.com/united-states/cons...faq_11_180.jpg
It 's no miracle button, but it does allow for a nearer focal point to some extent.
This kind of pictures usually have very little focal depth, so if your a bit off with your focal point, significant blurring is immanent. Plenty of light increases depth of focus (simply put). If your flash engages automatically, then the lighting is poor. Avoid flashing.
Most auto-focus algorithms on consumer cameras aim for the middle of the image. Many cameras have trouble to focus on a glossy surface. Here's a good trick to avoid focal problems with many cameras: Place a small piece of non-reflective paper with a bit of text or other sharp graphic flat against the blade of the razor. Aim your camera at that focal aid. Push the button of your camera halfway and keep it there. Your camera's auto-focus function will engage, but it won't shoot a picture yet (on most cameras). Keep it steady from here on, preferably with a tripod or placed on a solid surface. Then remove the focal aid, and press fully down on the button.
Best regards,
Bart.
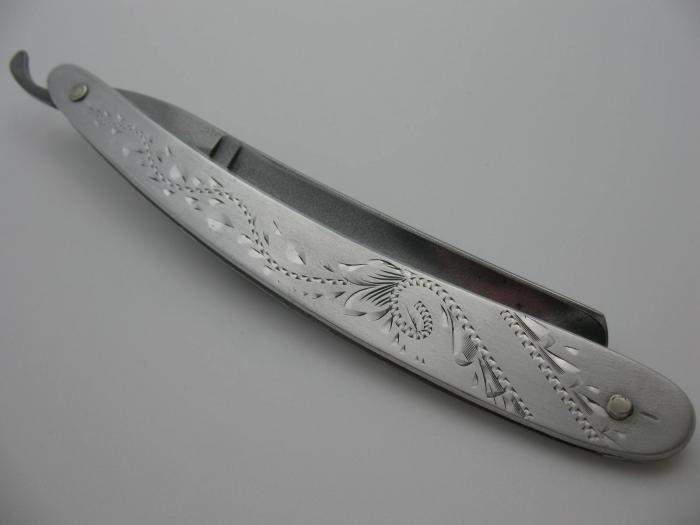
I can't do without my macro function on my digital camera. I just recently got a light box and I find the pics are much better than I could have done before. Here are a few examples of unaltered photos in the light box:
Attachment 11812
Attachment 11813
Attachment 11814
Chris L
The single best thing any digital photographer can do is learn about setting white balance with their camera. This will alleviate the need for any color correction when done properly. If you are going to use software to color correct, it is best to learn about histograms and how to use them. They make it a little easier to hit the right white point while maintaining good mid tones. Just my $.02!:p
Thanks for the tip. I've got to check into that. In the previous pics, the backdrop is white, but as you can see, it shows gray. Time to get out the owners manual!Quote:
Originally Posted by sicboater
Chris L
I was catching up on how to set the white balance on my camera. Hopefully tonight there will be a post showing before/after pictures.Quote:
Originally Posted by sicboater
Awesome pictures of awesome razors.Quote:
Originally Posted by Chrisl
Wow!
:tu
Bart.
I'm guessing that this thread will need to be made sticky before it's done. There are way too many times people need to show images in these forums.:)
That's not a white balance problem that is an exposure issue, white balance is for colour cast like the yellow of incandescent bulbs ... the meter on your camera meters for middle grey (12 or 18% depending on who you ask and which manufacturer of camera/light meter) ie it tries to make the metering area (this depends on the mode your camera is in) look middle grey. If you take a photo that is of a mainly white object the camera will underexpose and the white comes out grey.Quote:
Originally Posted by Chrisl
If you have a manual mode on the camera either select a shutter speed upto half what the meter says or select an aperture upto 1 stop slower the picture will probably be better exposed. If you use Aperture priority, Shutter Priority or full auto (or SV mode on the Pentax K10/20D) then you can dial in exposure compensation which will have the same effect.
Also If you are using an DSLR (or any camera that can use it) then use RAW - you wont have any white balance problems then.
Barney
If you have a camera that can shoot RAW format, suggest that you use a color balancing card. The name would seem like a misnomer since it consists of an 18% gray area, a white area, and a black area. However, this provides the means to perform color balancing in a program like photoshop. There are other ways that are less precise but this method is the most accurate if you can do it.
So, shoot a picture with the white balance card in the mix and remove it and shoot your normal picture.
Thanks Bart, I hadn't mentioned it until now, they're all up for auction now on the Bay along with some other so so razors. I'm paring down the razors that have been sitting too long in my resto drawer. None are in mint condition and all in need of restoration.Quote:
Originally Posted by Bart
Chris L
Here are a few experiments with razor photography, Here is the initial photo, with no enhancements or special setup:
Here is the same setup with the white balance preset to 'incandescent light.'
Here are a few shots within the lightbox while using a shroud. Basically I used a white sheet to block the open part of the box, so that only the camera was peeking through.
This was to minimize or at least homogenize the reflection from the shiny blade.
Phew boy, where to start, where to start.... :)
Well, I'm a part-time photographer. I work for a small nationally circulated paper on occasion and am diving into the wedding photography business as well. Just getting started there, but should have a better website coming. Right now, you can see *some* of my stuff at...
True Beauty Photography
and
dhatcher's Photo Galleries at pbase.com
(this way you guys can judge for yourself if you want to take my advice or not :) ...don't worry, my feelings won't be hurt if you decide not to follow what information I provide here).
So... onto razor photography, or more widely and categorically known as product or even possibly "jewelery" photography. Not in the sense that it IS jewelry, but because you should photograph razors (especially when that nice SHINY blade is open) as if it were jewelry. I made mention in someone else's post about all the photos I see on ebay with a big shiny spot on the blade (making it a lot harder if not impossible to see any detail), but I didn't want to hijack his current post and instead requested if anyone ever has any questions to feel free to PM or start a thread about photography for razors... well lookee what we got here... A THREAD! :D
I say to photograph razors as if it was jewelry because there is a certain technique to photographing jewelery that always produces those wonderfully magic magazine type images. The majority of this deals with lighting and the way the light reflects (or doesn't reflect) off the razor. You want to use what's called diffuse lighting (I know some people here may or may not know what that means, so I'm not trying to offend anyone if it sounds a bit elementary). What is diffuse lighting? Look at a light bulb in a lamp with no lamp shade... that is NOT diffuse. Now look at it with the lamp shade, that is diffused (somewhat). Basically you diffuse light when you put something directly in front the light that is going to change the pattern of light after it goes through whatever material. Now generally pro photographers will use all kinds of fancy specially made diffusers and crap they buy because hey, they need tools and equipment that will serve them and last them a long time just like anybody else who does a regular job or a furiously good hobbyist. :)
So how do you diffuse lighting at home without buying a bunch of photography stuff? Use whatever you can find. Some old white t-shirts, thin white pillow cases (please don't use your SO's good shirts and pillow cases... lord have mercy I'll have 20 people lined up at my door tomorrow fuming at me).
I'll try not to repeat a lot of photography advice you can find by quickly googling but I did want to mention the diffuse lighting. It is probably the single biggest thing I see that people can improve on. A quick google turned up this link to jewelry photography techniques...
Jewelry photography tips - how to photograph jewelry
Now if you ask me (or if you don't even) I'm gonna tell ya that looks like an ad for the photography equipment you see them using. I will admit, that EZcube thing is a nice tool to have to take photos of products. But in all honesty you can have nearly the same thing by buying one of these...
Bed Bath & Beyond Product
in white from your local flea market or walmart or wherever you can find it dirt cheap and not pay that ungodly $15 bed bath and beyond is asking for it. I think last time I checked the local flea market here sells those for about $1-$2. Cut a hole out of one side (look how the EZcube is setup for reference) and take a couple/few OLD white t-shirts, cut them down to size and drape them over or use some small spring loaded clamps to keep them in place (whatever works for you).
As for lighting, no need to get fancy, if you want to add a little cheap lighting to the deal get yourself 1 or 2 of these...
2.5 Million Candlelight Power Cordless Spotlight
And set them to the outsides of your homemade EZcube. Play with distance of the lights to the cubes, different angles (up, down, front, back... etc).
And lastly but not leastly (because I'm tired and it's bedtime right now) try if you can to use a tripod (even for the digital point and shoots). The more still your camera is, the more likely you'll get a nice crisply focused picture (assuming you got your focus right :) ).
Those are probably the best things anyone here (save for the pro's here who are probably giggling themselves silly at my advice) can do to improve their razor photography and get good to great photos of razors without all the frustrating glare and yuckyness.
Again, feel free to ask questions, I love to share advice on photography as well as learn! If people have questions that might be more advanced, don't be afraid to ask them! I wanted to try to keep this post a little on the simpler side (although a bit lengthy) as most folks here probably haven't gotten into the whole DSLR world and they just want to know what they can do to improve the photos they take with their point and shoots.
Oh and one more thing, definitely play with the settings on your own camera and really LEARN how it works. That will save you a lot of post processing frustration. Ok ok I promise... good night now. :D
Nice post, dhatcher. You put a lot more effort into responding than I did. Very nicely done!
The curious reader ought to link up to this SRP thread as well :)
http://straightrazorpalace.com/gener...r-content.html
http://www.tc.umn.edu/%7Emaro0049/leekcomp4.jpg
A load of really excellent info from dhatcher! :tu
Light is important, if you don't have enough it won't matter what else you do!
Further to my earlier post on color balancing:
You can see that the initial photo is a little red as I didn't set the white balance on my camera prior to shooting. Here are the steps to correct easily:
1-find the level adjustment tool in your preferred photo editor
2-If it has dropper tools (see photos) use the dark one to set the black point by then selecting the Blackest area of the photo. Use the lightest dropper to select the whitest part of the photo.
3- enjoy.
If you don't have dropper tools, you can use the Histogram and set the white and black points manually. Do this by moving the white and black arrows in to the first visible peaks on the histogram. (The first visible peak may be a flat line). You can alternatively do this for the individual histograms for Red, Green, and Blue to get a much more fine tuned color balance.
Feel free to PM with Questions. I will post more on Histograms later!:p
When saving the photo, resize it to 4" x 6" at 72 dpi and use the "save for web" option if you plan on posting it. This will color shift the photo to web safe colors and compress it without losing tons of detail.
The link hoglahoo put up is also a great read for a little more in depth info of product/razor/etc type photography. Some good info from Tierdaen and very quick and easy. :)
I am sure some have linked to this or other versions of it in the past. But it has a particular usefulness in the realm of making razor porn!
Making a Light Tent
The nice thing about this is that you are pretty easily able to set a strong white point (it is better to use middle gray to do this but you can use white and atleast get decent color). Just fill the frame of your camera with the background in your box, shoot at an optimum exposure for the light you are using and select that photo when prompted by your manual white point setting.
As richardhead was kind enough to point out, a shroud can make a big difference in the out come of your photo too by helping your shiny blade reflect something white. (For more on that see tierdaen's post that Hoglahoo linked to earlier. Thanks again Lee!)
Hope this helps someone!
:tu
I love pictorial tutorials like that. Thanks! If it was explained any clearer I'd think I was being spoonfedQuote:
Originally Posted by sicboater
Some great stuff here. I started a thread a while back on this subject that took off nicely: http://straightrazorpalace.com/general/9521 This thread has added some good new info, particularly the software tricks.
One point I made in the earlier thread that I wanted to reiterate: To flatter the proportions of your razor, back up and zoom in. Getting in close distorts the razor's lines. Shooting from three or four feet back and zooming in to fill the frame will make the whole thing look more natural. :)
Josh
Here's another neat light box, the second link is an animated (with narration) version of the same light box.
http://www.pbase.com/wlhuber/light_box_light_tent
http://filebox.vt.edu/users/kmckevin...p/lightbox.swf
Just another option.
J.
could someone make sure this is in the wiki please
Thanks Doc, good suggestion. I'm working on it.Quote:
Originally Posted by Doc
Here's the wiki I threw together. Let me know if anyone would like to see anything else:
Lightbox Instructional - Straight Razor Place Wiki
Thanks to: Richardhead and Dhatcher for their contributions.
Bjørn has kindly taken care of that already.Quote:
Originally Posted by Doc
Any road, if anyone wants a thread or posting added to the Wiki, the best way to ensure that it actually ends up there is to follow the suggestions in http://straightrazorpalace.com/rules...-srp-wiki.html
Nice !
I think it says it all...
I used this website to make a light box.
http://www.studiolighting.net/homema...t-photography/
You can see the first pics I have taken with it here:
Straight Razor Place Forums - Ditch Doc's Album: My restorations
all I did was snap and unpload
I have a question, I've traditionally used two 500watt lamps on either side of my lightbox but I notice how some also use 2 or 4 clip-ons used on the front of the lightbox angled upwards to reflect back down on the subject. what're the advantages of doing this? is this a better idea than to use two lamps on either side (usually slightly angled up because the top of my lightbox is lined with aluminum foil to reflect light better within the box)?
Angles.
http://straightrazorpalace.com/works...ng-razors.html
Scroll down in this post to the diagram I drew. After that a light tent and whit presets with a macro (upclose) mode.