
Results 1 to 10 of 41
 73Likes
 LinkBack URL
 About LinkBacks
Hybrid View
-
12-08-2013, 11:42 PM #1At this point in time...


- Join Date
- Jun 2007
- Location
- North Idaho Redoubt
- Posts
- 27,069
- Blog Entries
- 1
Thanked: 13249 Edge Restoration - Heavy Bevel setting
I was working a pretty chipped up razor the other day and a thread popped up about setting bevel on bad razors, it seemed that the razor gods were saying take some pics while you work Glen

So here is what I did ...
First off every time the term Breadknifing is used it brings up negative responses because people only relate it to the 90° version which is useful when done correctly, so I am going to start calling it "High Angle Honing"
High Angle honing can be used from 90° in increments down to the spine touching the hone, or "Normal Angle honing"
My typical progression is the lowest angle I can use to re-set the edge to the correct geometry that also means taking the spine into account, those of you that flatten out an edge on a swayback spine are creating more issues then you are solving, so pay attention to keeping it all in line.. Myself, if at all possible I will lean toward a slight smile
So let's look at some pics and I will explain each step, keeping in mind that you can start your progression at any of these angles
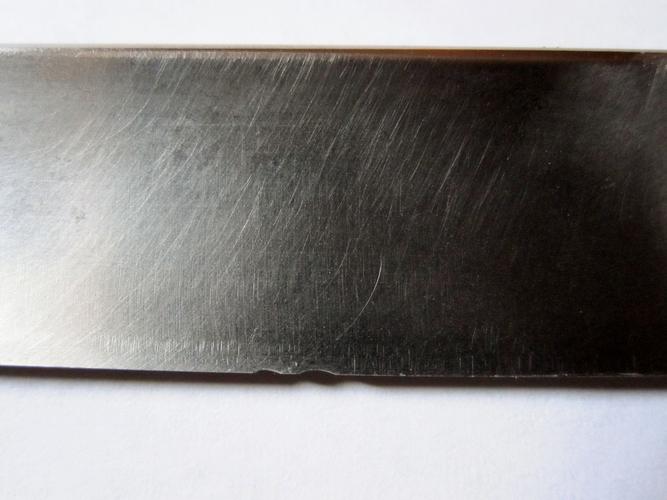
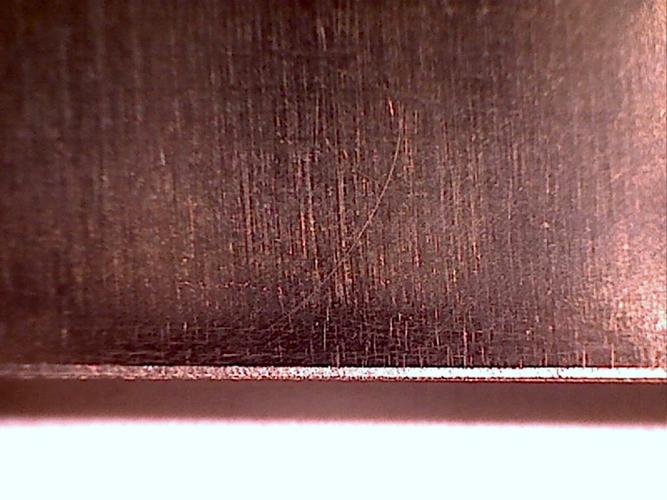
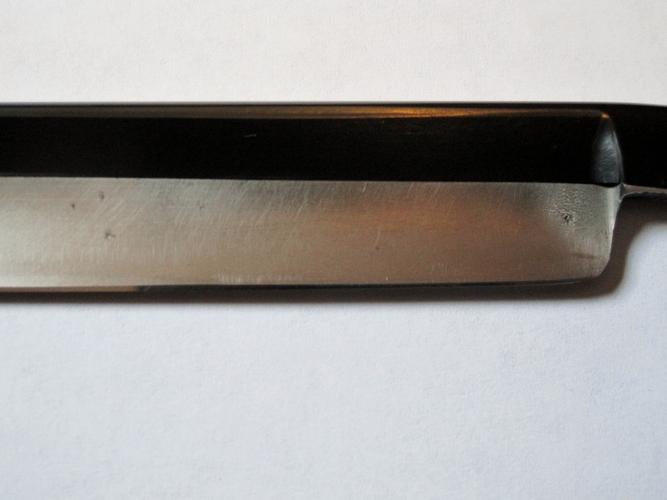
These pics are at 90° and here is why I decided on that angle, looking closely at that Triple+ chip there was a chance of that chip turning into a crack and running upward toward the spine if I had started lower and applied any pressure from the side.. This was the safest route to take by taking out most all of the chip at 90° then shifting lower slowly..
All this work is done on a DMT 325 plate
You will want to use the scratch in the steel just above and to the right as a reference spot as this progresses, I used that and if I had been a bit smarter when I started I would have colored the side before I started with a Magic Marker
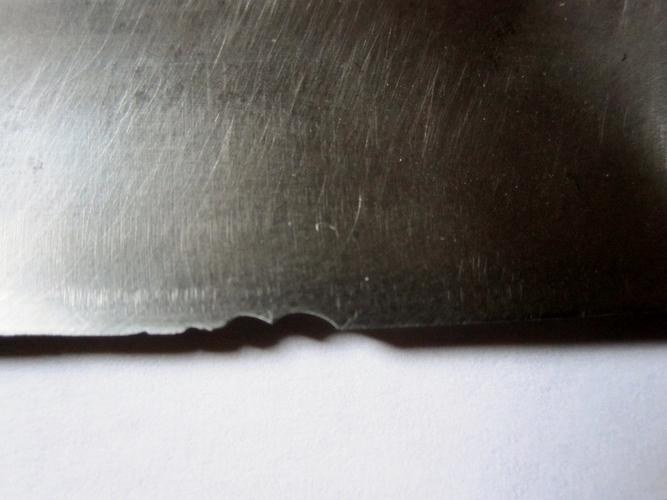
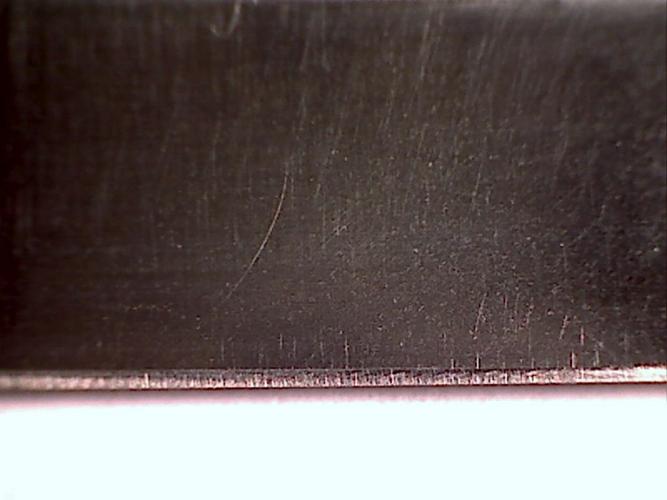
You can see as the chips slowly get smaller and smaller
Here the chips are nearly gone
Finally done at the 90° angle if you look very closely you can just barely make out two tiny dimples in the edge, this is where you want to stop and shift into bevel cutting so that you don't waste any steel...
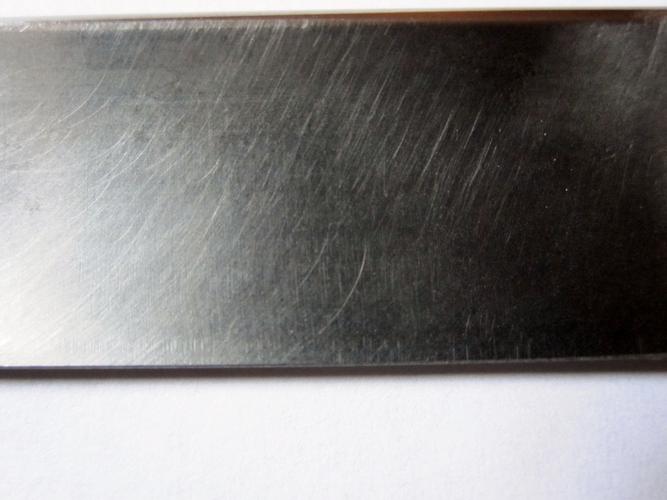
Time involved on the hone = about 1 minute, just make sure you keep checking the edge and the contour of the edge, on this razor I kept working the heel back so that when I started honing I would not have any issues back there.. I used very light pressure and just let the DMT do its job..
More coming
-
The Following 29 Users Say Thank You to gssixgun For This Useful Post:
10Pups (12-13-2013), BearCWY (10-17-2018), Cangooner (12-14-2013), Chevhead (12-13-2014), DduckyMark (10-04-2015), dta116 (08-08-2016), Fikira (05-03-2014), Geezer (05-27-2015), Grayelk (12-08-2015), greyrider1865 (01-04-2014), Haroldg48 (06-16-2015), Havachat45 (12-15-2013), JBHoren (12-09-2013), jmercer (01-21-2015), nipper (01-24-2016), OnTheRocks (02-10-2014), pcm (03-12-2015), Phrank (05-27-2015), Pi3 (11-20-2014), Sharp&Shiny (06-16-2015), SirStropalot (12-09-2013), Slawman (12-30-2016), Steve56 (12-01-2019), Stubear (06-16-2015), tinkersd (10-28-2016), Whizbang (08-17-2017), Willisf (06-16-2015), WW243 (12-08-2013), xiaotuzi (10-11-2016)
-
12-08-2013, 11:57 PM #2At this point in time...
- Join Date
- Jun 2007
- Location
- North Idaho Redoubt
- Posts
- 27,069
- Blog Entries
- 1
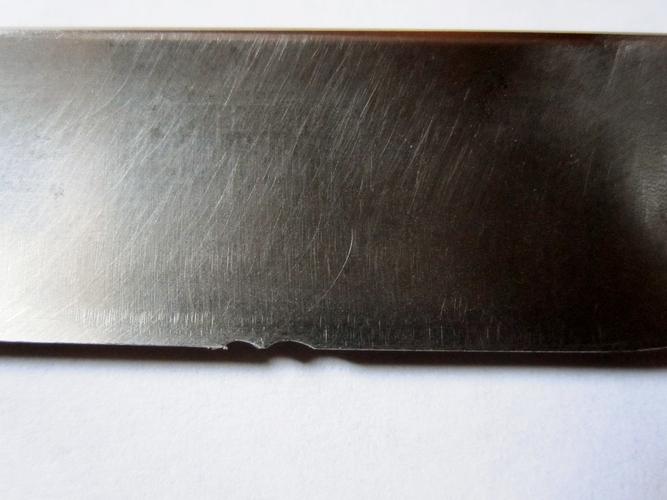
Thanked: 13249 Making the bevel in stages
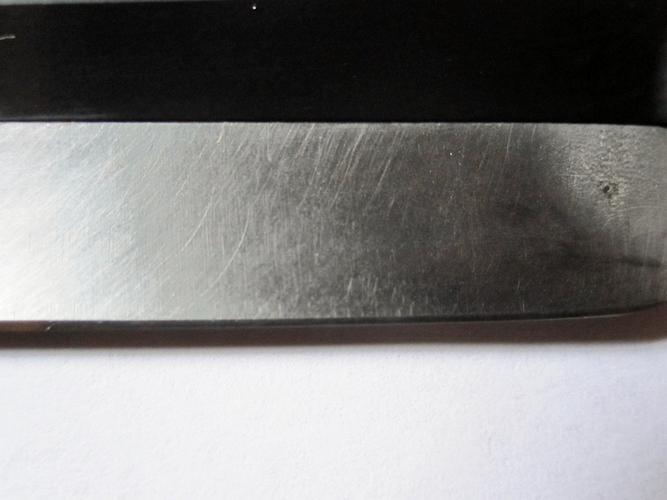
Still cutting on the DMT 325 Plate
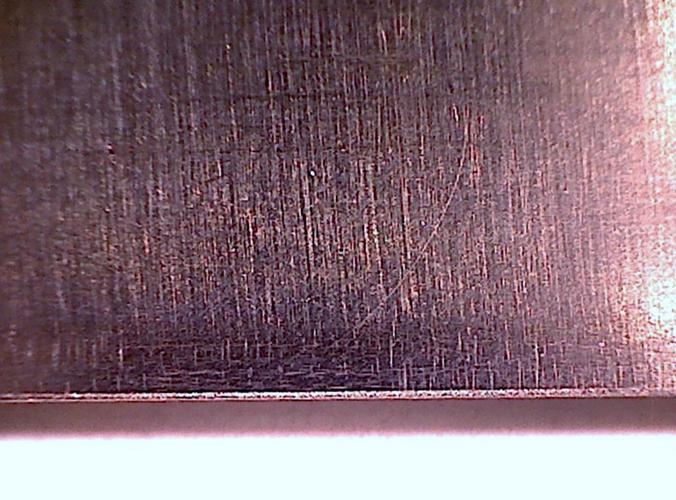
I am dropping down in angle and you can actually see the bevel starting to form..
Here I am using about a 60° angle doing circles and back & forth strokes to start the bevel about 20 of each
Time on hone about 1 minute
Taking it lower, down to about a 45° angle off the DMT you can see that the bevel has increased a slight bit, at this stage the edge is Knife sharp you can feel the bevel starting using the TNT of course it is pretty rough feeling because of the roughness of the DMT diamonds..
Time on hone again about 1 min doing about 20 circles here and 20 back and forth strokes
Touchdown !!! I have just dropped the spine to the DMT plate but I am using 3 layers of tape here, you can see that the bevel is almost a normal size but I use the 2 extra layers to keep the deep scratches from the DMT out of the bevel as much as possible..
Here I switch to standard 20 circles and 20 X laps, some things to note is that there is no burr there is no waste of steel, again reference the Scratch to the high right of where the chips were
This took me about 2 minutes to get the edge here on the hone, during this entire process of Edge restoration I used light even pressure letting the DMT to do the work
More comingLast edited by gssixgun; 12-09-2013 at 12:12 AM.
-
The Following 15 Users Say Thank You to gssixgun For This Useful Post:
ajkenne (12-14-2013), alx (06-02-2015), BearCWY (10-17-2018), Chevhead (12-13-2014), DduckyMark (10-04-2015), Grayelk (12-08-2015), JBHoren (12-09-2013), nipper (01-24-2016), Redfisher (12-26-2016), Sharp&Shiny (06-16-2015), SirStropalot (12-09-2013), Stubear (06-16-2015), tinkersd (11-19-2016), Willisf (06-16-2015), xiaotuzi (10-11-2016)
-
12-09-2013, 12:07 AM #3At this point in time...
- Join Date
- Jun 2007
- Location
- North Idaho Redoubt
- Posts
- 27,069
- Blog Entries
- 1
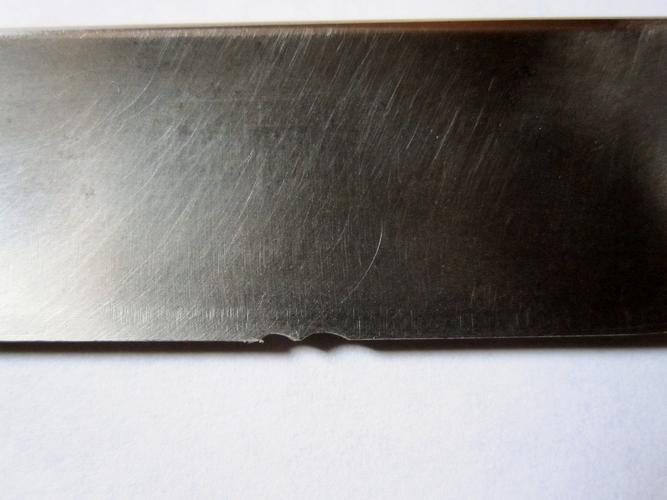
Thanked: 13249 Normal honing - Bevel Set
Now switching to the Chosera 1k and 1 layer of tape ie: Normal honing for me..
Again note that there is no burr formed here and the scratches from the DMT 325 have been taken out leaving no deep scratches at the High side of the bevel
Here are some more shots showing the entire edge geometry and contour
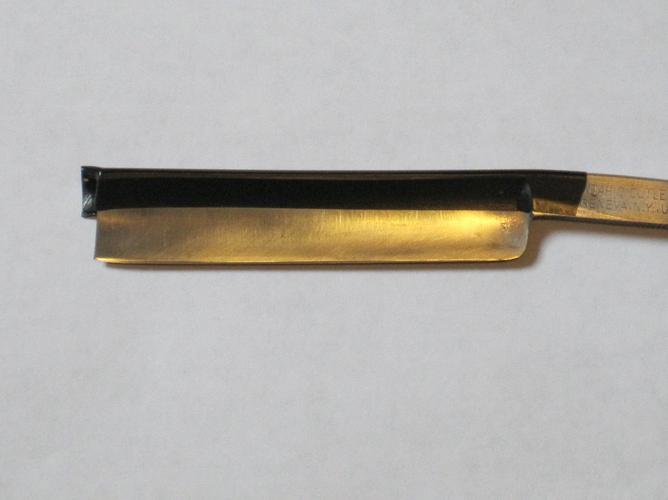
And the final of the bevel set, edge is passing all my tests for this stage and is ready to move up in the progression, total time on the hones is about 8 minutes I did 3 sets of 20 circles on the Chosera using medium pressure --> light pressure then 20 X stokes with light pressure and finally 5 or so X stokes at finisher pressure...
I hope the pics help show the process a little better, and you can see how the bevel is formed as you work through the process
Apologies as I seem to have lost 1 final pic in this process I thought I had a 60x pic of the final bevel set too
Last edited by gssixgun; 12-09-2013 at 12:10 AM.
-
The Following 25 Users Say Thank You to gssixgun For This Useful Post:
ajkenne (12-14-2013), BearCWY (10-17-2018), BobH (12-13-2013), bongo (12-09-2013), Chevhead (12-13-2013), ChopperDave (06-26-2015), DduckyMark (10-04-2015), Double0757 (12-11-2013), DoughBoy68 (05-27-2015), Grayelk (12-08-2015), JBHoren (12-09-2013), jfk742 (06-16-2015), jfleming9232 (12-09-2013), nipper (01-24-2016), pcm (03-12-2015), pfries (12-09-2013), Phrank (05-27-2015), RezDog (12-14-2013), Sharp&Shiny (06-16-2015), SirStropalot (12-09-2013), Stubear (06-16-2015), tiddle (12-09-2013), tinkersd (10-28-2016), Willisf (06-16-2015), xiaotuzi (10-11-2016)
-
12-09-2013, 01:34 AM #4Senior Member

- Join Date
- Jun 2010
- Location
- Andalusia, Alabama
- Posts
- 577
Thanked: 125
Excellent tutorial on "multi-angle" honing. Thanks for the step-by-step, Glen.
Last night, I shot an elephant in my pajamas..........
-
The Following 2 Users Say Thank You to jfleming9232 For This Useful Post:
gssixgun (12-09-2013), Sharp&Shiny (06-16-2015)
-
12-09-2013, 01:45 AM #5Senior Member

- Join Date
- Dec 2012
- Location
- Perth, West Australia
- Posts
- 1,431
Thanked: 497
Thanks for this Glen, it's going in my "Hints, Tips and tricks" file
 http://straightrazorplace.com/workshop/18504-welcome-workshop-how-do-i-where-do-i-what-do-i-answers-here.html
-
The Following User Says Thank You to bongo For This Useful Post:
gssixgun (12-09-2013)
-
12-09-2013, 04:46 AM #6Senior Member


- Join Date
- Dec 2010
- Location
- South Florida
- Posts
- 13,530
Thanked: 3530
You had me worried for a minute Glen,,,I thought you were going to hone that baby without tape,,,
 Chevhead likes this.
-
The Following User Says Thank You to Hirlau For This Useful Post:
gssixgun (12-09-2013)
-
06-15-2015, 11:01 PM #7Member
- Join Date
- Oct 2013
- Posts
- 53
Thanked: 4
I wish I'd seen this before taking some chips out of an old Torrey a few weeks ago. It came out well, but I took away more steel than I wanted to. I'll try this next time. Thanks for posting.
-
06-16-2015, 04:57 AM #8Senior Member

- Join Date
- Apr 2012
- Location
- Diamond Bar, CA
- Posts
- 6,553
Thanked: 3215
“I used this method and it really shortened the time it took to remove the chip, set the bevel and finish honing the razor due to not having to remove as much metal using this method.”
Actually… you are removing the same amount of metal, no matter how you do it.
You still have to hone to the bottom of the chip.bluesman7 likes this.


 Reply With Quote