Page 1 of 2 12 LastLast
Results 1 to 10 of 14
Like Tree22Likes

Thread: Replacing a couple of knots

  1. #1
    Senior Member JellyJar's Avatar
    Join Date
    Feb 2019
    Location
    Salida, CA
    Posts
    600
    Thanked: 94

    Default Replacing a couple of knots

    I've had these brushes for awhile and am finally getting around to replacing the knots.

    Name:  Brush befores.jpg
Views: 157
Size:  117.2 KB
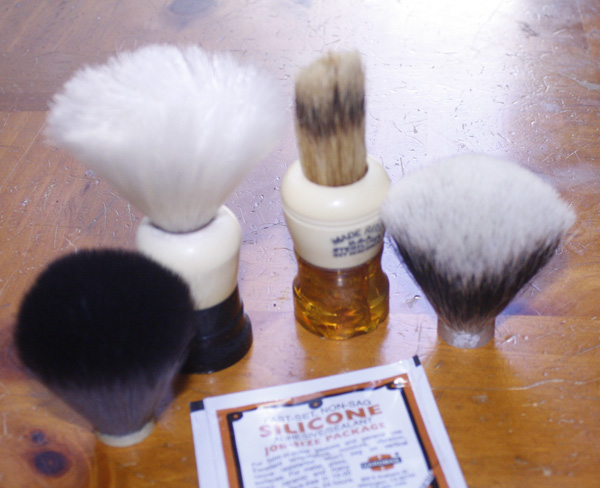
    The Ever-ready on the left is getting a Timber Wolf 20mm synthetic and the Made rite is getting a Maggards 20mm SHD badger fan.

    Name:  made rite with knot.jpg
Views: 244
Size:  19.5 KB
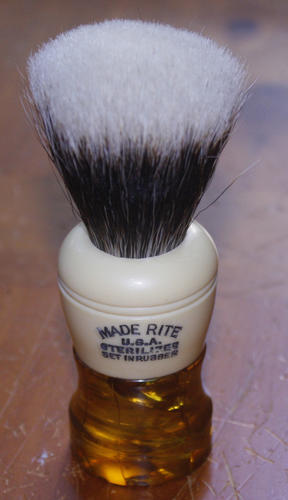
    The Made rite was really simple since it was already really loose. I used a few nickels to set the loft and it just needs to be glued up. I left it a little on the stiff side since I think it will soften up when it breaks in.

    Name:  broken ever ready.jpg
Views: 161
Size:  41.4 KB
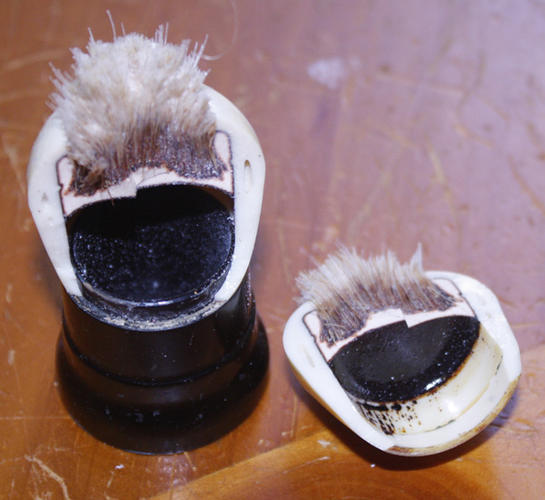
    The Ever-ready went a little sideways. I was cutting the bristles off with some side cutting pliers and it snapped. It should glue back together so I'm not too stressed about it.

    Now that I can see how it's put together I've got a couple of questions. It looks like the plug for the knot was poured/formed in the handle. I'd like to get the white part off, but it's pretty firmly attached. Any suggestions?

    Thanks in advance.

    Also the black part of the handle is completely hollow, so I'm not sure what to set the new knot against. Cut a chunk of wood dowel? I could do a stack of quarters, but I think it would make it too heavy. Again, any suggestions?
    BobH likes this.
    O'Toole's commentary on Murphy's Law: Murphy was an optimist.

  2. #2
    Skeptical Member Gasman's Avatar
    Join Date
    Nov 2016
    Location
    Colorado Springs
    Posts
    10,473
    Thanked: 2182

    Default

    All I can say is to clip away at it. The glue and all. You will get down to some little bits after some time and maybe a tiny grinding wheel on a dremmil will take care of the rest.
    What is the broken part made of?
    Geezer and HARRYWALLY like this.
    It's just Sharpening, right?
    Jerry...

  3. #3
    Senior Member blabbermouth PaulFLUS's Avatar
    Join Date
    Dec 2018
    Location
    Gainesville, FL
    Posts
    5,870
    Thanked: 594

    Default

    Sucks about the Ever-Ready. I'm not qualified to give advice. The Made Rite looks great though.
    JellyJar likes this.
    Iron by iron is sharpened, And a man sharpens the face of his friend. PR 27:17

  4. #4
    Senior Member JellyJar's Avatar
    Join Date
    Feb 2019
    Location
    Salida, CA
    Posts
    600
    Thanked: 94

    Default

    Quote Originally Posted by Gasman View Post
    All I can say is to clip away at it. The glue and all. You will get down to some little bits after some time and maybe a tiny grinding wheel on a dremmil will take care of the rest.
    What is the broken part made of?
    I was hoping to get the white area off so I could drill it from the backside. Chipping away it is then. At least the new knot is smaller than this one, so I might not need to get rid of all of it.

    The broken part is some form of plastic.
    O'Toole's commentary on Murphy's Law: Murphy was an optimist.

  5. #5
    I love Burls....... and Acrylic HARRYWALLY's Avatar
    Join Date
    Mar 2012
    Location
    Baden, Ontario
    Posts
    5,475
    Thanked: 2284

    Default

    Cut a piece of cardboard to fit tightly in the hole, at the proper depth. Then you could glue gun it in to seal it up. Just something to prevent the epoxy from running down when you set the knot.

    Or, pour it full of epoxy, to the height you want the base of the badger knot to sit at. I've done this before and it works well. A little extra weight feels nice in the hand. At least to me it does.
    Burls, Girls, and all things that Swirl....

  6. The Following User Says Thank You to HARRYWALLY For This Useful Post:

    JellyJar (11-08-2020)

  7. #6
    Senior Member
    Join Date
    Aug 2016
    Location
    Tel Aviv, Israel
    Posts
    653
    Thanked: 174

    Default

    I usually use wine bottle cork cut to the desired height.
    HARRYWALLY, MrZ and JellyJar like this.

  8. The Following User Says Thank You to dimab For This Useful Post:

    JellyJar (11-08-2020)

  9. #7
    Skeptical Member Gasman's Avatar
    Join Date
    Nov 2016
    Location
    Colorado Springs
    Posts
    10,473
    Thanked: 2182

    Default

    +1 to that!
    I've added 1/2" steel Nuts in the bottom of an empty handle. Toss in a quarter or two to get the right higth, then filler up with epoxy being careful not to over fill. You need to let it sit for a day to be safe but it sure makes for a nice heft in your hand when lathering.
    JellyJar likes this.
    It's just Sharpening, right?
    Jerry...

  10. The Following User Says Thank You to Gasman For This Useful Post:

    JellyJar (11-08-2020)

  11. #8
    Senior Member JellyJar's Avatar
    Join Date
    Feb 2019
    Location
    Salida, CA
    Posts
    600
    Thanked: 94

    Default

    Thanks for all the good ideas, I really appreciate it. I thought about filling with epoxy, but wasn't sure it was the best approach. A little wine cork filler would reduce the amount of epoxy I need. I'll play around with adding weight before I make it permanent.
    MrZ likes this.
    O'Toole's commentary on Murphy's Law: Murphy was an optimist.

  12. #9
    Senior Member blabbermouth
    Join Date
    Apr 2012
    Location
    Diamond Bar, CA
    Posts
    6,553
    Thanked: 3215

    Default

    I would first, glue the handle back together with CA glue, because the CA glue line is invisible. It does not need to be super strong, because once you glue the knot in the handle, it will be glued from inside.

    If you try to remove the filler and glue from the broken pieces you risk damaging the edges and you will have gaps or a dirty seam.

    Once dry, remove the interior with a large drill bit and drill press, clean up with a Dremel with a cutting bit and small sanding drum, they sand easily. Hold the handle with a wood clamp, wrap the handle with some craft foam or few wraps of duct tape when you drill. Aim for a tightish fit, not too loose, and not too tight. You only need to remove enough to fit the knot.

    You do not need to fill the hollow handle, I have used coins, wood dowels, corks, and nothing, just gluing the knot in with clear E6000. I have re-knotted several vintage handles and to date, none have failed. E6000 is inexpensive, easy to apply and clean up. You do not need epoxy, it is messy.

    Test fit your knot and wrap your brush, with masking tape just above the glue line to keep the brush and handle clean and easy to wipe off any squeeze out, but most of the glue will go into the handle, if you go slow and slightly twist the knot as you insert in the handle.

    Put an even coat on the handle sides with a wood coffee stir stick and a thin coat on the knot only about halfway on the epoxy on the knot.

    Once the glue has dried, you can trim any squeeze out with a sharp Exacto knife.
    Last edited by Euclid440; 11-08-2020 at 01:57 PM.
    JellyJar likes this.

  13. The Following User Says Thank You to Euclid440 For This Useful Post:

    JellyJar (11-08-2020)

  14. #10
    Senior Member JellyJar's Avatar
    Join Date
    Feb 2019
    Location
    Salida, CA
    Posts
    600
    Thanked: 94

    Default

    Quote Originally Posted by PaulFLUS View Post
    Sucks about the Ever-Ready. I'm not qualified to give advice. The Made Rite looks great though.
    Thanks for the sympathy Paul, but I only paid $4 for this brush so I'm not heavily invested. It's a clean break and should glue back up almost invisible. I like the way it looks so I hope to save it.
    O'Toole's commentary on Murphy's Law: Murphy was an optimist.

Page 1 of 2 12 LastLast

Posting Permissions

  • You may not post new threads
  • You may not post replies
  • You may not post attachments
  • You may not edit your posts
  •