:mad::(:td:cen:gaah:
Attachment 164862
Printable View
:mad::(:td:cen:gaah:
Attachment 164862
What Happened?
It looks like you were down to sanding and finishing!
Sorry to see it.
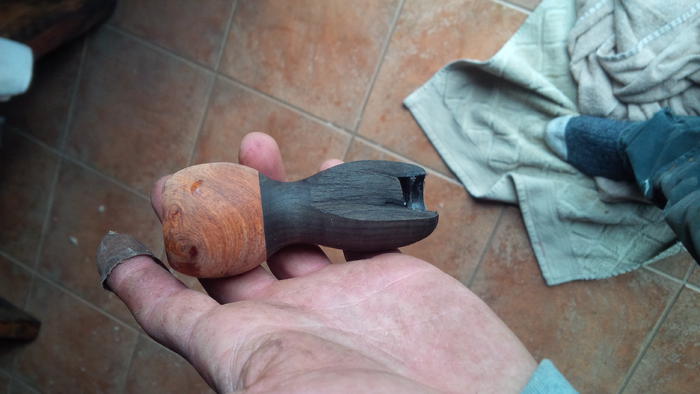
Actually I hadn't hit it with paper yet. I was still in the shaping process. I was Epoxying in a button of Tagua nut in the end. I had it in and decided to give it another couple taps with the wood mallet. FAIL!!
4 hours of work down the drain.
I think my hole for the button was too deep, and to much taper on the button. And of course to many taps with the mallet.
I'm hoping to Frankenstein a piece of something in place, on the diagonal. We'll see how it works out.
Cut it off...re glue and start again...
Not that I have ever done this... Lol
Good luck and keep us in the loop.
Sorry to see that happen. It looked like it would have been nice once completed.
Attachment 164875
Attachment 164876
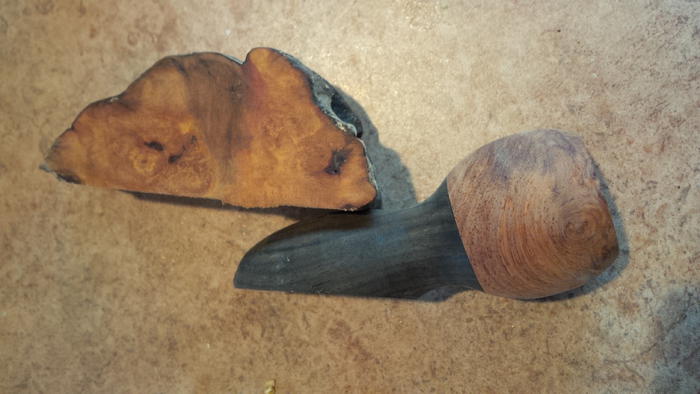
A piece of unknown burl. Cut and sanded the two pieces flat. Using Titebond iii wood glue. I'll trim down the excess burl after its dry. Then back on the lathe to see if I can save this piece.
Oh boy, sorry to see that happen to you. Know the feeling and frustration that can cause. Sounds like you have a plan the piece though. Good luck.
Bob
That sucks:( carry on as best you can.
Prolly will turn out cool! I think you could have used a bigger piece of burl to glue to it, though! :D
I literally just laughed out loud there Tom. To be honest I bought this huge candle holder at a garage sale for $5. It was a solid burl of some sort that I've chopped up.Quote:
Originally Posted by sharptonn
For some reason that glued on chunk of burl reminds me of the joke about a guy who walks into a bar with a frog on his head.;)
Bob
I think that will turn out great,sometimes bad stuff just happens:(
Attachment 164884
Oh Geez the badger too. That's gut wrenching but it happens.
Dang! Just how DOES that happen, Pixel? :confused:Quote:
Originally Posted by pixelfixed
That looks to me like a BEAUTIFUL piece of desert ironwood, my friend. If it is, then you'll want to take it easy on the lathe - that is some tough material.Quote:
Originally Posted by HARRYWALLY
Rich
It's Amboyna burl, indian ebony, and now also an unknown burl segment. This burl is definitely not an ironwood. It's on par with poplar for density.
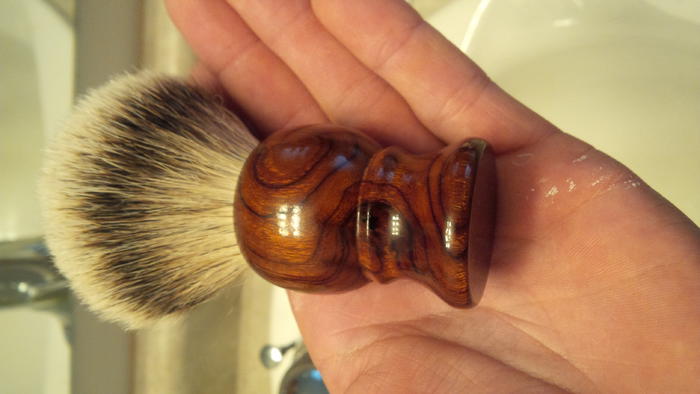
This is a desert ironwood brush I did for myself a while back. 26mm tgn grade A. I love this brush a lot.
Attachment 164896
From the looks of it, it'll be a nice contrast to the rest of the handle. Good luck.
Wife was really pissed on one dark and stormy night,got her Cleaver and went bonkers on some of my brushes:(Quote:
Originally Posted by sharptonn
Wow! You must have been a bad boy!
Did you spend your anniversary making brushes because you forgot what day it was ?Quote:
Originally Posted by pixelfixed
Oh! Allmost sorry I asked. Do you keep those around still? No wonder why you toss the Palmeras in a drawer. She won't think you care about them! :medvl:Quote:
Originally Posted by pixelfixed
That would be one day in aug. as I recall,maybe even into sept,we got married in that time frame, 35 yrs ago.Quote:
Originally Posted by 10Pups
Whats her name knows the dates,I have no clue,come to think of it, have seen her in a couple days, will go look around around the yard.
Yeah. She might have choked on brush handle pieces! Better go look!
Will ck it out in the morn,is dark outside,time to go to bed,the wif is like an old copper penny, she always shows up:)Quote:
Originally Posted by sharptonn
Sorry to see the fail. Looks like you have a good remedy for it. Boy I would hate to post some of my fails. A couple were pretty ugly. I think one of them even included some blood on it too. Thats why, when I have a fail I don't take pictures, I look around and see if anyone saw me do it and then gently place it in the bottom of the scrap bucket.
Keep us posted though. It looks as though it will take an interesting turn!!
Good luck.
Ray
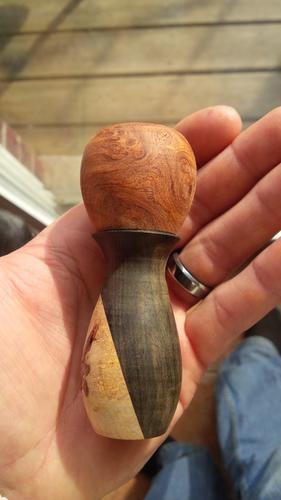
Had about a half hour today while my 2 girls were napping. I got the handle trued up, changed the top profile a bit, and got a hidden bark void filled with CA. I still need to cap the end, I'm still thinking Tagua nut but I might do Buff horn. We'll see how I'm feeling tomorrow about it.
Attachment 164989
Very nice save. I like it.
COOL! I dig a save! What kind of finish will you use? Looks great! :rock:
I'll post it when I get to it. I've been sucking in marine teak oil using a vacuum chamber. It's been working well. Let that cure for a week, Then a sanding sealer, friction polish, ren wax.
Wow! I just love it when s**t happens because the cure is often better than the original. As a creative artist I never look at "mistakes" as a bad thing. For me they lead to a better finished product. Let me know when it's ready and you are thinking of selling that particular handle.Quote:
Originally Posted by HARRYWALLY
I think that will turn out Great,cannot wait to see the end result:)
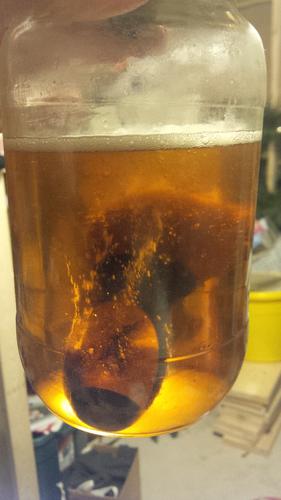
I got the Buff horn on the bottom last night and also put it into my vacuum chamber as well. This is how I've been sucking in my oil, cheap, easy and does a decent job at getting that oil deep into the wood. It's one of those rubber wine bottle vacuums to keep your wine, after its been opened. Works surprisingly well for this. Check it out.
Attachment 165075
Here it is after about 21 hours in the mason jar vacuum. Next, I'll leave it to dry for a few days and put it back on the lathe Fri. Sand it up and finish doing the finish.
Attachment 165077
Gee....I like it BETTER! Now, you will make a handle, bust it on purpose, and fix it! ;) Very nice!
Thats going to be really nice,how did you adhiese the buff horn?
The more I see it the more I want it. Harrywally please PM me with possible price and brush options. My BAD will be glad (my bank account not, but what the hell, gotta lather the face. Might as well be in style.)
I trued up the bottom of the handle, then took a spear point tool and cut small circle recesses in towards the middle for the epoxy to grab onto. I made sure that I stayed away from the edge. The Horn I made sure the side to be glued was completely flat, and then drill 1/16" holes, randomly, 1/16" deep. Also for the epoxy to grab onto, also staying away from the outer edge. Used the tailstock as the clamp with a piece of maple in between the horn and the tailstock tip, to not mark the horn.Quote:
Originally Posted by pixelfixed
Harry, Nothing Wrong With That Work Bubba! :bow:I'd be Proud to be seen using that Brush :tuQuote:
Originally Posted by HARRYWALLY
NICE JOB!!!
Damn Son! :bow:bow
PM sent.......Quote:
Originally Posted by Razorfeld