
Results 1 to 10 of 31
 126Likes
Thread: Attempting a couple brushes
 LinkBack URL
 About LinkBacks
Hybrid View
-
11-22-2016, 03:47 AM #1Senior Member


- Join Date
- Jun 2016
- Location
- NH
- Posts
- 1,924
Thanked: 1363 Attempting a couple brushes
I've recently been getting more into different brushes and now I find myself trying to make a couple handles. I have no prior experience with brush handles and only simple tools. But I have a couple knots on the way so I'm trying my hand at making something that is functional and possibly will look alright too.
I've only just begun but here's what I have so far. I have a thick (2 inch) slab of bubinga that I picked up a few years ago at a local hardwood dealer and I also have a chunk of "choke cherry" that I rough cut with a chainsaw from a tree I took down maybe 16 years ago.
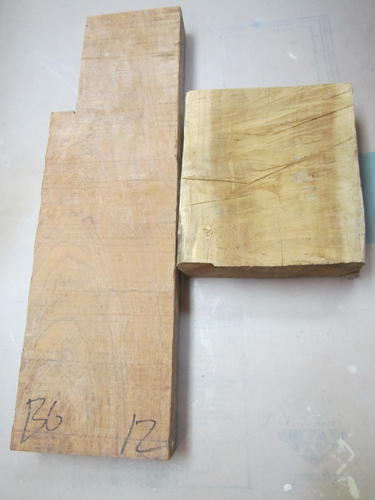
I cut a piece out of each with a hand saw and then rough shaped with a small plane
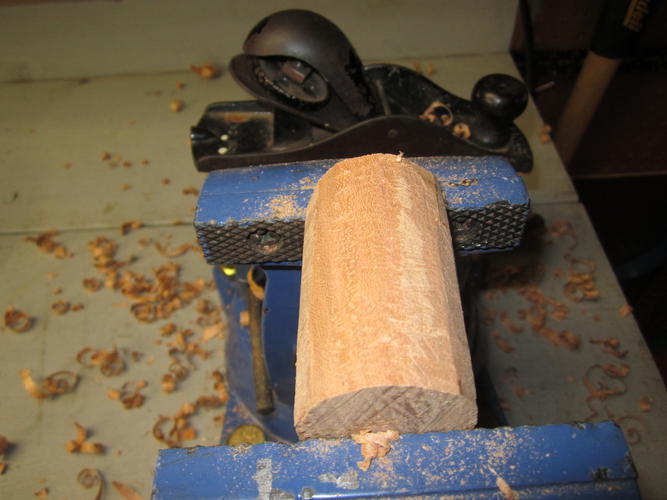
Then I shaped them into cylinders with a rasp.
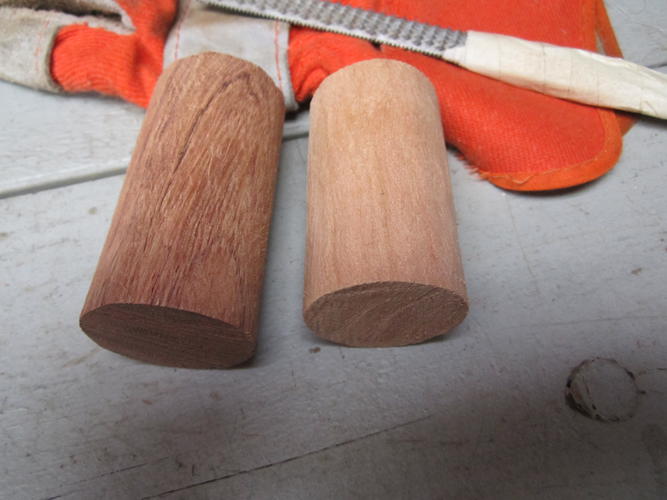
That's all I have so far. I don't know what shape I will make them and I need to study about the hole and setting the knot in there. I don't have a lathe so I plan on just shaping them into something by hand. Again, first attempt, limited tools and experience, just going for functional mostly and if it works I'll be happy with them. Anything I should know before moving forward?"Go easy"
-
-
11-22-2016, 05:22 PM #2
I have no advice to give however I will say when you have a lathe and a shop full of power tools you can turn these things out by the dozens.(I'm not knocking guys with power tools here) When you do it all by hand in my book that is a real accomplishment and something to be really proud of.
No matter how many men you kill you can't kill your successor-Emperor Nero
-
11-22-2016, 05:58 PM #3Senior Member

- Join Date
- Jan 2012
- Location
- Waukesha, Wisconsin
- Posts
- 1,943
Thanked: 390
Looking good so far! Maybe matching brush and scales in the future?
xiaotuzi likes this.
-
11-22-2016, 06:45 PM #4~ Life is but a Dream ~


- Join Date
- Dec 2014
- Location
- Oakham, Ma.
- Posts
- 3,844
Thanked: 1218
So far..so good!
That's an awesome project to take on without power tools.
I'll bet your results will inspire some of us that are in the same boat to give it a try.
Keep us posted with the progress.
Good luck!
Pete <:-}xiaotuzi likes this."Life is short, Break the Rules. Forgive quickly, Kiss Slowly,
Love truly, Laugh uncontrollably, And never regret ANYTHING
That makes you smile." - Mark Twain
-
The Following User Says Thank You to petercp4e For This Useful Post:
xiaotuzi (11-22-2016)
-
11-22-2016, 08:25 PM #5Senior Member
- Join Date
- Jun 2016
- Location
- NH
- Posts
- 1,924
Thanked: 1363
Thanks, guys! I am waiting to receive the knots and it is likely to be a while with shipping. I want to make the holes but not sure of the diameter and depth, how much room to leave.
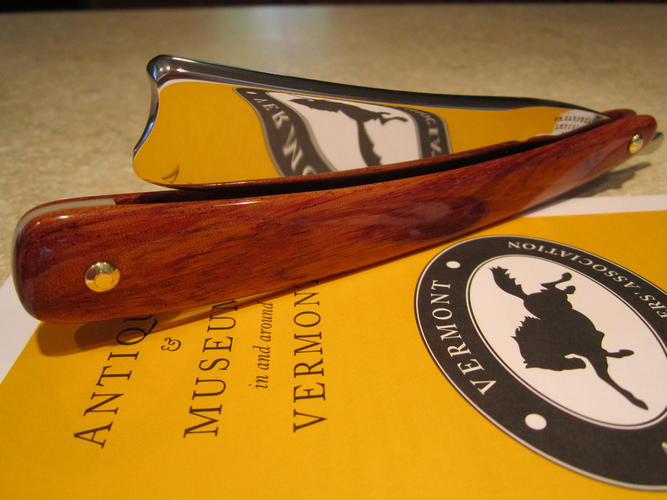
@ Dinnermint - here's a Wm. Hargreaves I restored a few years ago using wood from that same piece of bubinga, so soon I'll have a brush to go with it (if all goes well). I was into CA finishing at the time but not so much anymore. I was thinking something like tru-oil or tung oil for the finish on the brushes.
 "Go easy"
-
The Following User Says Thank You to xiaotuzi For This Useful Post:
dinnermint (11-22-2016)
-
11-22-2016, 10:41 PM #6Senior Member

- Join Date
- Aug 2016
- Location
- AK
- Posts
- 214
Thanked: 97
Very nice job on the razor, looks great.
Im going to say your brushes will turn out nice as well by the looks of your start and the finished product on the razor. What size knot did you get for the brush?
Once you get your knots in you can be sure about the bores. I use mostly 24mm knots but some of them have a big bulge above the plug so they need a larger hole, or stepped hole. If there is no bulge a 1" bore does nicely on the 24mm knots.xiaotuzi likes this.
-
The Following User Says Thank You to AKmik For This Useful Post:
xiaotuzi (11-23-2016)
-
12-22-2016, 11:08 PM #7Senior Member
- Join Date
- Oct 2016
- Location
- California
- Posts
- 109
Thanked: 20
Wow! I really like the finish on the handles, they look great. Congratulations.
Last edited by MajesticShaver; 12-22-2016 at 11:09 PM. Reason: Wanted to add more.
xiaotuzi likes this.
-
The Following User Says Thank You to MajesticShaver For This Useful Post:
xiaotuzi (12-23-2016)
-
12-22-2016, 10:38 PM #8Matt

- Join Date
- Dec 2015
- Location
- Albany, NY
- Posts
- 971
Thanked: 260
Ive used a small piece of brown grocery bag paper to smooth the tru-oil between coats. I found that trick on a knife site somewhere. It helps get any dust bumps out as well.
-
12-22-2016, 11:06 PM #9~ Life is but a Dream ~
- Join Date
- Dec 2014
- Location
- Oakham, Ma.
- Posts
- 3,844
Thanked: 1218
You should be tickled pink wit the results!
I would be proud to own either one of those beauties.
A lathe would be nice but I'm guessing that you got way more satisfaction doing it all by hand.
Congratulations on a fantastic job!
Pete <:-}"Life is short, Break the Rules. Forgive quickly, Kiss Slowly,
Love truly, Laugh uncontrollably, And never regret ANYTHING
That makes you smile." - Mark Twain
-
The Following User Says Thank You to petercp4e For This Useful Post:
xiaotuzi (12-23-2016)
-
12-23-2016, 03:45 PM #10Matt
- Join Date
- Dec 2015
- Location
- Albany, NY
- Posts
- 971
Thanked: 260
The paper bag is for smoothing out the finish between coats. I use my finger to apply as well.
-
The Following User Says Thank You to MW76 For This Useful Post:
xiaotuzi (12-23-2016)


 Reply With Quote
