
Results 1 to 10 of 18
 22Likes
 LinkBack URL
 About LinkBacks
-
06-03-2011, 08:21 PM #1Information Regurgitator


- Join Date
- Aug 2009
- Location
- So Cal
- Posts
- 578
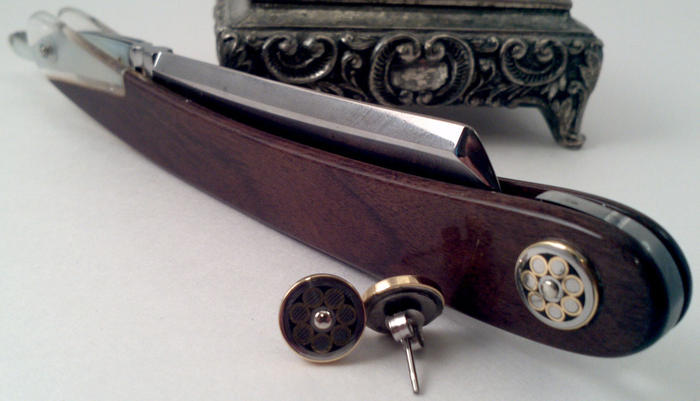
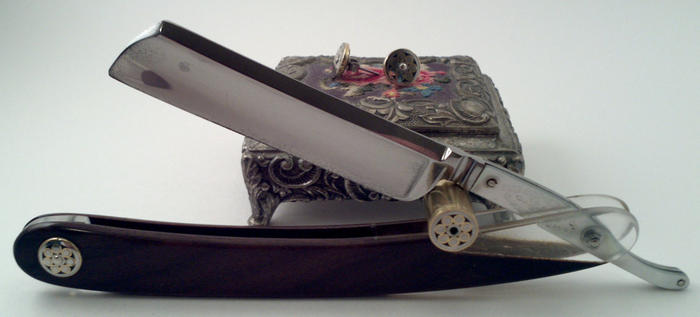
Thanked: 171 JR Torry in Bolivian Rosewood / Clear Acrylic
OK, this one was an experiment of mine and after numerous test runs, two failed attempts, and many months of swearing. I finally have a completed work, it has some minor imperfections throughout but I learned so much on this one. I wanted that pearl looking tang to always be visible so I fused a window to my wood, and to keep the design balanced I went with clear Acrylic spacer at the wedge.
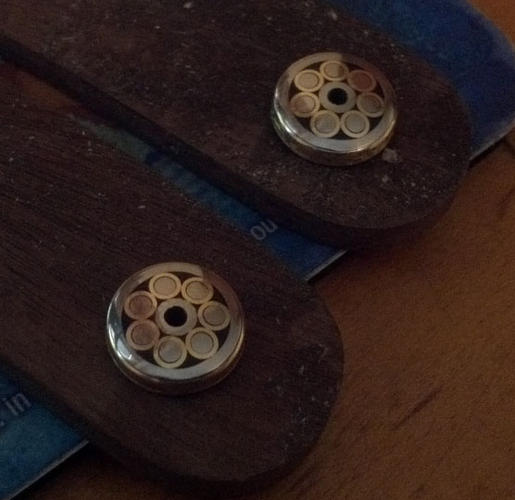
I inlaid some mosaic washers I made for an added touch. Mom liked the washers so much she asked if I could cut her some earrings from the stock; who could say no to that?
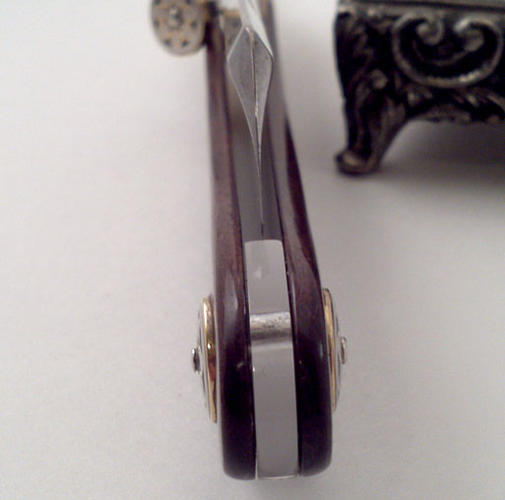
Blade: JR Torry 5/8 with MOP (possibly imitation MOP) on the tang
Scales: Bolivian Rosewood and Clear Acrylic finished in CA Glue.
Pins: Nickle pins with SS washers at the tang, Inlaid Mosaic washers at the wedge.
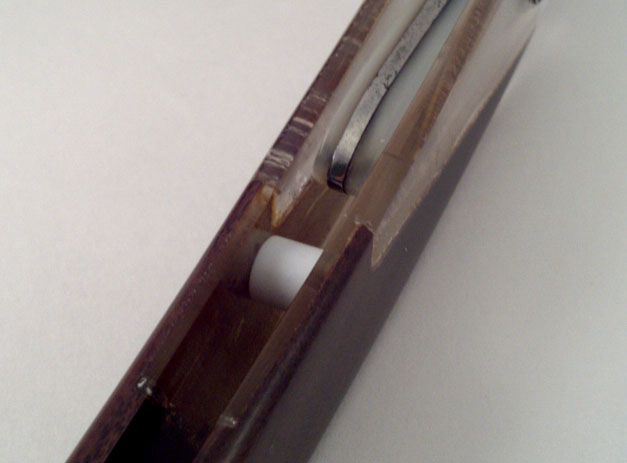
3rd Pin: Hidden in the Scales using SS pin, SS tube covered in white plastic tube.
Wedge: Clear Acrylic Spacer
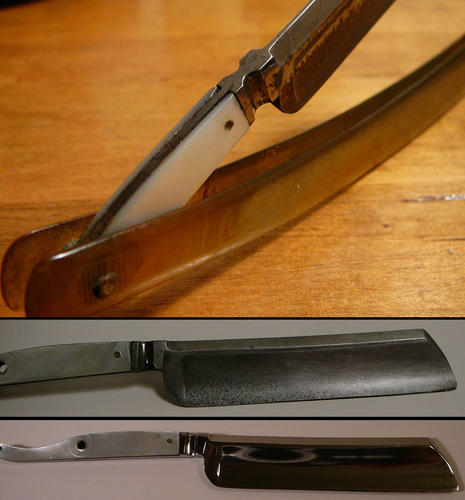
This Blade had extensive cell rot damage when I rescued it...
Washers created by using SS and Brass pins and black epoxy.
Here's my parts ready to go. I had to punch the inner tang washers myself for size issues. You can also see where I inlaid SS washers on the inside of the scales to hold the hidden 3rd pin.
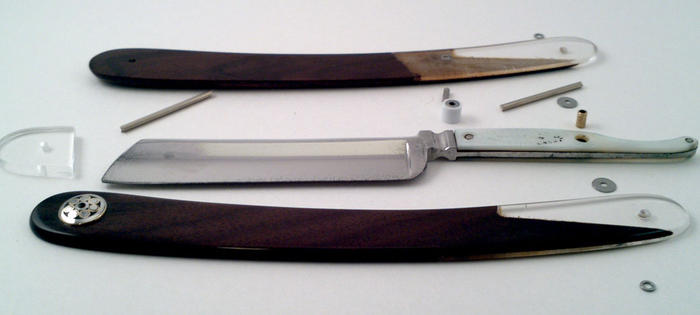
The 3rd pin had to be invisible on the outside because the placement wouldn't have looked right otherwise. I used a spacer for the wedge so the blade rested low, so I wanted a stop to catch the blade to keep the tang aligned with the acrylic which is why the 3rd pin was required.
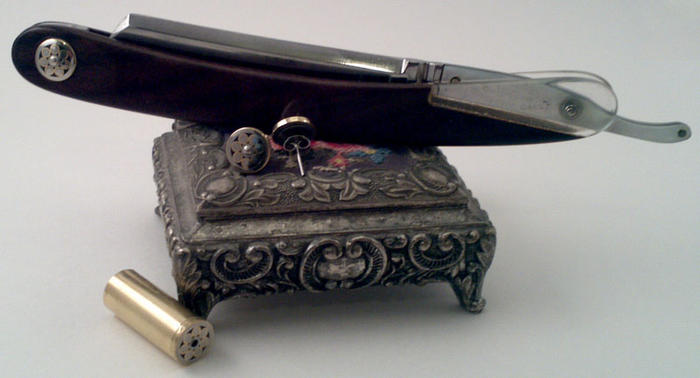
Here are just more angles of the completed razor...
-
06-03-2011, 08:27 PM #2Razor Vulture


- Join Date
- Oct 2010
- Location
- Lone Star State
- Posts
- 26,208
Thanked: 8626
I was intriqued by the title and now I know what is was about! Unreal razor! nice work!
"Don't be stubborn. You are missing out."
I rest my case.
-
The Following User Says Thank You to sharptonn For This Useful Post:
TheBaron (06-04-2011)
-
06-03-2011, 08:36 PM #3At this point in time...


- Join Date
- Jun 2007
- Location
- North Idaho Redoubt
- Posts
- 27,194
- Blog Entries
- 1
Thanked: 13250
I really like what you did with this, a ton of innovative ideas

Other then the huge waste of time making the mosaics you can buy them already made,,, I am much lazier then you LOL
Mosaic PinsMartin103 likes this.
-
The Following User Says Thank You to gssixgun For This Useful Post:
TheBaron (06-04-2011)
-
06-03-2011, 08:40 PM #4Information Regurgitator
- Join Date
- Aug 2009
- Location
- So Cal
- Posts
- 578
Thanked: 171
yea, that exact site is what gave me the idea, but they didn't have any that looked the way I wanted so I had to make my own. Originally Posted by gssixgun
 gssixgun likes this.
-
06-03-2011, 09:34 PM #5Senior Member

- Join Date
- Apr 2011
- Location
- California
- Posts
- 151
Thanked: 24
Really nice looking razor. Thanks for sharing how it all went together.
-
The Following User Says Thank You to tfrod For This Useful Post:
TheBaron (06-04-2011)
-
06-04-2011, 12:58 AM #6The Great & Powerful Oz

- Join Date
- May 2008
- Location
- Bodalla, NSW
- Posts
- 15,638
Thanked: 3751
Wow, that was quite an effort with rewarding results too. Nice work.
The white gleam of swords, not the black ink of books, clears doubts and uncertainties and bleak outlooks.
-
The Following User Says Thank You to onimaru55 For This Useful Post:
TheBaron (06-04-2011)
-
06-04-2011, 09:10 PM #7Senior Member

- Join Date
- Mar 2011
- Location
- North Carolina
- Posts
- 407
Thanked: 72
SO COOL! Man you got my wheels turning now. Fantastic job.
-
The Following User Says Thank You to tumtatty For This Useful Post:
TheBaron (06-04-2011)
-
06-07-2011, 06:13 PM #8Information Regurgitator
- Join Date
- Aug 2009
- Location
- So Cal
- Posts
- 578
Thanked: 171
thanks for all the nice comments guys, when I started this I feared it may end up looking a little Frankenstein but I was happy with the results. Although I may have to do a few normal razors before I can attempt to out do this one.
-
06-08-2011, 02:48 AM #9Poor Fit
- Join Date
- May 2010
- Posts
- 4,562
Thanked: 1263
Looks awesome. I'm not a big fan of the fancy washers but they seem to fall right in line with everything. Nice work.
-
The Following User Says Thank You to Catrentshaving For This Useful Post:
TheBaron (06-08-2011)
-
06-08-2011, 02:56 AM #10Junior Member

- Join Date
- Jun 2011
- Location
- Alabama
- Posts
- 9
Thanked: 7
Very nice job. Thanks for the post.
-
The Following User Says Thank You to Skullring For This Useful Post:
TheBaron (06-08-2011)


 Reply With Quote