
Results 1 to 10 of 13
 13Likes
 LinkBack URL
 About LinkBacks
Hybrid View
-
04-12-2014, 03:43 AM #1Junior Member

- Join Date
- Mar 2014
- Location
- Sydney, NSW, Australia
- Posts
- 27
Thanked: 0 Restoring Granddad's old straight with an ultramodern flourish
Hi all,
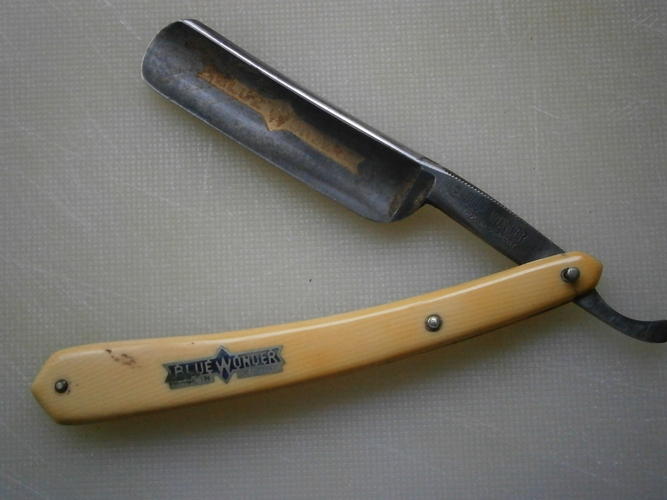
After inheriting a bunch of my Grandfather's old straight razors, unfortunately (or fortunately , depending on your point of view), the best of them was a nice Blue Wonder that had a broken scale.
I've decided to give it some new scales made out of carbon fiber. I love the look of CF but am a bit put off by the price of a new razor made out of one... besides, I reckon I can pull this off.
This is the first time I've worked with CF and the first scales I've made, its an ongoing project that I'll need to complete over a few weeks at least, since with my job and the family, spare time to make a mess is limited. Any hints on how to proceed are welcome - I've looked at some youtube vids, but because of the CF toughness and the dust, I'm planning on taking a slightly different approach.
I have a well equipped workshop, so outlay for powertools is limited to a good beltsander that can be locked into a vise, which I've been meaning to get for ages anyway.
First of all, I've dug around and found safety gear of large safety glasses, a good dust mask (meets a high international standard for dust), disposable gloves, boots, earmuffs and disposable overalls.
Acquired a
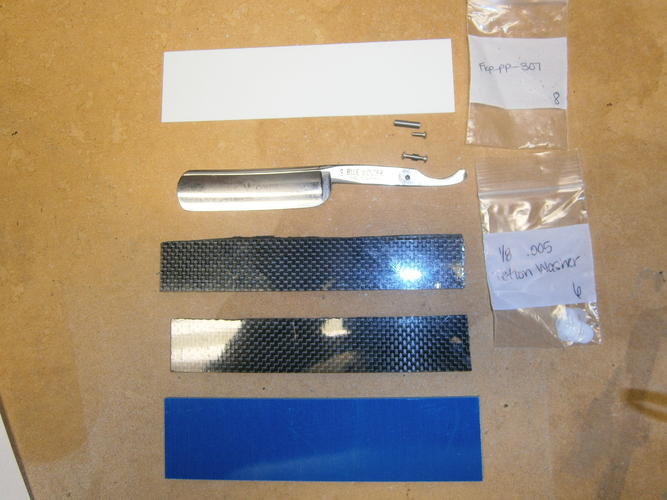
1. A4 sheet of 3mm CF from ebay, I'm amazed at how strong and light this stuff is... cost was around A$60 delivered from China via ebay (heaps cheaper than buying locally). I'll only use a small amount.
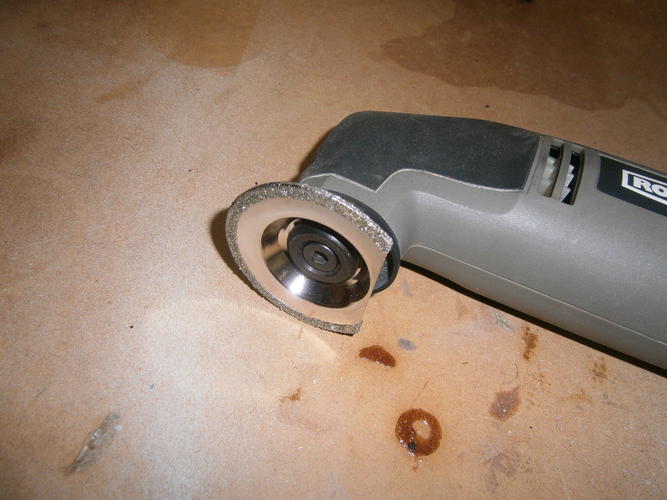
2. A diamond saw for a Sonicrafter (an oscillating tool). Cost ~A$30
4. A nice new 1/8 inch drill for enlarging the hole in the razor. Not expensive.
3. Ordered a number of 1/8 inch diameter pivots and associated tiny screws with a torx head, a bit of white lining and blue G10 and a few teflon washers from knifemakerusa to make the wedge blue with some white trim - a nod to the "Blue Wonder" blade. About US$54. Could have saved a bit of money by buying a smaller piece of CF from knifemakerusa as well, but didnt spot it until too late.
------------------------
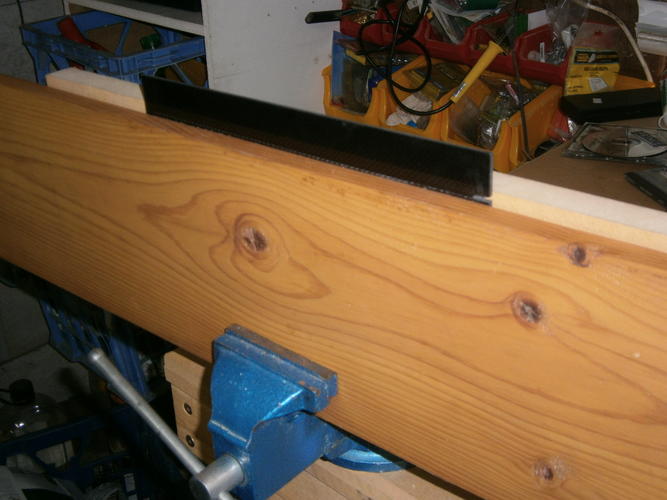
Locked the CF sheet into a vise and cut it with the diamond saw by sweeping it from one side of the sheet to the other - rather than working from one end to the other (unlike the little cut at the end suggests in the photo below). This stuff makes nasty fine dust that needs to be carefully swept up, vacuumed and removed afterwards. If I'd thought of it, I would have rigged up a vacuum cleaner to immediately suck it up - or at least wetted down some paper on the ground. I guess enthusiasm got the best of me.
For a bit of a test, I glued them together with a piece of paper in the middle using water soluble white glue, in anticipation of later shaping, Holds very firm.

and the next day soaked for 15 minutes in a glass of water to ensure they came apart.
No problems there - came apart easily.
-------------------------
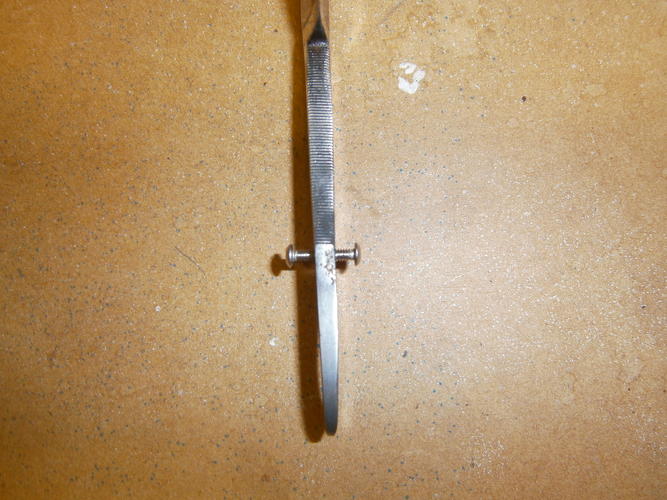
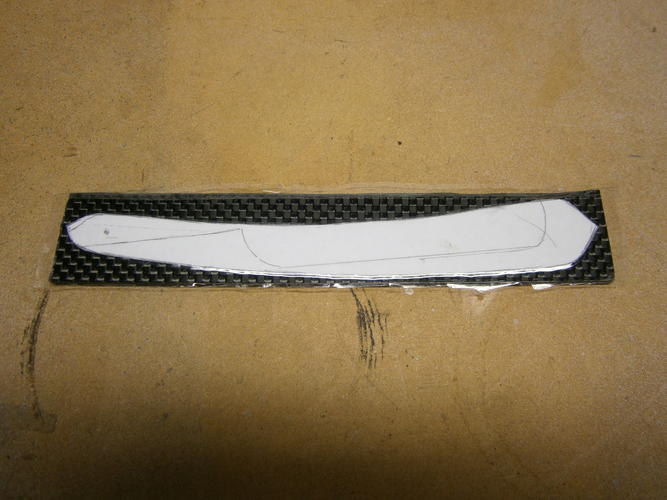
Snipped off the pin from the Blue Wonder razor using some aviation shears and traced out the scales, the razor and the pivot hole. I really like the style of the scales, so not going to change the shape - even though the concave curve is going to be tricky. Felt like a vandal cutting an antique like that, but it was broken anyway. Kept the bits for keepsake.
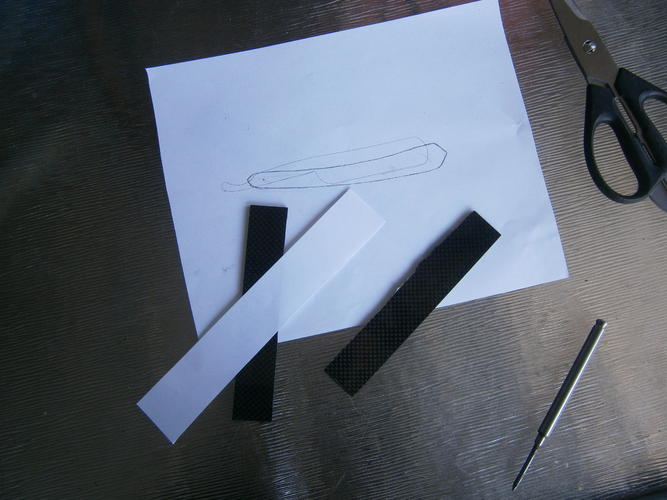
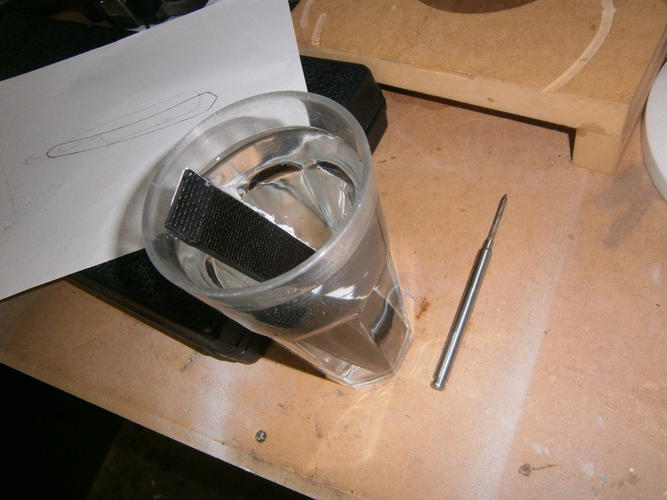
Took a few photocopies of this tracing, for reasons that will become apparent.
To be continued...
-
04-12-2014, 03:44 AM #2Junior Member
- Join Date
- Mar 2014
- Location
- Sydney, NSW, Australia
- Posts
- 27
Thanked: 0
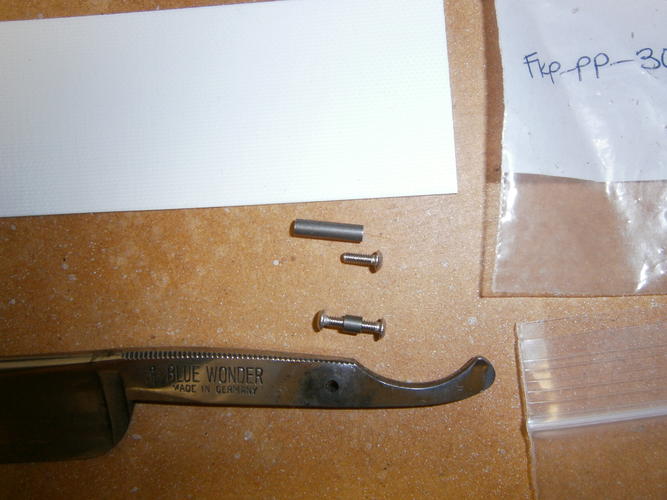
Everything from knifemakerusa arrived and then I had to visit my dear old dad in Adelaide - took along the tiny screws and pivot, since he had some ideas about cutting them down to size. We locked the pivot into a metal lathe and used the dremel tool with a cutting wheel at high speed to cut them - given their small size, it was a bit tricky but got there in the end.
The screw was screwed into a short offcut of the pivot, locked between wood in the jaws of a vise and then filed down - unscrewing from the pivot straightened out any burrs nicely, so it can screw into the pivot again.
FYI - the pivot is hardened steel, but the screws are not.
Here's the cut down pivot and cut down screws, next to the original sizes.
---------------------
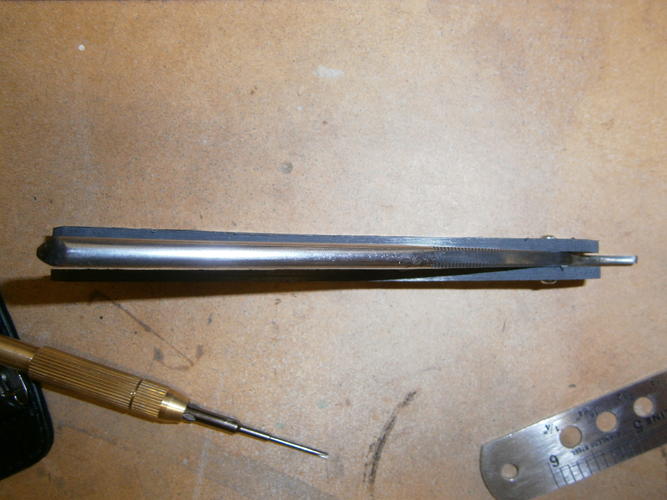
Next, I drilled out the hole in the razor using a drill press, a new 1/8 drill and a bit of drilling grease to wick away heat and get a nice cut. Clamped the razor to the drill table to ensure that the razor didn't slide around and more importantly, I didnt have to hold it.
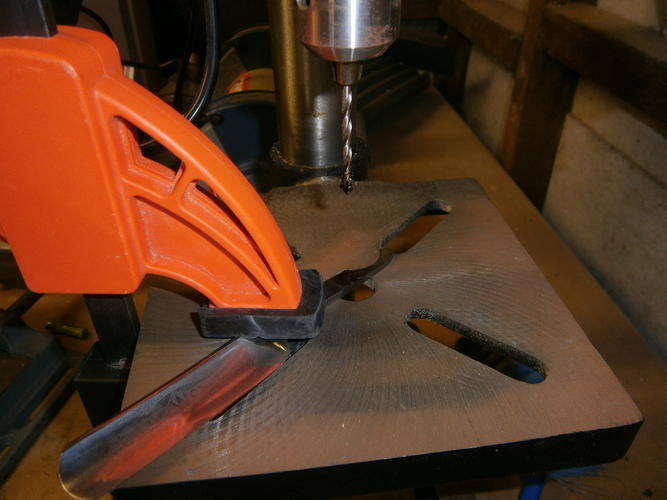
Worked perfectly.The pivot now fits snugly into the hole in the razor and the screws roughly protrude the thickness of the CF - although I feel they may need to be shortened a teeny little bit - maybe.
Now the messy bit - I dont have photos because there was black dust sticking to my overalls and gloves, but basically I'm not going to shape both scales stuck to each other (like with wooden ones) until both have been crudely shaped.
I cut out the profile of a scale and stuck it onto the piece of CF using clear tape and then clamped in the vice and cut off the corners using the oscillating tool, then used the dremel cutting wheel to saw into the concave part (sawing little vertical slots as I went so the cut pieces just fell away as I sawed)
In retrospect, the cutting wheel could have done the corners just as well as the oscillating tool.
After done with the cutting wheel, switched to the little grinding wheel and took the CF down close to the line.
Then clamped the belt sander into the vise and did the convex part, which is much easier.
Ended up with this
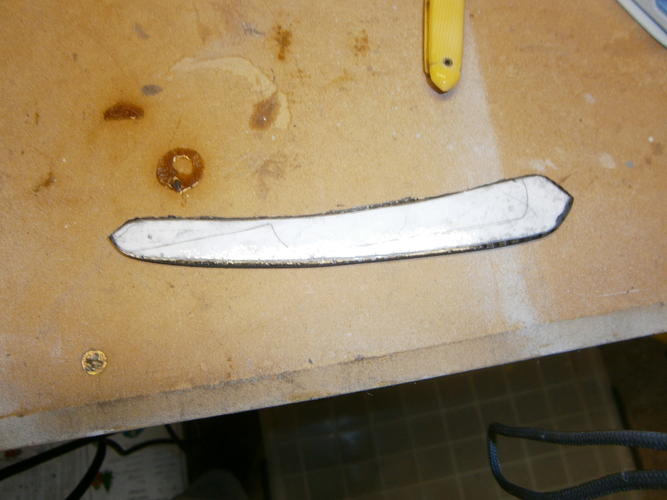
Which is one roughly cut scale, shortly to have its pivot hole drilled.
Total grinding and shaping time for one scale was no more than 30 minutes. I'll head down to the shed now to do the other one, that way I have to clean up one less time :-)
Stay tuned for the next installment...
-
04-12-2014, 04:13 AM #3Senior Member

- Join Date
- Feb 2014
- Location
- California
- Posts
- 463
Thanked: 51
This is great. Are you going to use the inlay? I hope so.
-
04-12-2014, 05:33 AM #4Junior Member
- Join Date
- Mar 2014
- Location
- Sydney, NSW, Australia
- Posts
- 27
Thanked: 0
I'm not sure yet - I was going to use the inlay (or liner) only at the end between the CF and the blue stuff, but I have thought in the past of running it right down the inside of the scales from end to end.
I'll think about it - I've got heaps left over so I might construct it one way and then another and see what looks best. Once its glued though, that will be it.
In fact, I was going to go crazy and buy glow-in-the-dark liner, but then remembered that after a few years it might not glow anymore.
Anyways... have roughly ground out the second scale, drilled the holes using a drill that was roughly the diameter of the screw thread and then screwed it together to ensure that the screws had enough room to grab the pivot.
I'm in luck
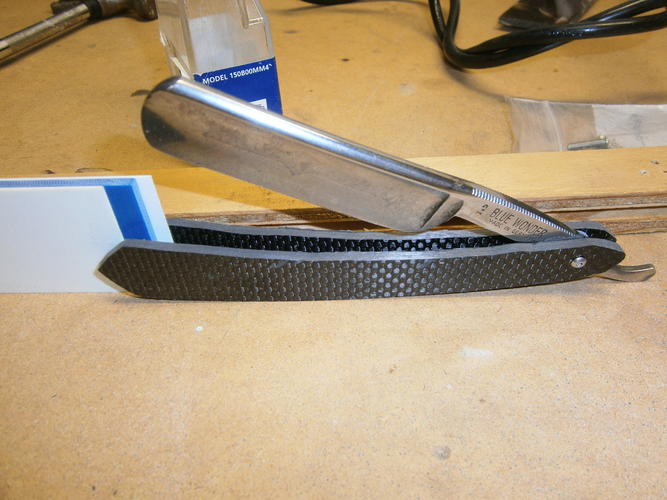
Once clamped to be glued, the CF has enough flex to bend pleasingly.
Next step is to dismantle and glue the two scales together with a bit of paper in the middle and then make them completely symmetrical with the Dremel grinder and belt sander.
That will have to wait until I'm free another day, cause I've cleaned up the CF dust for today and dont want to make more.
-
04-12-2014, 05:41 AM #5Senior Member
- Join Date
- Feb 2014
- Location
- California
- Posts
- 463
Thanked: 51
Looking good! I mean transfering the 'Blue Wonder' foil on the side.
borabus likes this.
-
04-12-2014, 10:29 AM #6Sharp Minded Citizen
- Join Date
- Oct 2013
- Location
- Bucharest
- Posts
- 434
Thanked: 156
Should come out nicely. The carbon fiber you are using is not woven so you may want to keep the rounding of the scales to a minimum or else you're going to replace the checkerd pattern witha a grey/ black stripes pattern. I suggest you look up the woven/non woven patterns on a google image search and see if you like it...also you can use a small piece of our cr to test round it an see how it looks.
If you are using 1/8 drill on the scale holes keep in mind that the pivot you cut should protude into the scales about 1mm each side with the washers in place for no blade play. If you drill 1/8 holes and the pivot does not protrude into the scales you are going to have blade play due to the fact that the screws are smaller in diameter then the 1/8hole.
You may also want to use anoter dremmel bit to sink the screw heads...i use a round stone bit to make a sink for the.screw heads.
Also take care on the wedge so it has the same angle on eatch side or you could get an off center blade.
I sugest after rough profiling the.scales to hand finish them up under water with 800grit or higher...i go up to 2k....no dust, faster.
Also you can use a drop of CA to set the liners to the wedge for a snug fit.
Can't wayt to se how this turns out. I use cf in a lot of my restores and i love it.
Best of luck!
-
The Following User Says Thank You to ovidiucotiga For This Useful Post:
Graham (04-12-2014)


 Reply With Quote