
Results 1 to 5 of 5
 12Likes
Thread: Geo Wostenholm & Son Restore
 LinkBack URL
 About LinkBacks
-
06-13-2016, 10:27 AM #1Senior Member


- Join Date
- Sep 2015
- Location
- I'm thinking...
- Posts
- 447
Thanked: 79 Geo Wostenholm & Son Restore
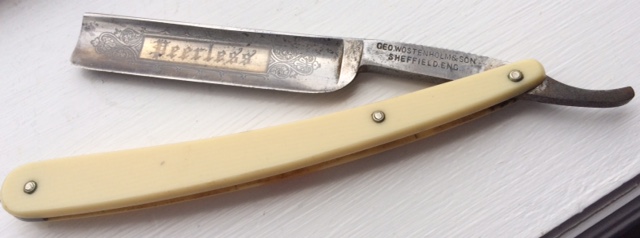
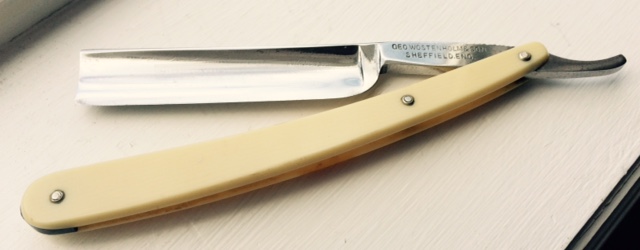
I worked on another SR restore project yesterday. This was a Geo Wostenholm and Son, Sheffield England. The beautiful etching in the original photo disintegrated fairly quickly once I started trying to clean up the water staining. And yes, I was careful! So I decided to clean it down to a near mirror finish and have a plain blade. There must be some trick (which I obviously don't know) to clean up this type of fine etching on the blades. Still, I am not disappointed...I like a clean look. There was a dark stain on the scales that I could not remove as well. Again, this was done all by hand...no machines. I like the heft of this razor...feels good in my hand. Paid $20 CDN for this one.
Here is the before image:
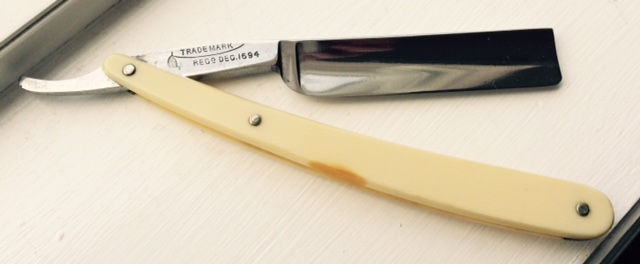
And the after (both sides):
Last edited by Whizbang; 06-13-2016 at 10:32 AM.
Substance likes this.
-
06-13-2016, 10:48 AM #2I love Burls....... and Acrylic


- Join Date
- Mar 2012
- Location
- Baden, Ontario
- Posts
- 5,475
Thanked: 2284
Although what you did looks great, and you did a fantastic job, personally, if there was no ugly hone wear that needed to be blended away, I would have done minimal restoration and left that beautiful etch intact. A wise man once told me, once it's gone, it's gone. These old razors are old, and sometimes trying to make them look new again is a mistake. At least in my opinion.
Burls, Girls, and all things that Swirl....
-
The Following User Says Thank You to HARRYWALLY For This Useful Post:
cheetahmeatpheonix (06-15-2016)
-
06-13-2016, 11:04 AM #3Senior Member
- Join Date
- Sep 2015
- Location
- I'm thinking...
- Posts
- 447
Thanked: 79
Your point is well taken. I should have done a minimal restore and left well enough alone. There was a sticky sort of tarnish on the surface and I tried to remove this carefully, skirting around the etching, but then it looked very unbalanced...one part clean and the other still tarnished...tried to touch up the etching and I found myself on a slippery slope....and well, the results are clear. I won't do that again. The etch is still visible up close, but not like the original. I certainly welcome advice on how to preserve this kind of etching and still do a reasonable restore. Originally Posted by HARRYWALLY
 HARRYWALLY likes this.
-
06-13-2016, 11:41 AM #4I love Burls....... and Acrylic
- Join Date
- Mar 2012
- Location
- Baden, Ontario
- Posts
- 5,475
Thanked: 2284
Like I said, you did a great job with what you did. I also don't have the razor in hand, who knows, with what you've described, I may have done the same in the long run. Just wanted to put my opinion in your head for the next razor.
Burls, Girls, and all things that Swirl....
-
06-13-2016, 11:46 AM #5I love Burls....... and Acrylic
- Join Date
- Mar 2012
- Location
- Baden, Ontario
- Posts
- 5,475
Thanked: 2284
To preserve etching, I take scotch tape and put it over over the etch. I then trace it with a utility knife and remove the outside tape leaving only tape over the etch. Then proceed with Polish. If your going to sand, I would use electrical tape in place of scotch tape. Just transfer the cut out scotch tape onto electrical tape and cut it out accordingly.
Burls, Girls, and all things that Swirl....
-
The Following 4 Users Say Thank You to HARRYWALLY For This Useful Post:
cheetahmeatpheonix (06-15-2016), MikeT (07-02-2016), tintin (06-13-2016), Whizbang (06-13-2016)


 Reply With Quote