
Results 1 to 10 of 14
 42Likes
Thread: Packwoods Superior
 LinkBack URL
 About LinkBacks
Hybrid View
-
08-13-2019, 01:50 AM #1Senior Member


- Join Date
- Feb 2019
- Location
- Salida, CA
- Posts
- 600
Thanked: 94 Packwoods Superior
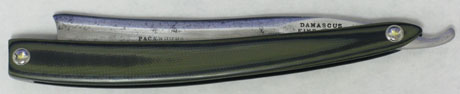
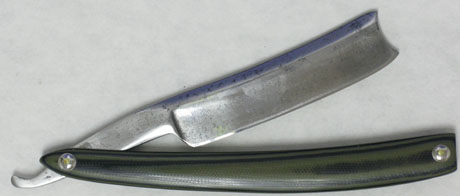
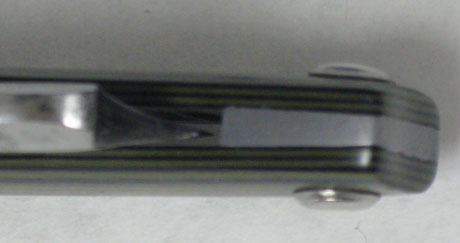
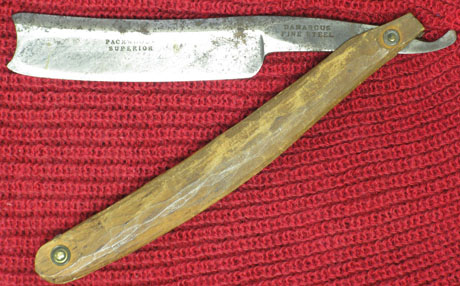
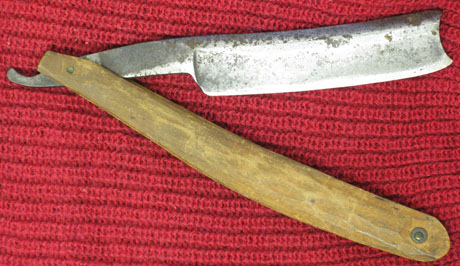
Finished this Packwood from 1830ish and took it for a spin last weekend. I did a light restore on the blade (a near wedge 6/8 to 13/16 with a swaged spine). The scales are olive green and black G10 with a lead wedge and stainless domes. The G10 is very stiff and I was worried it wouldn't flex enough for a wedge. Turned out to work fine. The wedge had more of a taper before I noticed a small dimple in the lead at the end and hammered it out. I was apparently a little to aggressive and thickened the end of the wedge. This also closed the scales up a little so the blade rests a bit higher than I had planned. I think I got the wedge pin a bit close to the end but it's nice and tight and closes dead center. Overall I'm pleased with the outcome. It balances well and is comfortable to use. The shave was not the best so I'll be heading back to the stones. I know the scale material is a bit less than traditional, but I like the look and think it suits this razor.
Thanks for looking
The front
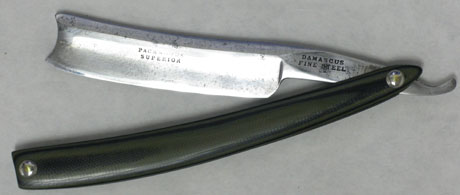
The back and the wedge
Some before pics if you didn't see it in the Show and Tell thread
 O'Toole's commentary on Murphy's Law: Murphy was an optimist.
-
08-14-2019, 03:24 PM #2Razor Vulture


- Join Date
- Oct 2010
- Location
- Lone Star State
- Posts
- 26,190
Thanked: 8621
Looks great!
Sometimes, you can use an SE blade and trim that lead on the end after tapping it in. Then, a bit of buffer.
You should be fine with the G10.JellyJar likes this.
-
The Following User Says Thank You to sharptonn For This Useful Post:
JellyJar (08-15-2019)
-
08-14-2019, 04:24 PM #3www.edge-dynamics.com

- Join Date
- Feb 2013
- Location
- London
- Posts
- 3,066
Thanked: 512
The scales look great, that's a distinctive green.
-
08-15-2019, 01:07 AM #4Senior Member
- Join Date
- Feb 2019
- Location
- Salida, CA
- Posts
- 600
Thanked: 94
Thanks Sharptonn and JOB15
I bought two sets of the G10 (it's not super expensive in 1/8" thickness) one with a much brighter green. I'm glad I went with the darker as it fits the patina on the blade better. The bright stuff may show up in the future when I feel like getting funky. I realized why I'm getting the pins too close to the ends: I have been centering the holes with measurements but positioning them from the ends by eye, my mistake was not accounting for the diameter of the domes when setting the distance from the end. Hopefully I've got that detail worked out and just need to up my skill a bit with making wedges. Getting closer with each razor.O'Toole's commentary on Murphy's Law: Murphy was an optimist.
-
08-15-2019, 01:23 AM #5Razor Vulture
- Join Date
- Oct 2010
- Location
- Lone Star State
- Posts
- 26,190
Thanked: 8621
You learn every razor, Jelly.
Reason you had to tap the wedge-in was because the G10 is too hard. Pin the top and gap every time.
Using lead and letting it stay oversized is quite handy at the end sometimes!
Don't be bashful on thinning that stuff way out.
Try the SE blade and polish on the wedge end. It will look different, I promise.
Yeah....Spacing the pins. No idea. I use old scales laid on top as a guide! Lazy.
It turned-up nice. Someday, you can unpin it and take off half the thickness, move the pins in to the point the collars still cover your old pinholes. Thin that wedge and try again.
I revisit mine more than twice at times.....Last edited by sharptonn; 08-15-2019 at 01:27 AM.
-
The Following 2 Users Say Thank You to sharptonn For This Useful Post:
JellyJar (08-15-2019), ScoutHikerDad (08-16-2019)
-
08-15-2019, 02:30 AM #6Senior Member

- Join Date
- Jan 2015
- Location
- Pinole, ca
- Posts
- 1,526
Thanked: 339
Nice job. Love that blade. I hope you get the edge to your liking.
For locating center I use a pair of dividers set to roughly center from the edge in the area I think the pivot or wedge hole should go and scribe a line. One from each side, where the lines cross is center, adjusting the distance between the points of the divider will move the area they cross closer or further from the pivot or wedge end, adjust to suit your taste. If using collars that won’t bend at all I lay those up with a piece of pinning stock and make marks with a fine felt tip pen so I don’t sand that area out of flat.
-
The Following 2 Users Say Thank You to jfk742 For This Useful Post:
JellyJar (08-15-2019), ScoutHikerDad (08-16-2019)
-
08-16-2019, 12:39 PM #7Senior Member

- Join Date
- Jun 2013
- Location
- Pompano Beach, FL
- Posts
- 4,048
Thanked: 636
Nice job. They do shave well.
JellyJar likes this.


 Reply With Quote