
Results 1 to 10 of 10
 23Likes
 LinkBack URL
 About LinkBacks
Hybrid View
-
02-22-2021, 01:05 AM #1Senior Member

- Join Date
- Feb 2020
- Location
- Red Deer, Alberta
- Posts
- 246
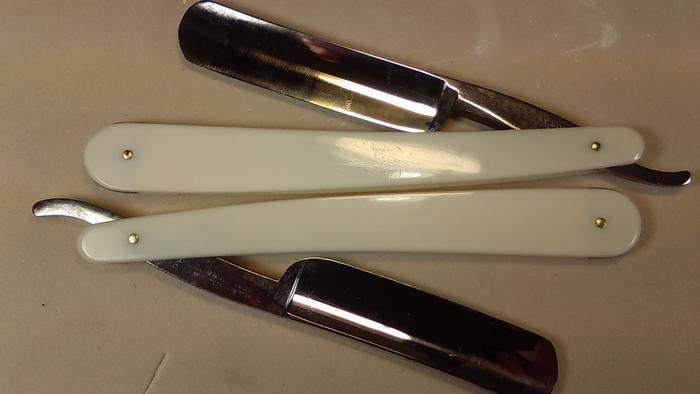
Thanked: 10 ShurEdge Double Hollow Ground with Brass Collars
First shave with this restored ShurEdge today. Very fine shave.
I took Sharpton's advice to Outback, about peening these collars, "You big sissy, go ahead and peen them."
Not wanting to incur the wrath of Sharpton (or anyone else for that matter) I thought what the heck, The worst I can do is have to cut them off and start over.
It's not the prettiest peening job, and I forgot to flatten out the inner washer's first, I never the less went ahead.
I'm still working on my peening skills; trying to tap dead on and pushing out and off all at the same time.
Anyway, here are a few pics. When I use the phrase 'Very fine shave' I mean it can be a better shave, so back to the hones it goes tomorrow to re-hone.


-
02-22-2021, 01:32 AM #2Senior Member


- Join Date
- Feb 2016
- Location
- San Antonio, TX
- Posts
- 1,862
Thanked: 435
Good looking razor! There is something funny about the bottom of the blade from heel to toe. Or maybe I'm imagining things...
Semper Fi !
John
-
02-22-2021, 02:37 AM #3Senior Member


- Join Date
- Mar 2015
- Location
- Akron, Ohio
- Posts
- 12,119
Thanked: 4317
Pretty good, for a first try. !
-
02-22-2021, 04:28 AM #4Senior Member
- Join Date
- Mar 2012
- Location
- Thunder Bay, Ontario, Canada
- Posts
- 17,389
Thanked: 3228
I think what you are seeing is a bellied hollow ground blade. Originally Posted by Johntoad57

BobLife is a terminal illness in the end
-
02-22-2021, 03:09 PM #5Senior Member

- Join Date
- Dec 2018
- Location
- Gainesville, FL
- Posts
- 6,879
Thanked: 683
Robeson made a hell of a nice razor. I'm sure you'll get that one to be a superb shaver. That double hollow always looks weird in photos.
Nice work. Maybe consider darkening that engraving/etching and the tang stamp. That is a good restoration skill to have. It make it look more defined.Iron by iron is sharpened, And a man sharpens the face of his friend. PR 27:17
-
02-22-2021, 03:14 PM #6Senior Member
- Join Date
- Apr 2012
- Location
- Diamond Bar, CA
- Posts
- 6,553
Thanked: 3215
I like the pin/collar design with domed and flat collars. First shape and polish the collars, by making a mandrel from a bolt or screw with the head turned down, with a file and the bolt chucked in a drill press, hand drill or Dremel. Double nut the washer to the head and shape the washer/collar as needed with a file and sandpaper.
Using your design, you could bevel or round the edge of the flat washer. Doing so will give the flat washer a thinner and more finished appearance. It does not take much.
Once shaped using the same mandrel sand on progressively finer grits of sandpaper to 600-800 then polish with a dab or metal polish on a paper towel to a bright finish. It goes quickly. I always make an extra collar incase you mar one or drop and loose it.
This will save you a lot of finish work once pinned, and a more finished look. Or you can buff on a buffing wheel with Green Stainless compound on a buffing wheel once installed. Use a lite touch a buffing wheel removes material quickly.
It looks like you cut the pivot pin a bit short and did not have enough of a head on the first side. Once you get a head on and start to peen the other side, work both side alternating from side to side so the pin heads are even. If the pin is too long, file off a bit from the top and peen. You can decide if you want a flat or round pin head by the length of the pin. If you want a more rounded, taller pin hit more on the corners as you rotate the razor and strike around the pin head. Move the razor and the hammer, a highly polished peening hammer helps.
I start my dome by chucking the pin in a separate drill press Jacobs chuck on the bench. You can use a Jacobs chuck from a hand drill. Buy a beater drill at a garage sale, (Old cordless drill) and remove the chuck. Or drill a hole in an anvil or any thick piece of steel.
I form the head pretty well in the chuck, make sure you have your collars in place when you start forming the head so the collars will fit.
On large domed collars make a smaller domed backing collar to keep the dome from crushing.
It is not as hard as it sounds, especially in brass. A domed hollow collar will keep the pin and scales in tension. Nice first try.
-
02-22-2021, 03:43 PM #7Senior Member
- Join Date
- Mar 2015
- Location
- Akron, Ohio
- Posts
- 12,119
Thanked: 4317
Won't be long, before you have the confidence to peen collarless, on Ivory.
 Mike
Mike


 Reply With Quote