You beat me to it. That was the first thing I thought of when I saw that picture as well!Quote:
Originally Posted by Cangooner
Printable View
You beat me to it. That was the first thing I thought of when I saw that picture as well!Quote:
Originally Posted by Cangooner
Oops-Brain Fart
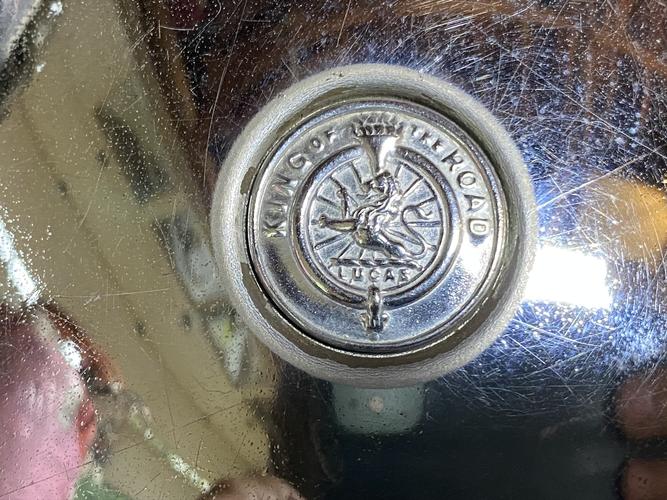
But the prince did have a cool badge Richard..
Attachment 323411
Think I’d still rather push start it and pop the clutch over that knuckle busting crank handle.
Doubles as a jack handle and gas gauge, so I will be keeping it regardless,
And yes, bagging everything.
:tu
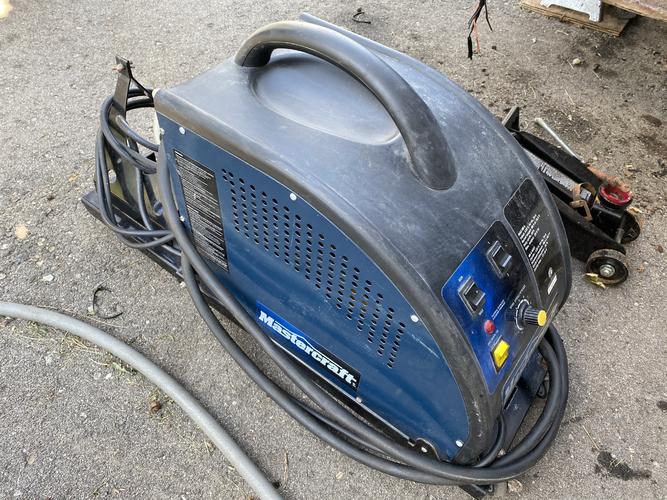
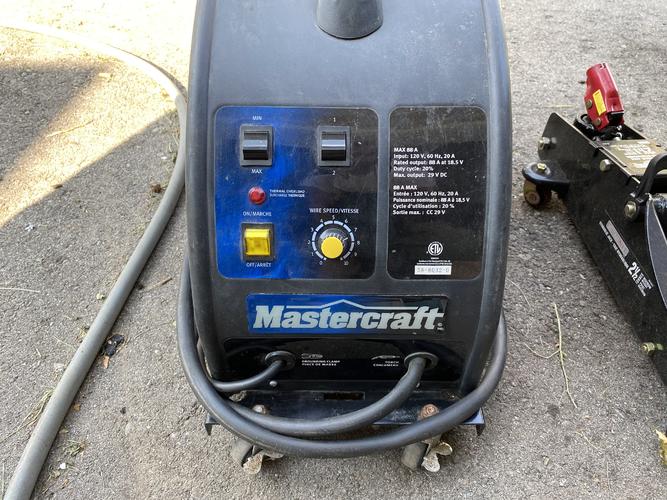
Upgraded the home welding capacity tonight.
Have a stick welder, but wanted a gas mig welder for the panel stitching I have in store.
Attachment 323852
Attachment 323853
Runs on 120 ac and should be plenty up to 3/16 plate steel.
Now a trip to the junk yard and pick up some cheap damaged panels to practice on.
How'd the trip for parts go? I believe you were making a short road trip to check them out.
Ive done a lot of MIG Welding. That is something i did enjoy doing. Stick welding i found not so much fun. That is a nice additive to your shop Mike.
Attachment 323856
New sealed wood for inside the front edge of the rag top where it clamps to the windscreen. New top strip that goes in front of the scuttle, or dash panel.
And two I wasnt planning on changing, unsealed. They go at the back rear corners of the tub above the rear fenders, and what the heck, changing everything else pretty much so in case these are needed.
Plus a vintage grab handle, and a box of spaenaur British nuts and bolts. When the gent restored his, he bought all the hardware in boxes. These are all the remnants. A nice gold mine of hardware here.
Saves me money on what I still need to source.
Couple shots of his 52, which hes owned since he was 18, over 50 years ago..
Not great pics, but they are for me as I rebuild mine.
Attachment 323857
Attachment 323858
Nice score! :tu
Just wondering if you had to give him your first born or if it was more reasonably priced.
I've read of car clubs for rare cars and guys will loan out things like door handles so someone can have replacement cast from them--all at no charge. I read one article and the owner's father was a machinist and the car needed all new Babbitt bearings and the father let him pour one and then told him to get out of the way so he could get to work! HA!
220 Cdn for the welder with a full spool of flux core on her still,
So 150 USD ish for the rig. No gas, but it has the feed hose, pretty happy with the deal.
And the gent I went to see about the above parts reached out again tonight. Said it was nice to meet a young, lol, enthusiast and he went back to his storage unit and found a bunch more wood and stuff, including the dash inner main panel.
Going to be sending me some more pics, but I’m glad I didn’t pull the trigger with Moss yet..
May be another road trip in my future.
:tu
Wow Mike its come along way since I last saw it at your place.
Thanks Colin.
Can’t believe how fast I drove it seeing how soft she is underneath now, hehe.
Gonna be like brand new when done though and safer at those speeds than ever before.
Take you for a rip when I’m done. Will finally have passenger leg room.
Nice to see that shave vid you did with that western kami, nice blade bro!
:tu
This article made me think of this thread. [The picture attached.]
https://www.startribune.com/mpls-bus...cle/572206032/
Most know that I readily acknowledge that I'm a Mastodon with computers and so I presume that it's just me but when I clicked on the link all I got was this--Quote:
Originally Posted by 32t
Attachment 323871
Close the pop up and the article is, in part about a business owner with a sweet TD.
:tu
Second trip to my new older gent Mg brother proved even more lucrative.
$100 for all the wood inside, and the two door skins themselves as well as original dash. Lots of this will just be templates, but way better unaltered condition than what I have now so pretty happy. And a bunch of it can be spliced to what I already have and save both time and money on the wood restoration steps.
Attachment 324032
And more pictures were taken of key design nuances that no longer existed on my ride.
Like how the front and rear quarter panels dont actually touch or overlap, and that they both folded under the lower edge of the wood. Mine are so altered along the bottoms I never would have known and overlapped things. And definitely 22 gage steel on the body, thicker on the rails and hood.
Attachment 324033
Or how it could look with the door open.
Attachment 324034
Nice score! :bow :tu
Interesting about how those panels have what appears to be an open gap that water and even worse snow/salt mixture from those Canadian Winters to get into and start trouble. Oh well, what do I know :shrug:
For sure Roy. I will aspire to have tighter dolly work, and will also be epoxying all the exterior wood in marine grade sealant. Wonder what Outback uses in his industry.
I’m sure west or the like makes something better than the zero protection that they used 70 years ago to seal the wood.
I accept the standard Mg rebuilders consensus that no glue was used between the joining wood, only hardware, thus the car could flex on its frame and not split. But I will have no issues bonding everything individually with all the wonderful new adhesives/strengthened available to ensure things last longer than 70 years from this rebuild forward.
I will still need to order a fair bit of new timber that I just don’t have enough to reference, but half of what I was going to as I started to peel back the layers.
:tu
'Some' of the modern adhesives and other bonding agents are incredible. While I'd still weld panels (like the guy in the video I emailed you) many years ago in a car magazine (Hot Rod?) They were showing an adhesive to bond metal to metal instead of welding.
They cut a square in the middle of a door panel or such then used a pneumatic hammer and a special tool to make a 'Dog Leg' in the panel so that the patch piece would be level with the panel.
Everything was ground clean, the adhesive applied and the patch installed and clamped and left to set up.
After the set up time was done they used a ball peen hammer and started pounding on the patch away from the adhesive and they eventually tore the patch and it never did let go from the adhesive :dropjaw:
But there again---I'd weld panels as that's going to be the best and most permanent bond :tu
Wood order placed with Hutson from UK.
From all reports the American wood suppliers leave too much relief in their mitres, ostensibly for ease of install regardless of gaps. But I want this tight as I can make it and am going right back to frame to do it.
Plus keeping it all original, or English, in the wood, just seems right.
Heres an old vid (80s) from Hutson, building an Mg tub in their facility.
Part of my learnings and confidence to redo all this comes from watching this video. A lot!
https://youtu.be/OEqpqZj8FPw
Work platform almost ready to move the tub to and I am taking next week off to get most of the tear down done.
My hope is to have everything in the garage that needs work, protected, before the fall wetness besets us all.
Cheers gents.
Hands are getting grimy now, hehe
Normally I use powdered laundry soap as my go to inexpensive effective hand scrub after oily grimy work. Stuffs getting more expensive and less easy to find as pods take over.tried this and it works awesome.
Attachment 324203
Squirts out as foam and you apply it dry, right on the grime.
Surfactants or whatever are such that it really lifts the slick quickly. Add water after a few moments, you’ll know when, and hands are clean, cept under the nails, still need a brush for those.
Anyway, just a quick share.
While I don't use the fancy dancy foaming Dawn, I've filled an old hand soap dispenser with regular Dawn as hand soap for years! Works great.
I will give you a tip on how to keep grease and crud from getting under your fingernails OR how to make it easier to remove.
That tip is to use some cheap bar bath or hand soap (I use Ivory), get it wet, let it soak just a bit then drag your nails across the bar soap then use the palm of your had to firmly pack the soap under the nails. It's worked very well for me for years.
I hate those commercial grease removal products as they are very harsh on the skin. My procedure works better and doesn't cost nearly as much.
Attachment 324204
You don’t use it, yet,,,Quote:
Originally Posted by cudarunner
Hehe..
I’m a trail blazer I tell ya, a dang Pie O near!
Parcels shipped already from UK, so I could have it next week while off. That’s be awesome. Waiting for the scary update from the border if they hit me with import again, but whatever..
Also got a nice note from Hutson saying I would get a 10% discount and they were including, as requested the jig used at 2:30 approx in the previous video. Only see it a second or two but it’s an important tool. I simply asked for them to share the measurements so I could make one as my two door gaps are different by 1/2 an inch and there is no reference in the manuals.
Cheers gents.
Pie O near! Attachment 324239:rofl2:Quote:
Originally Posted by MikeB52
My dad used LAVA Bar soap, he'd come in from the field and take a bath with it. He even used it to wash his face with! That LAVA is bar sandpaper. He was a tougher man than I ever will be.
My maternal grandmother's younger brother's wife made their 'Lava' at home. It was lye based and she mixed in actual sand in it. It was so much coarser than the LAVA. All I ever saw my uncle use it for was his hands, I doubt that even my dad could have used it to bath with Attachment 324240
Sounds like a great company to do business with :tuQuote:
Originally Posted by MikeB52
Lava! I remember that stuff. Was da bomb. So gritty, but that pumice was super effective coupled with the detergents in the bar. Havent seen it in years. Went the way of the cherry pop tart. :(
Some pharmacy's, and health food stores carry it, or its equivalent.Quote:
Originally Posted by MikeB52
-Richard
What!
No cherry pop tarts any more. :dropjaw:
My ol' man always had a bar of Lava in the sink in the washroom next to the garage. I remember it being not to my liking as a kid. Way to rough for my soft hands back then.
Similar to cudarunner my grandmas LAVA type soap was really gritty. one rub - dirt off, two rubs -skin off.
Just how badly do you guys miss it? :w
There's a vintage bar for sale on Etsy...
:hmmm: I wonder what my 1/2 used bar would bring---:shrug:Quote:
Originally Posted by Cangooner
I hate those commercial grease removal products as they are very harsh on the skin. My procedure works better and doesn't cost nearly as much.
Love the Lava. A couple years ago I bought a bunch from the Dollar Store, liquid in small pump containers and bars.
Down to my last jug of liquid, I really like the liquid, but the bar works well also, especially combined with a stiff fingernail brush. The trick to making the bar last is a cheap plastic soap holder that has the little spikes the keep the bar out of the water. Leave it in water and it will melt.
You can still get bars and liquid on-line, but only in small jugs. Love that stuff, even like the smell.
Body cant come any further till the engine and tranny are pulled. Originally it would be able to split now leaving the firewall attached I believe. But the way they modified and folded everything to fit the triumph engine means I need to get in where the engine is to undo stuff safely, so getting ready to pull the engine and trans as one lift.
Attachment 324319
My stump and root buster ready to resume its intended function. Need a few longer bolts to tie everything together still.
I believe the reason they set the engine so far back was two fold.
Avoid lengthening the propeller shaft, and avoid the steering column..
Attachment 324320
Attachment 324321
Im considering dropping the mounts between the frame and moving them forward, say down 2, and frwd 5.
Attachment 324322
If I can, it will allow an eromous amount of foot room once again in the cabin, as well as allow for proper pedal placement once more.
May very well be worth the effort, despite the increased complexity of the rebuild.
Looks like if I remove, and modify the support, I can drop it lower. Looks like the drive shaft would appreciate being a little straighter too, although that could just be my eye and wishful bias.
Figure the tracking will be better too, moving the C of G forward closer to the front cross member as well as lower.
Double checked my hardware and did the deed.
Attachment 324400
Note the mounts are wedge fit without any actual hardware connection!
Attachment 324401
And lots of space to work now, ended up pulling the steering rack and broke one of the mounting flanges in the process,,,
Attachment 324402
Heres a shot of where I want to move the mount, in green.
Attachment 324403
The red circle is around the dumb iron or non load bearing frame extension the bumper and front valance connect to. Easily replaced.
Attachment 324404
And a mock up of where the firewall needs to be rebuilt to regain leg room.
As I pulled the engine I stopped and releveled it to see if the forward move made sense, and it totally will work. Will regain gobs of foot clearance as rather bell housing moves forward.
Once the power plant was out, then I could free up all the stuff preventing the body from coming off.
Attachment 324455
Built up a wooden subframe to simulate the car frame and lagged the body frame to the supports, with every strap I had.
Hope it doesnt split in half!
Attachment 324456
No going back now. And hope the frame I built to hold the tub is accurately sized.
Attachment 324457
Attachment 324458
Frames look nice and straight!
Attachment 324459
Relieved to have gotten the tub off safely. Now I can focus on the frame.
Repair the rot at the back left, and replace the front dumb iron pieces.
Then par 15 epoxy cladding and hopefully the freshly painted engine back in before it gets too chilly.
Accepting the body work till be a winter pursuit now, but a fun one.
at least its inside where it can be dealt with, bit by bit.
:tu
Looking good but maybe should just get a blueprint and start from scratch?????
:rofl2:
I bet there won't be very many parts still connected to one another.
A 'Tram Gauge' would be really nice to help check that frame for square.Quote:
Originally Posted by MikeB52
https://www.youtube.com/watch?v=18R2mjXYMEk
This one shows how a guy made his own;
https://www.youtube.com/watch?v=_I_BCkkazCA
You'd need hangers with self centering pins to check for side to side and twist along with dimensions but as long as you feel it's good to go, then so be it. :tu
May need to build me one of those Roy Thanks for the tip.
Goal this week off was get her stripped down' mission accomplished.
Attachment 324565
Bonus of keeping the old fuel back when I bought her was its the best engine cleaner solvent I know of, despite the smell.
Attachment 324566
Looks pretty good for 61 years old huh?
Decided to paint her MG maroon,see how many people I fool when shes back,together.
Hehe.
Wait, I'm confused here (Imagine that!) Wasn't this car running and weren't you driving it Mike?
You can 'X measure' your frame for squareness behind the front and in front of the rear 'kick' but to get a proper measurement, you'd need the Tram to be able to get up and over the kick.
I take it that the 'MG Maroon' is the factory engine paint for your year.
Yes gasoline is quite the solvent, but after you are 100% sure that you have all oil and grease removed, I'd recommend that you go over what you are going to paint with a lacquer thinner. House hold will do but automotive is stronger. You could even just pour the thinner into a paint sprayer and us that to wash the engine down.
You want the most oil free surface you can get so that the paint will not only stick when first applied but stay in place for years to come---But you already know that. :tu