OK...
Only cause you asked Kris, lol..
:)
Printable View
OK...
Only cause you asked Kris, lol..
:)
I 'think' that you just said the Four Words that Mike's lovely bride never wants to hear ever again :shrug: :thinking:Quote:
Originally Posted by Cangooner
Looking good!
True dat Roy.
Ruthy will need a bit of time riding shotgun with the wind messing up her do before I suggest something maybe a bit more air tight next time. Something with built in windows maybe..
A mid 60s Neunelfer perhaps..:hmmm:
Hehe.
Latest shipment arrived with the mgb brake hoses and mounts, so I have been test fitting stuff and am cutting brake lines.
Seems I need yet two more fittings though. Mgb used male ended hoses with a 3/8-24 sae thread, whereas the TD was 3/8-20 sae with a female receiver at the one end of the hose that connects to the rigid lines.
Upon this discovery I went looking at my fittings all around and the rear ends drums are also 3/8 24. Makes sense since the rear end came out of an mga.
So as long as Im careful and dont get any of the fittings mixed up, itll all work, my cars going to be a mix of both thread pitches. But I will be eliminating 2 extra Ts that were added, probably because of the way the brakes evolved.
Good thing I decided to replace it all as it too was kinda Mickey Mouse..
:tu
My local machine shop did a sweet job on the hubs, checked fit, on hub and rim, and very tight in a good way!
Another item off the still to do list!
Attachment 326840
These spline drive wheel nuts were the ticket! Very little extra clearance needed.
I"m glad you are blessed with a competent machine shop. They can be hard to find.
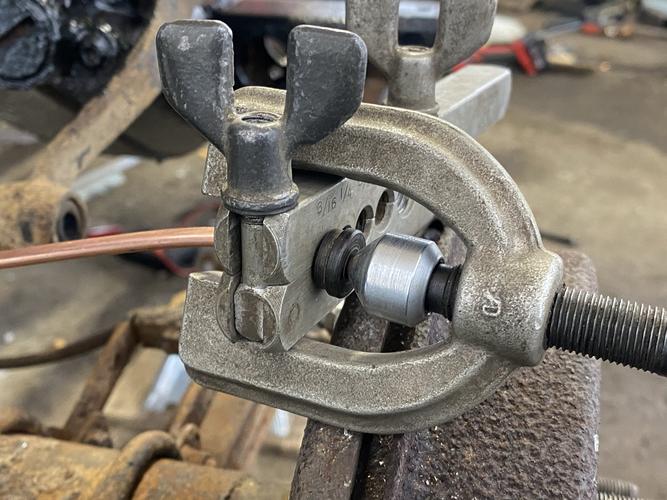
Got all the hard brake lines plumbed in.
Double flare, 3/16 line.
For this not familiar, double flare is a pain, and a two part flaring process. But it provides a very good hydraulic seal.
Had to hand chamfer every tube end prior to flaring to ensure there was no splitting or rolling of the edge as the flare is made.
Attachment 326846
Then you clamp it up in the jig and set your depth to a specific height to start the flare. Then you insert the preflare former and clamp it tight.
Attachment 326847
Remove the preformer and retighten with the cone to set the final flare angle of 45.
Attachment 326848
Attachment 326849
Attachment 326850
Still need to install the clamps but those can wait till the end.
On to the engine installation!
Copper-Nickel tubing :shrug:
Cunifer line, but yup, copper nickel blend..
:tu
Had to look 'cunifer line' up. Interesting composition as it seems to have a bit of iron in it and on occasion a tiny bit of magnesium.Quote:
Originally Posted by MikeB52
I also found this and thought I"d share:
Description
Why Some Brake Shops Refuse To Carry Copper Nickel Tube
There are brake shops who WILL NOT carry Copper Nickel tubing, can you guess why?
Is it a safety issue?
Nope Copper nickel tubing meets the definitive SAE J1047 standard. Its approved for automotive use including brake lines and passes inspection
Ok well then it must be a bitch to work with?
Nope. This tubing is a breeze to work with and can be bent by hand. If anything it bends so easy youll have to make sure you helper doesnt bend it for fun when they should be holding the light. Its that easy and almost fun to bend.
Does it look bad?
Nope copper nickel tubing is an attractive alternative to grungy steel lines and can even be polished to shine.
Is it weird and non standard?
Nope Copper nickel tubing is standard on Aston Martin, Porche, or other high end luxury cars.
Then it must require special high priced fittings to work?
Nope again. This tubing is the same size and operates using the exact same hardware as your existing lines. If you want to reuse your old nuts and fittings you can, and your new tubing will put them to shame with how nice it looks.
The Real Reason
Brake Shops tell us they dont want to use Copper Nickel Tubing because it means YOU WILL NEVER COME BACK for more tubing work. They dont like the thought of putting something on your car that will result in no chance of future business.
Especially in the northern US where every year road salt eats away at your steel lines. They know that youll be back and they can rack up more labor charges. They know that with rigid steel tube you wont be working on your own lines without the help of expensive handling tools.
How many times do you want to replace your lines?
Do you want to replace the line once and for all? Do you want to enjoy recreating your existing lines without the use of expensive bending tools? Do you want to invest in the same materials high end manufacturers already use?
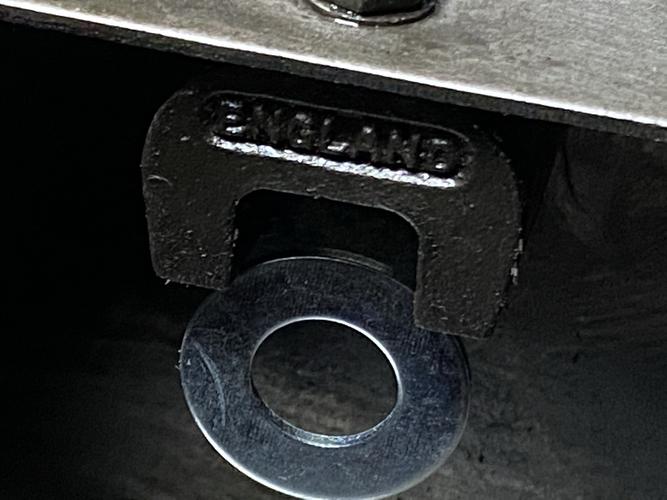
Cleaned out the oil pan before replacing the gasket and noticed this.
Attachment 326867
Washer added for effect, nothing scary actually stuck to it happily.
Attachment 326868
Love the details back then..
I can be a bit slow on the uptake-----so is the piece that says ENGLAND magnetic and holding onto the washer :thinking:
I suppose the magnet is there to help keep metal debris from the engine in the oil from going back into the engine?
Bob
I'm happy you knew to do the double flare as that is a biggie that some folks don't know about. :chapeau
Yessir Roy, these days, and more practically in my opinion, the drain plug is magnetic to capture stray swarf that gets into the oil. The only way to clean the old horseshoe magnet in this pan is to remove it, but the protection, closer to the crankshaft, may have been better back in the old old oil days.
Neat splash guard as well to protect the crank as it’s spinning from splashing oil.
Maybe by the time you had to clean it you would have to remove the oil pan to repair it anyway?....
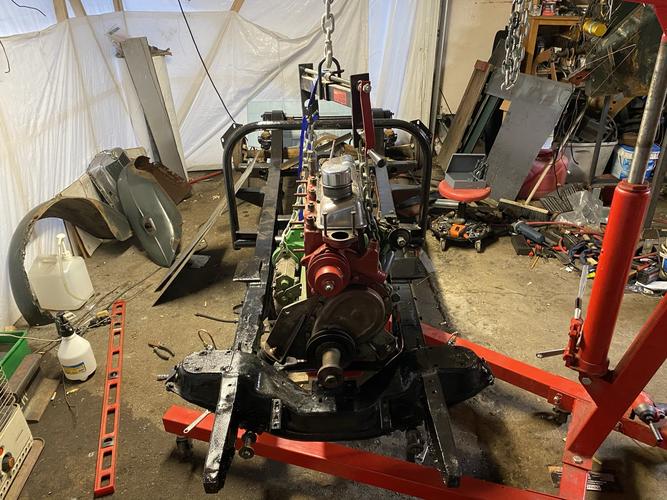
Engine and tranny installed with new mounts!
Attachment 326915
Attachment 326916
Stance looks pretty good with respect to the main frame lines.
Attachment 326917
Now on to the suspension so I’m ready to put the shocks and front end back together when they return from the shop.
Then the plan is body panel tear down over the winter. Do most of my welding when it’s so cold the metal can take more tacks.
Cheers.
Looking good, Mike!
Must be some advantage to freezing your ass off! :beer1:
Lol, must be some advantages!!
Figure I’ll do a lot of the panel sticking and repair as I take the body apart, where I can. The 20 gage wheel well panels, and around the rear flares will be lots of fabrication, so the more I get done as removed, the more I can back tack as well.
Tig is good for that type of work, with new steel, not so much with used metal. Mig’s better for that stuff.
The absence of the engine and stand has given me another patch of garage to use for the next steps too.
Almost like a slide puzzle in my garage, as I try to move stuff around, take more stuff off, and put repaired stuff back on...
Cheers gents..
Spot of mild up here last few days so I took advantage.
The front end upgrade to mgb meant I had to modify the mgb designed sway bar links to fit my TD steering rack.
Attachment 327185
Original plan was to shorten them as seen and just reweld, honoring the original angles.
Well sadly the right hand was 18 offset and the left was 21 which had me questioning the British quality control at the sway bar link factory..
So, plan B was to cut, drill tap and step them so I can install them, get the angles perfect, then weld the link arms in place.
Had to radius the shaft a bit to accommodate the shoulder of the countersink.
Attachment 327186
Should work just fine.
Now Im tearing down the calipers and hubs for new bearings seals and pistons respectively.
Attachment 327187
Will be nice to have all this done before I turn to the cosmetics.
:tu
Getting chilly over the next few days. They are blaming texas, so WTF Tom.?
A texas low should not mean snow, it should mean some country song reference I figure...
Hehe.
Glad to see your post.
I got thinking you were slacking there for a bit!:rofl2:
I'm pretty sure if I had taken on this job, at least a couple of those parts would be left looking at me from the bench after I was "done". :rofl2:Quote:
Originally Posted by MikeB52
Enjoy the mild weather - gotta run with it when we can, eh?
For reference this is what it would look like if I didnt go to the trouble of shortening the links..
Attachment 327188
Way to busy around the steering.
This is what mine will look like.
Attachment 327189
To me, was a non decision.. had to be done..
:beer1:
Truth be told, I have been. Son ordered me to rest the wrist a week. And he wasn’t wrong. Still hurts, but I think it’s on the mend. Must have torn something.Quote:
Originally Posted by 32t
:shrug:
Can’t imagine not being able to torque stuff in retirement so had to rest it up..
Broke my left arm right below the wrist when I was 6 years old did it again (same wrist) but worse 36 years later. The second time was about 25 years ago and every once in awhile when I put a lot of pressure on it the damn thing hurts! :banghead:
As you get older your really appreciate having body parts that work without hurting and working like they should.
The rework of the sway bar link pins is much better. Nice work Mike
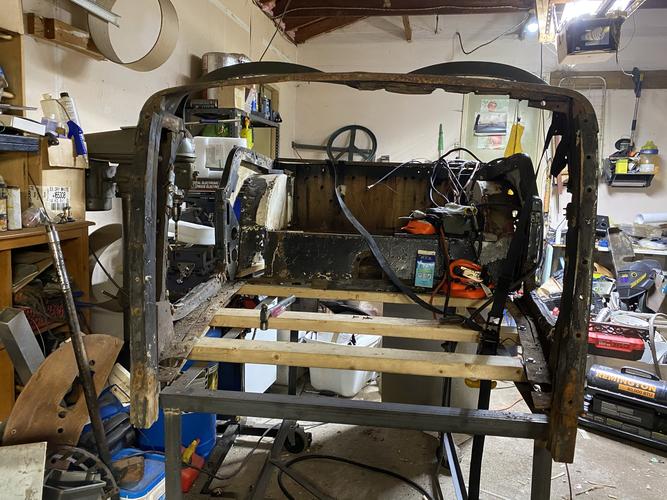
Pulled the firewall off the chassis with all wiring still strewn through it.
Look at the cluster of shit!
Attachment 327279
Im going to have maybe 6 wires going into the cockpit when completed.
6!! Not this...
Attachment 327280
Skinny lil car aint in..
I helped a friend turn a 1964 Elva Courier into a race car. Lots of fun!
He wanted to save the harness etc. at first...........
Even at that vintage it is surprising what you don't "need".
So much modded over the years. And no fuse box anywhere to be found during tear down.
I guess when they converted to NA wiring they never replaced the voltage regulator, but man, risky not having circuit isolation in a wooden car..
Will be completely fused when Im done.
Still mild-ish up here so I decided to pop the front hub bearings and replace them.
Another little upgrade on this restoration is that the mgb used tapered bearings, whereas the Mg used roller bearings only. So significant reduction in friction and improved side loading on cornering also to be looked forward to in the summer of 21.
Nice that they gave me little detents to drift out the journals.
Attachment 327306
Seems one inner bearing was replaced in the past? But only one?
Attachment 327307
Wear pattern is non existent happy to say. Bet they were better quality then the new ones going in, but 60 years of service is plenty..
Still need to pack the grease, but I do that by hand and Im way to grimy to take pics at that moment..
:)
Having electrical protection is wise. How many fuses do you figure you'll need?
Ignition, lights, heater, auxiliary., so 4. Looking for an old fuse block online, maybe look at marine sites too. Boats might be more likely to have the kind of fuse block I want..
I would presume that you'd want the newer style fuses instead of the glass or ceramic?Quote:
Originally Posted by MikeB52
I’d prefer glass actually. Not period correct or anything, I just prefer em.
They become vogue in the early 60s I think, but not sure on that.
I am sure I have what you are looking for around here somewhere......Quote:
Originally Posted by MikeB52
But I am sure when all is said and done getting a new one would be cheaper and more convenient!LOL
Little gadget I wont need often, but surely do right now to match up my repair panels to the originals.
Attachment 327409
Seems my body panels are 20 gage, and my rear tie bar or cross brace is 18 gage.
Thicker than I thought.. but not surprising as they feel thicker than more modern cars.
I myself have purchased tools that could have not been purchased if I would have taken the time to research how to modify or such. I would presume that you have either a micrometer OR a caliber of some sort--
http://dhfco.com/pdf/DHF%20Catalog_wire_sheet.pdf
I have both, but for gaging body steel, what with the twistin and clipping over rusty painted edges, I’d rather use this $10 piece of steel. I can scrape off paint and rust, or work over the edge to make sure I’m on the right size.
I like my precision instruments to stay in the wood shop.
But that’s a good chart to have copied and up on the wall.
:tu
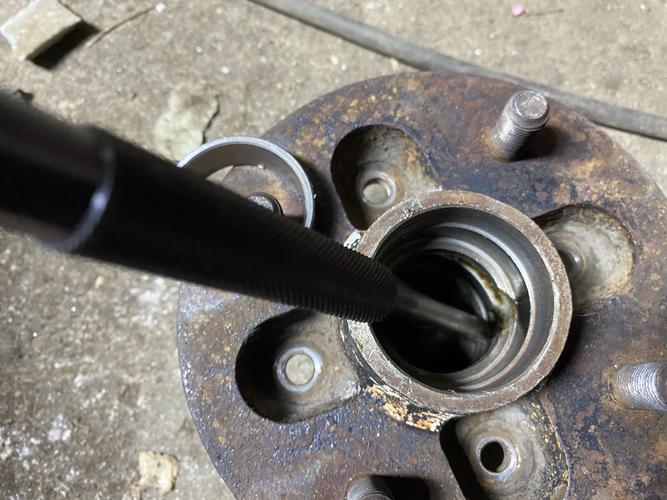
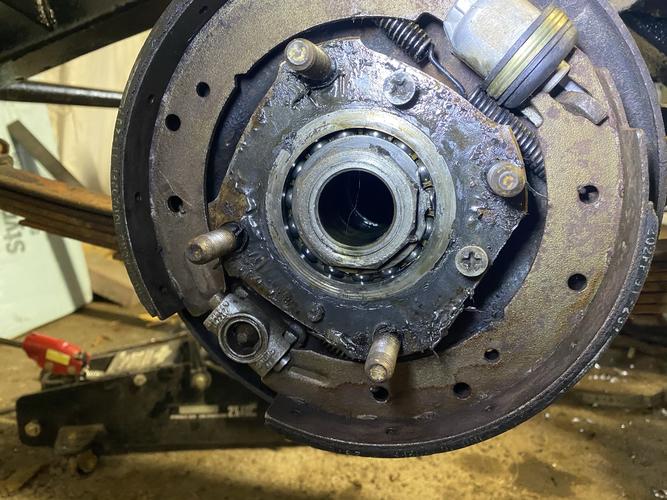
While I await some parts I turned to the rear brakes and bearings.
Attachment 327457
The half shaft pulled out clean and easy, but the DPO seems to have replaced a rear bearing, and didnt use a wrench on the nut, he used a punch!
Attachment 327458
So now Im torn between believing the bearing is new ish and leaving it be, or filing down the damaged nut to some semblance of castellated again and finding the 1 61/64 8 pt socket needed to do the job properly....
The shoes were covered in oil so Im thinking a seals gone bad, so will probably tear it all apart while here....
:tu
might have used a screwdriver or chisel to remove it last time. I've seen that a lot.