Results 1 to 9 of 9
 5Likes
Thread: Various Heat Treating Methods Tested
Threaded View
-
07-22-2013, 03:44 PM #1Junior Member

- Join Date
- Jul 2013
- Location
- Austin, TX
- Posts
- 3
Thanked: 0 Various Heat Treating Methods Tested
Issue:
I've read too many ways to heat treat, beyond just "quench in oil or brine and bake to temper". Some of the write-ups seem to make sense, but I'd like to see for myself. Partial inspiration for this experiment: "Grain Refinement" on youtube.
Setup:
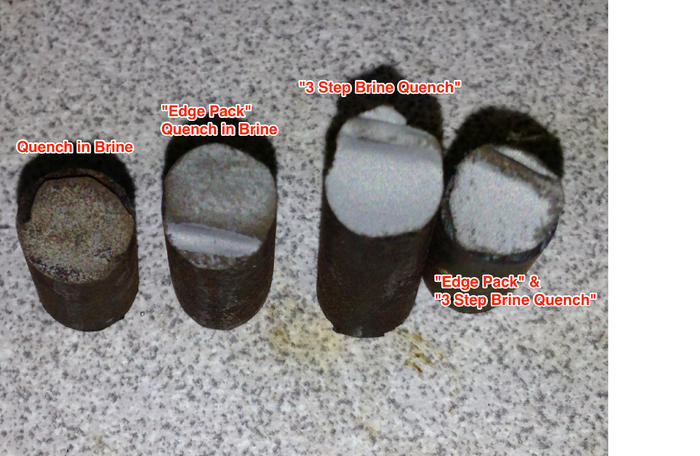
I took 4 segments of 1/4" O1 drill rod and scored them with a hacksaw (for breaking later).
Each one was quenched:
Quench in Brine: I realize this is O1, so I should have used oil, but I wanted to try brine. I also just cracked a blade I was working on, so maybe not the greatest solution going forward. I heated it to dull red or orange and dunked it, swirling until completely cool.
"Edge Pack" Quench in Brine: Not sure if my method was sound, but I heated it up, waited till it was almost non-glowing and then did some light hammering on the sample. Then I quenched as before in brine, until completely cool.
"3 Step Brine Quench": This is a method proposed by this site (Heat Treatment). Basically, you do a quick dip in brine (less than a second) to get below about 900F, then cool it slowly (about 1 min) until brine no longer sizzles, then let it air cool for about 15 minutes. The theory is that getting to 900F in less than a second avoids perlite, but the "450F to room temp" range is where the martensite actually forms, so give it as long as you can in that stage.
"Edge Pack" & "3 Step Brine Quench": Combined to see if there is additive value.
Results:
When I broke the samples, the first one only required a pair of pliers and the angle of the anvil and hammer. The rest required the sample to be in a vise and hammered transverse. Then I chased down the part that flew across the garage.
The pic attached isn't the greatest, but what I can see with a bench microscope is pretty visible. The different color of the first sample is probably due to rust (it was done a day earlier). With that said, the grain is visible in that sample, much more than in the other samples. Either "Edge Packing" doesn't do much, or I did it wrong, though it seems to have improved grain a little.
Overall, it seems that "3 Step Brine Quench" method produced the most uniform grain - though a little fuzzy in the picture, it makes a pretty nice picture under a scope.
Going Forward:
I want to try again on a blade with the "3 Step Brine Quench." I say again, because I had a practice razor that cracked yesterday. I had worked with sandpaper and got pretty close to an actual edge, which I suspect was my problem. The quench caused some waves in the edge and it also cracked as it cooled. Boo. That goes on the wall in my shop to remind me of my first effort.

Also, who the heck am I?:
I recently got into bladesmithing, I've made a couple of stock removal blades and I recently got my shop setup with a small forge and an anvil. I've been reading a ton about blacksmithing, bladesmithing, razor-making, and anything related - so my head is full of knowledge. Now that my shop is operational, I've begun putting that stuff into practice. I'll hopefully post some info on my next project, which will be a razor out of actual O1 steel (not nicholson file like the last one).-pcop
www.facebook.com/PcopSteel


 LinkBack URL
 About LinkBacks


 Reply With Quote
