
Results 1 to 10 of 13
 12Likes
Thread: Grain size / work hardening
 LinkBack URL
 About LinkBacks
-
05-27-2013, 06:32 AM #1
 Grain size / work hardening
Last week I accidentally broke a razor I was working on. I thought I had annealed it, but evidently I was wrong.
 There was a slight kink between the tang and the blade. I thought I'd tap it straight with a hammer, but after 2 taps, the blade just snapped.
Not really a bad thing, because I was already thinking of breaking one of my blades in progress to examine grain size. That it happened to that particular blade was not a big problem, and in fact it also showed that I needed to rethink my annealing process.
Here are the pics:
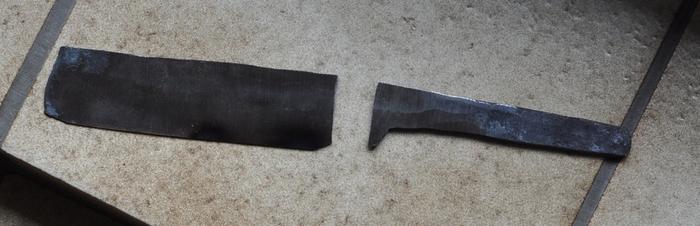
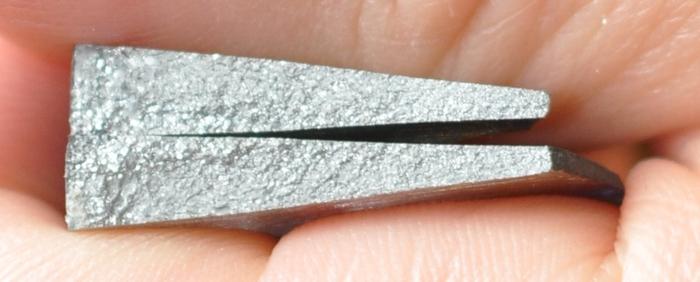
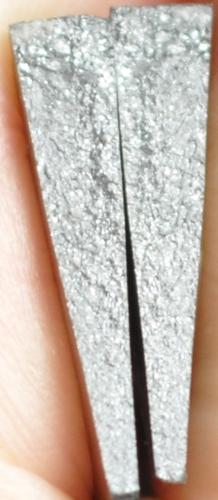
The spine of the razor was not hammered at all since the stock was at the right thickness. I only tapped it for straightening. You can clearly see that the repeated hammering near the edge made the grains a lot smaller than near the spine, where they were left alone and allowed to grow unchecked.
You can also see that the grain size is not uniform. There are probably several reasons for this. Uneven cooling, uneven hammering (one side more than the other). Not soaking the blade long enough in the fire. To be honest I don't know which factor is most important.
What I did learn after experimenting is that repeated hammering will leave the blank in a near hardened state. Probably not as hard as when it is properly hardened, but hard nonetheless. Initially I had assumed that with the repeated heating and slow cooling, the material would be fairly soft. But it seems that the anvil (and the cold outside draught) acts as a heatsink enough that the material is hardened at least on the side that touches the anvil a lot. Combined with the work hardening that takes place in the straightening phase, it leaves the razor hard.
For annealing I now build a charcoal fire and insert my blanks until they reach an even bright orange. Then I turn off the air supply. At that point the heat is no longer blown out the top, but spreads locally, making the entire inside a dark orange. I just leave the charcoal to burn without additional air, leading to a very slow cool.
Tapping the annealed blades with a peen hammer now makes a very different pitch than the blank I just started working after forging. The ones after forging make the same sound as the blades I hardened yesterday. The annealed ones make a much lower sound with a bigger frequency spread (more than one tone).Last edited by Bruno; 05-27-2013 at 06:36 AM.
Til shade is gone, til water is gone, Into the shadow with teeth bared, screaming defiance with the last breath.
To spit in Sightblinders eye on the Last Day
-
-
05-27-2013, 03:50 PM #2Senior Member

- Join Date
- Mar 2011
- Location
- Corcoran, Minnesota
- Posts
- 665
Thanked: 170
Charlie posted an excellent piece on annealing some time back - pictures, and I think video. When I anneal, I cool in a bucket filled with vermiculite. My understanding is to anneal, and then normalize 2 to 3 times before heat treating. This will result in small, uniform grain size. PM Mike Blue if you have any questions - he has studied this more than anyone I know.
-
05-27-2013, 04:14 PM #3Senior Member


- Join Date
- Dec 2006
- Location
- Burkburnett TX
- Posts
- 3,095
Thanked: 2392
My guess would be temperature is the main reason for the large grain. Maybe try using a magnet and heat the blade till non-magnetic then heat a little more. The curie point where steel becomes non-magnetic is a little below the critical temperature.
I spent a bit of time looking for the shadows as steel heats up and cools down and the crystalline structure changes. If you can see when the structure changes as you are heating it up, decalescence you can train your eye to find the right color or have an indicator so you know when you have achieved critical temperature.
I agree about Mike Blues input, he is the one who made the light bulb go off in my head and changed theory into practice for me.
CharlieLast edited by spazola; 05-27-2013 at 04:27 PM.
bryan likes this.
-
The Following User Says Thank You to spazola For This Useful Post:
skipnord (05-27-2013)
-
05-27-2013, 06:11 PM #4
I think you misunderstand. This was not supposed to be a hardened blade.
This is just what was there after the blank was forged, without annealing or proper normalization.
In other words, you see the grain as it developed during the forging, which was done at welding temperatures.
I just thought it was interesting to see the grain develop differently in different parts of the blade.spazola likes this.Til shade is gone, til water is gone, Into the shadow with teeth bared, screaming defiance with the last breath.
To spit in Sightblinders eye on the Last Day
-
The Following User Says Thank You to Bruno For This Useful Post:
spazola (05-27-2013)
-
05-27-2013, 06:27 PM #5Senior Member
- Join Date
- Mar 2011
- Location
- Corcoran, Minnesota
- Posts
- 665
Thanked: 170
And, as you well know, that is why we have to anneal and normalize before we heat treat. Any time we heat into the 2 to 300 degrees above critical, we get grain growth. I made a knife from a file that I did not follow the steps with several years ago, and when I accidentally dropped it on my concrete floor after heat treating, it shattered. Lesson learned. This thread is good information for folks that are new to forging blades - I know it is not new to you, Bruno. Happy forging.
-
05-27-2013, 07:21 PM #6Senior Member
- Join Date
- Dec 2006
- Location
- Burkburnett TX
- Posts
- 3,095
Thanked: 2392
Whoops, I will try to learn to read more completely.
Foot in mouth, Charlie
-
05-27-2013, 11:50 PM #7Senior Member

- Join Date
- Oct 2009
- Location
- Silicon Valley, CA, USA
- Posts
- 3,157
Thanked: 852
Do keep an eye out for one of the electric sensor guns that let you point and measure temperature. Originally Posted by spazola

Getting the temperature right is difficult and different temp implies different timing.
Vermiculite is a good trick.... Some use wood ash.
Watch for furnaces that burn the carbon from the steel... a coating of clay slip works for
some to keep the carbon content from burning off.
If it was easy all razors would be perfect.
-
05-28-2013, 12:27 AM #8"My words are of iron..."

- Join Date
- Oct 2006
- Posts
- 1,898
Thanked: 995
There is an ancient method now called by its common name: edge packing. I prefer finish forging, but the principle is the same. With hammering the grain structure is reduced mechanically rather than as I and others usually do with temperature cycles.
Where this method has taken a modern turn is in some of the friction forging machines, even friction pattern welded steels being produced. Those grains can be finer than even some produced with crucible powders. The machinery is expensive but it is another way.
Annealing large grained steel still leaves the large grain boundaries as a place for a fracture to propagate. Even pearlite can be harder than you think.
-
05-28-2013, 12:47 AM #9Senior Member
- Join Date
- Oct 2009
- Location
- Silicon Valley, CA, USA
- Posts
- 3,157
Thanked: 852
Add shot peening to the reading list. Shot peening - Wikipedia, the free encyclopedia Originally Posted by Mike Blue
-
05-28-2013, 02:52 AM #10"My words are of iron..."
- Join Date
- Oct 2006
- Posts
- 1,898
Thanked: 995
No problem, shot is just little tiny hammers.
Adam G. and niftyshaving like this.Nothing discloses real character like the use of power. Most people can bear adversity. But if you wish to know what a man really is, give him power. R.G.Ingersoll


 Reply With Quote