
Results 1 to 10 of 24
 38Likes
 LinkBack URL
 About LinkBacks
Hybrid View
-
04-02-2019, 05:59 PM #1Solving Problems


- Join Date
- Jul 2011
- Location
- Dallas, TX
- Posts
- 16
Thanked: 0 Forged razor out of 1084 not performing as well as I hoped trying to figure out why
So I make knives via stock removal and have had good success over the last few years. I'd done a bit of blacksmithing in the past, and recently picked up an anvil and a gas forge and thought it'd be fun to forge a straight razor from some inexpensive 1084 I had sitting around.
I'm worried that it's more of a razor shaped object than an actual razor at this point though, and I'm trying to figure out where I went wrong, hopefully someone here can help.
Potential issues:
1. Heat treat - I've got a digitally controlled Paragon kiln that I've used for heat treating for years now with great results, but the razor came in at around 57 Rockwell using hardness test chisels, which was softer than I'd hoped for, was aiming for 60+. Maybe I should have just quenched it and skipped the tempering?
2. Edge geometry - I'm worried that the blade is too narrow near the edge, because initially, the edge was crumpling like foil. I'm not sure how narrow of a blade 1084 will actually work with. With AEB-L, for example, I know that a blade this narrow wouldn't have the foil crumpling effect with an edge this narrow. I ground it back a bit and resharpened it, but the profile looks like crud now.
3. Overall geometry - I did my best to hollow grind it properly, but doing it by hand and this being the first one I've made, it's entirely possible I made a mistake somewhere and I'm wondering if the general geometry is good enough to get it to shave like an actual straight razor.
It will take the hair off of my forearm with some effort, but it doesn't do a thing to the stubble on my face. I've sharpened it with the same Japanese water stones and strops I use for my commercially made straight razor (1k, 6k, 8k, green chromium stopping compound on a hardwood backed leather strop, red compound on another strop, 1 micron diamond strop paste on a third, 0.5 micron diamond strop paste on a 4th), but the edge isn't working nearly as well following the exact same sharpening process I've used to good effect with my commercially made straight razor.
As this thread is useless without pics, I'll add some and provide some measurements:
Measurements:
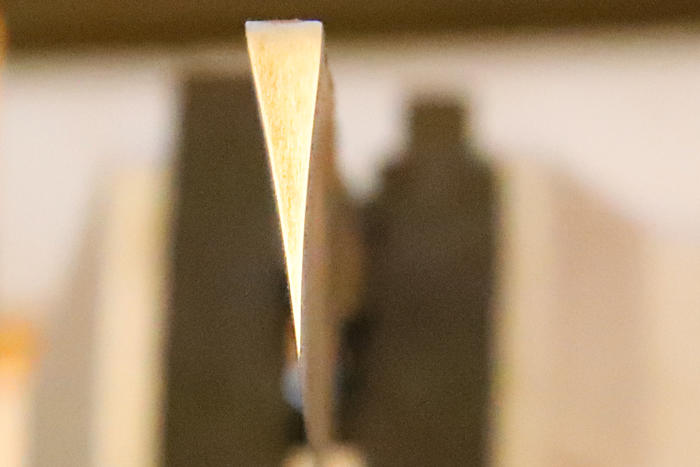
0.007" thick at the edge
0.214" wide at the spine
1.05" to 1.14" tall
3.304" blade length
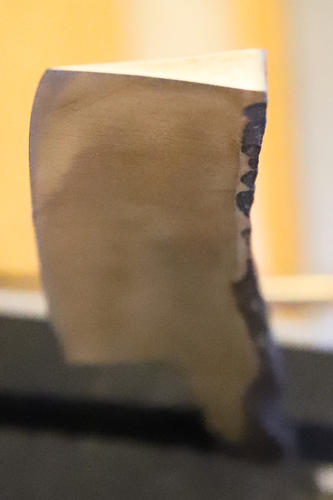
Pics:
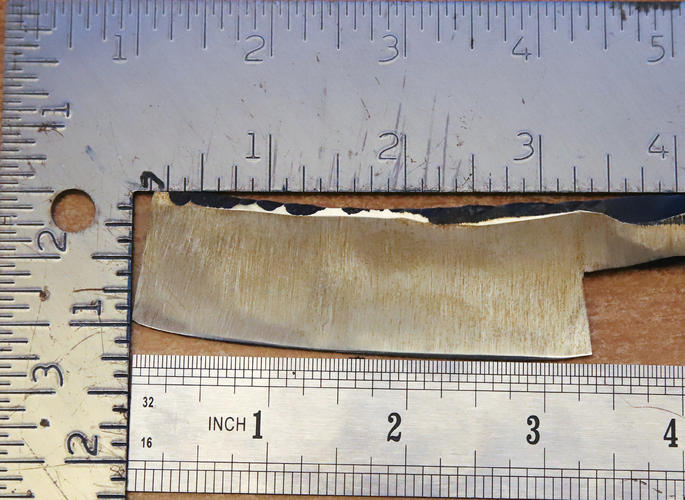
Any thoughts on where this razor went wrong and what to change on the next one would be greatly appreciated.
-
04-02-2019, 08:04 PM #2Senior Member


- Join Date
- Feb 2013
- Location
- Haida Gwaii, British Columbia, Canada
- Posts
- 14,454
Thanked: 4830
Well I am not a builder. I have done a fair amount of honing. At this point my first guess is that you angle is too low, due to the ratio of spine to width. Try building up your spine with three layers of electricians tape. You might make it with two. Also when honing a brand new razor that has never had a bevel established, the 1K can take a significant amount of time, and if you do not have a perfect apex from heel to toe it will never shave well, or sometimes at all.
ScottGoodman likes this.It's not what you know, it's who you take fishing!
-
04-02-2019, 08:09 PM #3Solving Problems
- Join Date
- Jul 2011
- Location
- Dallas, TX
- Posts
- 16
Thanked: 0
Interesting! Never knew that it could be too low! Originally Posted by RezDog

Are there any guides as to what the ideal spine to width ratios are?
-
04-02-2019, 08:22 PM #4Razor Vulture

- Join Date
- Oct 2010
- Location
- Lone Star State
- Posts
- 26,166
Thanked: 8617
!/4 of the width of the blade is pretty standard for big razors.
8/8 should have a 1/4 wide spine.
-
04-02-2019, 08:24 PM #5Senior Member
- Join Date
- Feb 2013
- Location
- Haida Gwaii, British Columbia, Canada
- Posts
- 14,454
Thanked: 4830
Well first off, let me say, I could have messed up on the math.
http://www.coticule.be/wedges.html?f...alculation.xls
Is a good resource.It's not what you know, it's who you take fishing!
-
04-02-2019, 08:29 PM #6Solving Problems
- Join Date
- Jul 2011
- Location
- Dallas, TX
- Posts
- 16
Thanked: 0
That is very handy, thank you! Originally Posted by RezDog
It looks like my blade is waaaay too wide. I'll have to see if I can grind it down into something workable or just make another one - practice makes perfect!ScottGoodman likes this.
-
04-02-2019, 08:39 PM #7Senior Member

- Join Date
- Jan 2015
- Location
- Pinole, ca
- Posts
- 1,526
Thanked: 339
If i remember correctly you want to be around 3.8-1 from the edge to where the spine contacts the hone for a given spine thickness. 16*-18* included angle. This is a generalization btw. I made one and it was at 3.4-1 after a piece of tape and it shaves well.
What temp did you temper it at? Maybe too soft, at 57rc I suppose your edge could be too flexible to stay on the hone. Id do what rez said and try a bunch of tape to see if it will hold an edge. First thing to do is to get the edge to follow the shape of the spine, set a bevel then grind to it to clean up your hollows and get the geometry close.
Im sure one of the resident makers will be along and should be able to sort you out.Last edited by jfk742; 04-02-2019 at 08:44 PM.
-
04-03-2019, 07:07 AM #8
Also the width of the razor should be even along the length. Your razor seems much wider at the heel than at the toe. Originally Posted by GuyMontag
Til shade is gone, til water is gone, Into the shadow with teeth bared, screaming defiance with the last breath.
To spit in Sightblinders eye on the Last Day


 Reply With Quote
