Page 1 of 7 12345 ... LastLast
Results 1 to 10 of 63
Like Tree161Likes

Thread: 1095 stubby WIP

  1. #1
    Senior Member jfk742's Avatar
    Join Date
    Jan 2015
    Location
    Pinole, ca
    Posts
    1,526
    Thanked: 339

    Default 1095 stubby WIP

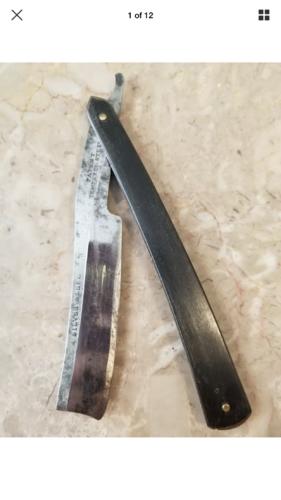
    Just started this razor after getting a forge up and running. Going off of memory and what I’ve found on the internet as far as thermo-cycles and heat treat go. I banged out an rso on a railroad track section for an anvil. Looking to end up with one of these:

    Name:  59707F6D-B95E-48D5-A648-F5F2EE63D89E.jpg
Views: 340
Size:  15.6 KB

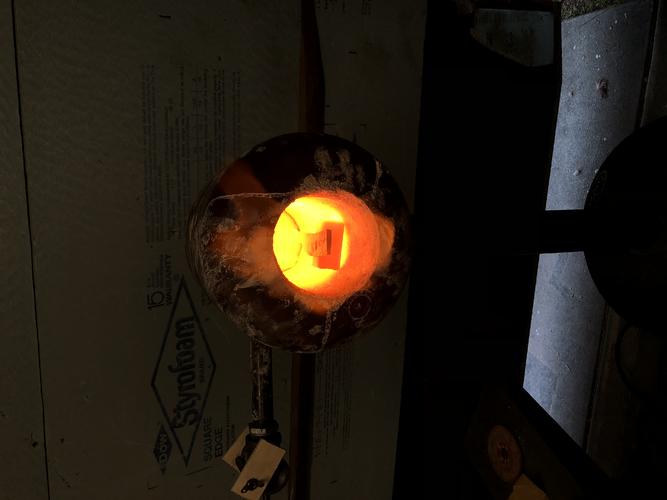
    I normalized are what looked like bright cherry, then cycled down from there until I hit an even dull red, maybe 4-5 cycles. I also turned down the forge progressively. On the last heat I shut the forge off and let the razor go to black on the anvil then stuck the steel back in and capped the ends of the forge to let it all cool slowly and hopefully anneal the steel for grinding and filing.

    Name:  6FE5EB54-269D-4A1E-B93D-42F0C76BEAEA.jpg
Views: 312
Size:  23.2 KB

    Hoping for any input or suggestions on how to end up with a decent heat treat and fine grain structure. I do have another gas forge I made for heat treating. It has a muffler and a thermocoupler for monitoring the temp. I do plan after rough grinding to go through a proper normalizing and grain refining session. I definitely would like to learn my colors. For tempering I started on a pid controlled deep fryer that I still need to get some low temp salts for. Plannng on 2-3 tempering cycles at 400f.

    Again, this is my plan based on a dangerously small amount of experience and reading. An and all help would be appreciated.

  2. #2
    Senior Member blabbermouth markbignosekelly's Avatar
    Join Date
    Dec 2012
    Location
    Egham, a little town just outside London.
    Posts
    3,733
    Thanked: 1074
    Blog Entries
    2

    Default

    Cant help whatsoever but good on ya for having a go and good luck
    jfk742 likes this.

  3. #3
    Senior Member blabbermouth spazola's Avatar
    Join Date
    Dec 2006
    Location
    Burkburnett TX
    Posts
    3,095
    Thanked: 2392

    Default

    First of all I have to say you have an amazing aptitude for grinding razors, your hand eye coordination is next level.

    Everything you mentioned in heat treat process sounds good. Using the muffler and waiting to see decalescence happen then, hold it for a little bit, then quenching sounds like a plan. Two tempering cycles is good.

    If you have some scrap you can practice your process, then break it to see what the grain looks like.
    rolodave, RezDog and Gipson like this.

  4. The Following User Says Thank You to spazola For This Useful Post:

    jfk742 (01-13-2020)

  5. #4
    Senior Member blabbermouth bluesman7's Avatar
    Join Date
    Jul 2014
    Location
    Denver CO
    Posts
    4,571
    Thanked: 810

    Default

    Keep in mind that 1095 has a low hardenability, so any test pieces should be at about the same thickness as the thin part of your razor in order to cool fast enough.
    spazola and rolodave like this.

  6. The Following User Says Thank You to bluesman7 For This Useful Post:

    jfk742 (01-13-2020)

  7. #5
    Senior Member jfk742's Avatar
    Join Date
    Jan 2015
    Location
    Pinole, ca
    Posts
    1,526
    Thanked: 339

    Default

    So if I end up at say .030” at the edge that should also be the thickness of my test sample? I have #50 quench oil. Is 120f preheat for oil a good temp to start at?

  8. #6
    Senior Member blabbermouth bluesman7's Avatar
    Join Date
    Jul 2014
    Location
    Denver CO
    Posts
    4,571
    Thanked: 810

    Default

    I'd guess up to .08" or so would be thin enough, but I would also think that it would be easy enough to match the razor thickness pretty close.

    I like to go up to ~ 150ºF with my quench oil, but I usually use canola, so it might be different for #50.
    Last edited by bluesman7; 01-13-2020 at 07:21 PM.

  9. #7
    Senior Member jfk742's Avatar
    Join Date
    Jan 2015
    Location
    Pinole, ca
    Posts
    1,526
    Thanked: 339

    Default

    Charlie: I need my grinding to be good because my blacksmithing skills are questionable at best.

    Victor: I’ll make some coupons and see.

    My buddy had me heat treat a couple of 1095 knives he made for him and we used canola. I tried a couple of times while increasing the heat from 1470-1485 and they both barely skated a file. I compared it to some black oxide drill bits and they were about the same. When we did that razor last year the as quenched w2 seemed way harder. Would be nice to have a Rockwell tester to really see but that is a financial impossibility at the moment, may be some day....

  10. #8
    Senior Member blabbermouth bluesman7's Avatar
    Join Date
    Jul 2014
    Location
    Denver CO
    Posts
    4,571
    Thanked: 810

    Default

    Quote Originally Posted by jfk742 View Post

    My buddy had me heat treat a couple of 1095 knives he made for him and we used canola. I tried a couple of times while increasing the heat from 1470-1485 and they both barely skated a file.
    I think that the amount of mass directly behind the edge can have a lot of effect on the quench speed. I have not had issues with 1095 and canola, but I have only quenched thin sections with it.
    rolodave and jfk742 like this.

  11. #9
    Senior Member jfk742's Avatar
    Join Date
    Jan 2015
    Location
    Pinole, ca
    Posts
    1,526
    Thanked: 339

    Default

    Made a little progress. Forged the blank and forgot to take pictures. It was pretty ugly and took me about 2 hours to forge and normalize. I attempted to anneal the blank by leaving it in a red glowing forge. Unfortunately there isn’t enough mass to the forge to retain heat long enough to properly anneal. It’s grinding fairly easy but could be a little softer.

    Finally remembered to start taking pictures. This was after using an angle grinder to get the scale off and some rough profiling with the belt grinder.
    Name:  48C9CF05-F516-4112-B441-B71007A162AE.jpg
Views: 271
Size:  45.0 KB

    Name:  25C609C1-FA45-462E-9060-6B8C40A9D7AD.jpg
Views: 297
Size:  45.5 KB

    An hour or two of grinding:
    Name:  44FFE08E-F2E2-4580-B9BE-453D9844A6BA.jpg
Views: 313
Size:  51.8 KB

    Name:  9E354A53-DE16-46BE-B86D-CE527E589309.jpg
Views: 295
Size:  42.6 KB

    I kind of got away from my original intent with this project but I think it will turn out ok in spite of my loose interpretation of a stub tail.

  12. #10
    Captain ARAD. Voidmonster's Avatar
    Join Date
    May 2011
    Location
    Pacifica, CA
    Posts
    2,474
    Thanked: 2226

    Default

    Quote Originally Posted by jfk742 View Post
    Made a little progress. Forged the blank and forgot to take pictures. It was pretty ugly and took me about 2 hours to forge and normalize. I attempted to anneal the blank by leaving it in a red glowing forge. Unfortunately there isn’t enough mass to the forge to retain heat long enough to properly anneal. It’s grinding fairly easy but could be a little softer.

    Finally remembered to start taking pictures. This was after using an angle grinder to get the scale off and some rough profiling with the belt grinder.
    Name:  48C9CF05-F516-4112-B441-B71007A162AE.jpg
Views: 271
Size:  45.0 KB

    Name:  25C609C1-FA45-462E-9060-6B8C40A9D7AD.jpg
Views: 297
Size:  45.5 KB

    An hour or two of grinding:
    Name:  44FFE08E-F2E2-4580-B9BE-453D9844A6BA.jpg
Views: 313
Size:  51.8 KB

    Name:  9E354A53-DE16-46BE-B86D-CE527E589309.jpg
Views: 295
Size:  42.6 KB

    I kind of got away from my original intent with this project but I think it will turn out ok in spite of my loose interpretation of a stub tail.
    Lookin' great! Got kind of a Fred Fenney 1830's pointy tail which I don't often see.

    Definitely dig the tall, square spine.
    jfk742 likes this.
    -Zak Jarvis. Writer. Artist. Bon vivant.

Page 1 of 7 12345 ... LastLast

Posting Permissions

  • You may not post new threads
  • You may not post replies
  • You may not post attachments
  • You may not edit your posts
  •