
Results 1 to 10 of 14
 52Likes
 LinkBack URL
 About LinkBacks
-
07-08-2019, 08:54 PM #1Senior Member


- Join Date
- May 2010
- Location
- Upstate South Carolina
- Posts
- 3,308
Thanked: 987 Uneven Hone Wear on a Big Smilin' Wedge
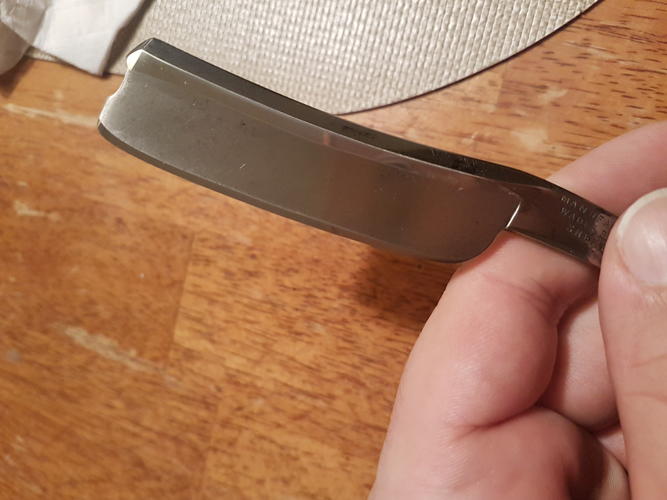
So I won this big chopper wedge Wostenholm IXL on the bay for 40 bucks (which included very nice bone scale blanks, though I'm thinking wood or horn for this one). Anyway, I haven't polished the crud off of it yet, but it is mostly in great shape with very little tarnish, not too much pitting, and nice deep, clear stamps. I don't know if you can see it from the pics, but it does have some pretty uneven hone wear on the spine and someone's recent bevel:
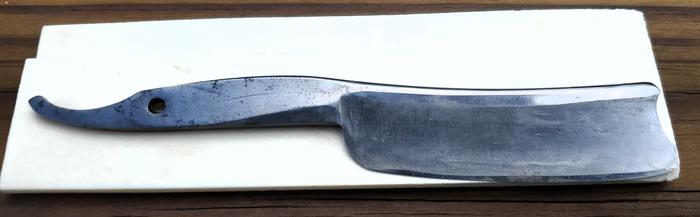
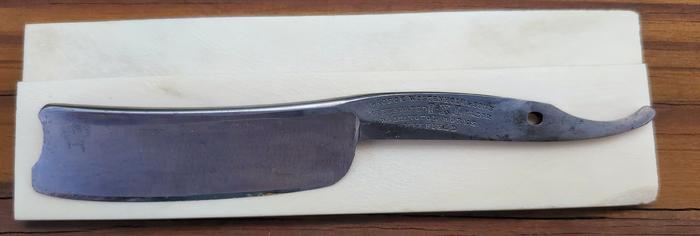
I know this subject has been done to death on the Honing forum, but I don't think I've ever had one this bad. Given that it's almost a full wedge, would you guys just put on multiple layers of tape and start with the rolling gymnastics on the hones, try to even it out with sanding, what? This is the heaviest, nicest Wosty I have come across, and I still can't believe the price I paid for it, so I don't want to screw it up. TIA for your input. Aaron/SHDThere are many roads to sharp.
-
07-08-2019, 09:05 PM #2Senior Member
- Join Date
- Jun 2013
- Location
- Pompano Beach, FL
- Posts
- 4,016
Thanked: 631
If it were me I would sand a little before polishing. I would blend in the edges of the hone ware with the sanding only for cosmetics. On a wedge or near wedge I generally use 2 layers of tape. Before applying tape check spine with a straight edge for high or low areas. Putting a layer of tape in low areas and covering with one layer full length of spine can help with an even bevel.
-
The Following User Says Thank You to bouschie For This Useful Post:
ScoutHikerDad (07-08-2019)
-
07-08-2019, 09:23 PM #3Senior Member
- Join Date
- May 2010
- Location
- Upstate South Carolina
- Posts
- 3,308
Thanked: 987
Thanks, Leonard-I kinda figured all 3 of those would apply. I have started with as many as 5 layers of tape before, removing layers as I work my way up the hones (don't laugh, it works for extreme cases). I have also done the differential/partial taping (whatever it's called) at times too, but probably not as good at it as more experienced hands. It may be a moot point for awhile anyway unless I bump it to the top of the queue, as I've got a pile of other blades I've already matched to scales; just gotta find time to do 'em. Thanks again! Originally Posted by bouschie
 There are many roads to sharp.
-
07-08-2019, 10:18 PM #4Senior Member


- Join Date
- Feb 2013
- Location
- Haida Gwaii, British Columbia, Canada
- Posts
- 14,395
Thanked: 4821
If it is a super duper keeper, and you don’t have much in it you could send it to Karl Johnson for a light regrind to remove the hone wear from both the spine and minimalize the bevel width.
You could also accomplish the same thing with hand sanding. With the bevel already established you can work it down to invisible with a lot of hand sanding and effectively do the regrind by hand.
You could also follow the above procedure, and won’t retype it.
The fourth is to hone it and use it, with new scales of course.
:-)
Keep us posted.It's not what you know, it's who you take fishing!
-
The Following User Says Thank You to RezDog For This Useful Post:
ScoutHikerDad (07-08-2019)
-
07-09-2019, 01:19 AM #5Skeptical Member


- Join Date
- Nov 2016
- Location
- Colorado Springs
- Posts
- 10,481
Thanked: 2185
Like Leonard said, I've sanded a few by hand to hide the hone wear. Its a lot of work but can be done. If you really want it corrected, like Rez said. Contact Karl. Either way you got a nice keeper there. Its a biggie!
ScoutHikerDad likes this.It's just Sharpening, right?
Jerry...
-
The Following User Says Thank You to Gasman For This Useful Post:
ScoutHikerDad (07-09-2019)
-
07-09-2019, 07:27 AM #6Senior Member
- Join Date
- Aug 2013
- Location
- NYC, NY
- Posts
- 1,496
Thanked: 169
What I would personally do is rolling x without tape and get the wear that is there more equalized and establish at the very least the heel bevel. After that, one layer of tape if you wanted tape to hone with and just be patient/refresh the layer of tape periodically. Layering up the tape is just folly. I got a butcher recently where the toe was heavily hit and the mid to heel as well as the spine had not much contact at all in those areas. I just equalized it on my corrective bevel setter, moved on through a few synth grits and honed it on a jnat. So long as I never chip the edge, I am never going to have to hog off tons of steel again and it shaves beautifully.. It's not really the trendy solution, but mine anyway had that wear at the toe already. Btw, you should have a good look at that blade. Sometimes, a lot of wedges are that way due to improper approach by whoever owned it, but other times it is because of a warp or twist causing the person honing it who is otherwise capable to just run out of talent. Wostenholms are usually pretty good about not being that way though.

Last edited by kcb5150; 07-09-2019 at 07:30 AM.
ScoutHikerDad likes this.
-
The Following User Says Thank You to kcb5150 For This Useful Post:
ScoutHikerDad (07-09-2019)
-
07-09-2019, 07:37 AM #7Senior Member
- Join Date
- Aug 2013
- Location
- NYC, NY
- Posts
- 1,496
Thanked: 169
That blade really doesn't look too off imo really looking at it. I am guessing it is not warped at the heel because neither side was really hit on the edge but the spine was so they probably were not being mindful of rocking to establish contact on the stone with the edge.
ScoutHikerDad likes this.
-
The Following User Says Thank You to kcb5150 For This Useful Post:
ScoutHikerDad (07-09-2019)
-
07-09-2019, 02:12 PM #8At this point in time...


- Join Date
- Jun 2007
- Location
- North Idaho Redoubt
- Posts
- 26,963
- Blog Entries
- 1
Thanked: 13226
If you want an even bevel there are only two solutions
Add Tape and the associated Tricks
Remove steel
To be VERY clear you don't need an even bevel to shave, but most of us strive for them
Once the steel is removed from the razor it can't be put back so choose carefully how you want to proceed
Regrinds are done one of two ways,
Superficial where you remove the MINIMAL amount of face steel to make the razor look good again
Full Regrind where you are actually changing the grind of the razor ie: changing a Near Wedge to a 1/4 wedge or close
Understand that this doesn't make the razor into perfect geometry again, doing a regrind simply resets the spine and bevel to equal, you cannot ever add thickness to the spine to reset the geometry.
You can ONLY reset that geometry by adding tape or making the razor smaller ie: changing a 7/8 into a 6/8 or whatever measurement works
Math is math
A little known tape trick, that I have posted over the years
Put one layer of tape on the spine, grind the spine of the razor on a 1k hone until you hit steel, flip and repeat,
Now add a second layer of tape, or more depending on geometry, this is the nondamaging way of correcting for warp, rather than grinding away steel you are grinding away tape.. This is the older version of what Matt is doing with removing steel, same concept
These are all just tricks to compensate for bad honing in the past,
Hone On !!!
PS:
Add 3 layers of tape and do a Sharpie Test, then you can make an educated analysis of what you have in your hand BEFORE moving forwardLast edited by gssixgun; 07-09-2019 at 02:20 PM.
"No amount of money spent on a Stone can ever replace the value of the time it takes learning to use it properly"
Very Respectfully - Glen
Proprietor - GemStar Custom Razors Honing/Restores/Regrinds Website
-
The Following 4 Users Say Thank You to gssixgun For This Useful Post:
Cangooner (07-09-2019), cheetahmeatpheonix (03-26-2022), RezDog (07-09-2019), ScoutHikerDad (07-09-2019)
-
07-09-2019, 03:32 PM #9Incidere in dimidium


- Join Date
- Mar 2012
- Location
- Val des Monts, Quebec
- Posts
- 4,065
Thanked: 1439
As opposed to removing a bunch of steel that doesn't *need* to be removed? As Glen pointed out, there are two paths available here, and when used correctly, tape can be *extremely* helpful in dealing with tricky geometrical problems without irretrievably changing the structure of the blade. Originally Posted by kcb5150
Don't get me wrong: it's your blade, so do whatever floats your boat. As long as it works and gets the result you're looking for, that's fantastic.
But for those who prefer not to permanently alter a blade's geometry, and who would rather preserve as much of the remaining steel as possible, tape makes perfectly good sense. And it just works.
It was in original condition, faded red, well-worn, but nice.
This was and still is my favorite combination; beautiful, original, and worn.
-Neil Young
-
The Following User Says Thank You to Cangooner For This Useful Post:
ScoutHikerDad (07-09-2019)
-
07-09-2019, 03:39 PM #10Senior Member

- Join Date
- Dec 2012
- Location
- Egham, a little town just outside London.
- Posts
- 3,734
- Blog Entries
- 2
Thanked: 1074
JMO Originally Posted by kcb5150
As Aaron has said it's the nicest Wosty hes ever come across grinding away the spine is going to destroy it aesthetically. Yes it does work, and for someone who views a razor as an utilitarian tool this is perfectly fine but for many it simply ruins a razor.
This is a far better approach with the same theory behind it.
Originally Posted by gssixgun
-
The Following 2 Users Say Thank You to markbignosekelly For This Useful Post:
ScoutHikerDad (07-09-2019), Steel (07-10-2019)


 Reply With Quote