
Results 1 to 7 of 7
 29Likes

Thread: Worcester Razor Co. Red Devil Tobacco
 LinkBack URL
 About LinkBacks
Hybrid View
-
08-07-2019, 06:55 PM #1Senior Member


- Join Date
- Dec 2018
- Location
- Gainesville, FL
- Posts
- 6,866
Thanked: 682 Worcester Razor Co. Red Devil Tobacco
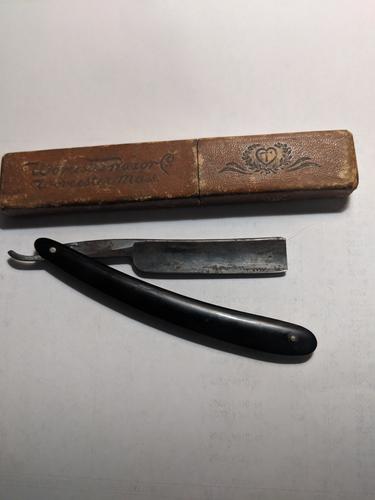
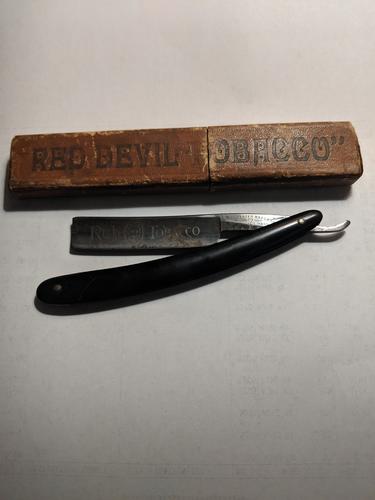
It needs a little love but this one should clean up pretty well. Worcester Razor Co Red Devil Tobacco 9/16" square point, 1/2-3/4 hollow with minimal pitting. Mainly surface rust. And it has the original box.
 Iron by iron is sharpened, And a man sharpens the face of his friend. PR 27:17
-
08-08-2019, 12:55 AM #2Senior Member
- Join Date
- Dec 2018
- Location
- Gainesville, FL
- Posts
- 6,866
Thanked: 682
This really should be in "What Are You Working On" thread but I'm not technically working on it anymore. I think it cleaned up pretty well.
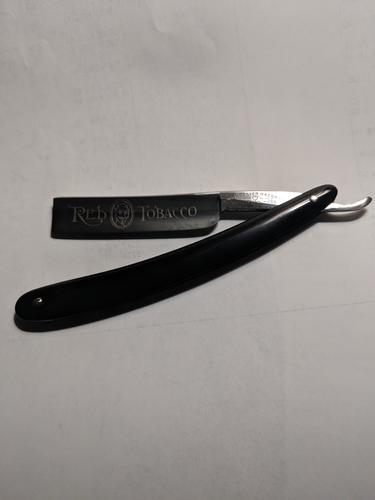
I like these quick shine em up, hone em up, strop em up projects. I'll probably shave with it in the morning.Iron by iron is sharpened, And a man sharpens the face of his friend. PR 27:17
-
The Following User Says Thank You to PaulFLUS For This Useful Post:
ScoutHikerDad (08-08-2019)
-
08-08-2019, 03:19 AM #3Senior Member
- Join Date
- Dec 2018
- Location
- Gainesville, FL
- Posts
- 6,866
Thanked: 682
Something I learned from this one or at least it occurred to me when I got this one. To keep from removing the engraving... actually I think it is etched but whatever. The point remains that I wanted to just get the surface so I took sand paper and wrapped it around a brass pipe 5/8" in diameter and used it to sand the hollow.
Maybe this is old news to everyone but it was a new one for me for this application at least for sanding the grind. I have laid paper flat on a flat surface for the tang and tail but for some reason it didn't occur to me to use something round for the hollow.ScoutHikerDad and JellyJar like this.Iron by iron is sharpened, And a man sharpens the face of his friend. PR 27:17
-
The Following User Says Thank You to PaulFLUS For This Useful Post:
ScoutHikerDad (08-08-2019)
-
08-08-2019, 05:06 AM #4Senior Member


- Join Date
- Feb 2013
- Location
- Haida Gwaii, British Columbia, Canada
- Posts
- 14,457
Thanked: 4830
I started hand sanding with wine corks as a backer, and then Richard sent me some hair curlers and that has been my go to since.
It's not what you know, it's who you take fishing!
-
08-08-2019, 01:30 PM #5Senior Member
- Join Date
- Apr 2012
- Location
- Diamond Bar, CA
- Posts
- 6,553
Thanked: 3215
I use a synthetic wine cork, wrapped with a 3x3 inch piece of 6mm craft foam wrapped with a 3x3 inch piece of wet and dry.
The Synthetic corks are harder and smoother than cork, corks and have a flat end for getting into the corner of a stabilizer.
The foam has just enough give to conform nicely to the curve of the belly or a flat and is thick enough to give your fingers something to grab onto without cramping.
I usually start with 600 and go up or down from there, 600 will get most small scratches out without causing any deep scratches. From 600 I go to 1k or the buffer with green compound. 600 grit scratch pattern is easily removed.
A sheet of 9X12 6mm craft foam $2 is a nice working surface and can be covered with a paper towel for messy work.
-
The Following 3 Users Say Thank You to Euclid440 For This Useful Post:
DZEC (08-09-2019), PaulFLUS (08-08-2019), ScoutHikerDad (08-08-2019)
-
08-08-2019, 02:22 PM #6Senior Member
- Join Date
- Dec 2018
- Location
- Gainesville, FL
- Posts
- 6,866
Thanked: 682
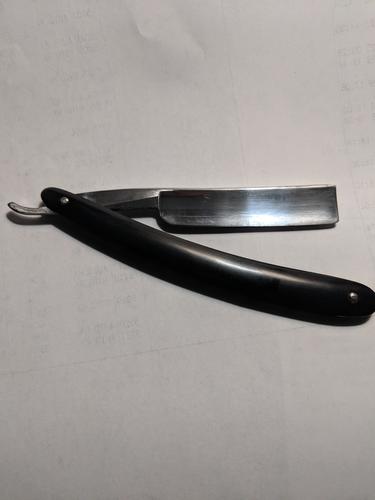
So I shaved with this little gem this morning and it worked quite nicely. When put on the hones it proved to have no warp and took a nice even bevel. After heavy sanding on a blade I usually do the pyramid progression on the Norton 220 x 1000 then do The pyramid on the 4000 x 8,000. This time I didn't go to the 12K to finish. It sounds strange but I've found some razor shave better without finishing and some need to be finished. I don't really understand the minutiae of honing enough to know why. I just try it until it works best and then stick with that for that particular blade
Iron by iron is sharpened, And a man sharpens the face of his friend. PR 27:17


 Reply With Quote