
Results 1 to 10 of 20
 13Likes
 LinkBack URL
 About LinkBacks
Hybrid View
-
03-05-2012, 03:12 PM #1Senior Member

- Join Date
- Jun 2011
- Posts
- 222
Thanked: 30 Gillette Fatboy Cleaning - Plating Project
So I now have three Fatboy razors. This one here is my most recent pickup - thank you flea market guy for the awesome deal $2.00 !!!!!
With the price being so low on this one & the amount of plating that is missing - I decided to disassemble the razor to clean it properly and get a new plating finish on it also. The plating will be nickel just as the factory finish. If the results are satisfactory then I may consider a new plating job on my Gold Executive Fatboy - I am unsure because of pricing on 24K gold plating.
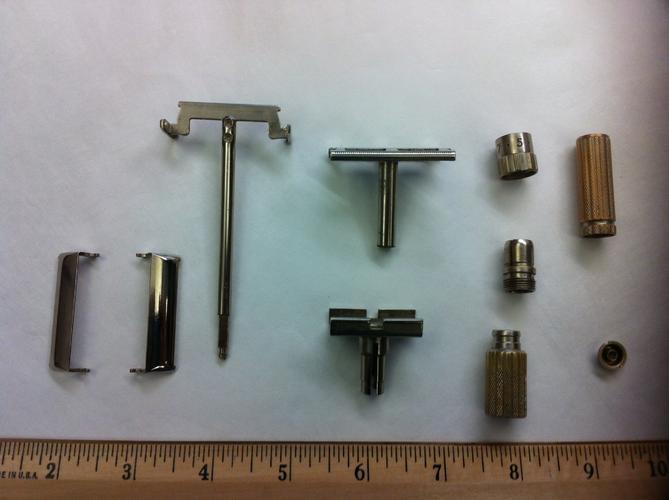
The disassembly was actually quite easy. I watched the video on YouTube and read the guide a few times. Ten minutes later it looked like this (both springs are not shown, but are safely in a baggy) - More pictures after it comes home from plating.
-
03-05-2012, 07:28 PM #2Senior Member
- Join Date
- Sep 2010
- Posts
- 2,169
Thanked: 220
I'm amazed that you found a place that does nickel plating, I have a Victorian stove that I want to get done but can't find a place to do it! Probably pricey also. What do you plan on cleaning it with? I used CLR once on a DE & it worked excellent.
-
03-05-2012, 07:43 PM #3Senior Member
- Join Date
- Jun 2011
- Posts
- 222
Thanked: 30
I have a family friend that owns a plating company. He would also be the person that would do the gold plating. I am still unsure of the costs, but I know that the nickel will be fairly cheap (especially compared to the gold plating).
To clean the razor I boiled the pieces in baking soda and alcohol and water. There was little crud build up so this razor was either taken care of or used very little. The plating could have been removed when cleaning it, being rolled around a bunch of other stuff, or anything that fits the category of not caring for it properly.
Once at the plating shop, its it stripped completely down to the bare metal. Then comes the new finish sometime today or tomorrow. Unless I pay for shipping, I wont be able to pick up the razor before Saturday. I live four miles away,and I am not in a rush to get it back - so I will get some pics over the weekend.
-
03-06-2012, 02:59 AM #4Senior Member
- Join Date
- Sep 2010
- Posts
- 2,169
Thanked: 220
It pays to know people! I'm looking forward to the pics of the finished razor. Originally Posted by jumbojohnny

-
03-07-2012, 01:57 AM #5face scraper

- Join Date
- May 2011
- Location
- west virginia
- Posts
- 352
Thanked: 62
I have been wanting to take apart my slim for awhile, but it is still in decent shape. Hope it turns out how you want
-
03-07-2012, 02:00 AM #6< Banned User >
- Join Date
- Feb 2011
- Posts
- 1,256
Thanked: 194
I completly destroyed a perfect fatboy because of that video on youtube. It is not beginner friendly at all and the tools that were reccomended for the jobs were destructive. I was young and dumb and have never forgivin myself for watching that video and wrecking my razor. It was not beginner friendly at all. I am very glad to see your's worked out for you though. I just hope the video doesn't encourage more like me and end up causing a destruction. I would love to see it repllated though
 I have heard razor emporium does a heck of a job
-
03-07-2012, 03:21 PM #7Senior Member
- Join Date
- Jun 2011
- Posts
- 222
Thanked: 30
Sorry to hear about that misfortune. Were you the one that posted on the comments for the video? I read that after I had already dismantled my razor, but reading the comment made me nervous (what if I got lucky with this one - not lucky with one of the others?). I didnt use the video as a how to, I used it to see the disassembly in action. There is a link to a step by step guide to break down the razor - thats what I went by.
It all worked perfectly fine for me. Damaging those threads could have been because one of two things-
1) The tool you used to hammer out the collar was too thin and therefore would have gone into the collar rather than sit on the base of it evenly. I used an old wooden dowl that fit perfectly inside the shaft and it came out with no problem. Even better than a dowl, is the handle to another old Gillette (not an adjustable though).
2) You need to press down the setting spring and turn the ring as far apart as possible. The dial should end up resting just to the left of the #9 yet still be between #1 & #9. That will lift threads as high as possible, making it much harder to come into contact with threading.
All the same I am curious about which specific piece was damaged. Could you identify it by using one fo my pictures? I have a few spare parts...maybe I have one that can save your Fatty.
-
03-07-2012, 08:16 PM #8< Banned User >
- Join Date
- Feb 2011
- Posts
- 1,256
Thanked: 194
yeah I was the one that posted the comments and now that I think about it they were very rude. he only put the video up as a guide and it was not his fault I screwed it up. I dont have the fatboy anymore so thanks for the offer though
-
04-06-2012, 11:11 PM #9Senior Member
- Join Date
- May 2010
- Posts
- 109
Thanked: 24
Update please...
-
10-01-2012, 08:50 PM #10Senior Member

- Join Date
- Mar 2012
- Location
- PA
- Posts
- 650
Thanked: 81 Gillette Fatboy Cleaning - Plating Project
Damn that looks nice!
I just gave my FB another go today (last attempt wasn't impressive on a 4), now I'm quite pleased at setting 7. Came on here looking for ways to maintain/clean it on a regular basis. Now I'm wanting to get it re-plated lol
I'll have to look up your friend and see what he would it would run me.
Thanks!


 Reply With Quote