
Results 1 to 10 of 66
 16Likes
 LinkBack URL
 About LinkBacks
Hybrid View
-
05-07-2009, 02:52 AM #1There is no charge for Awesomeness


- Join Date
- Aug 2006
- Location
- Maleny, Australia
- Posts
- 7,977
- Blog Entries
- 3
Thanked: 1587 How To Make a (Very) Home-made Strop: A life in pictures.
Last time I made some 'roo strops I promised Robin (BeBerlin) that I would put together a little photo tutorial if I were to ever do it again. Well, I have done it again and, true to my word, here is a little photo tutorial.
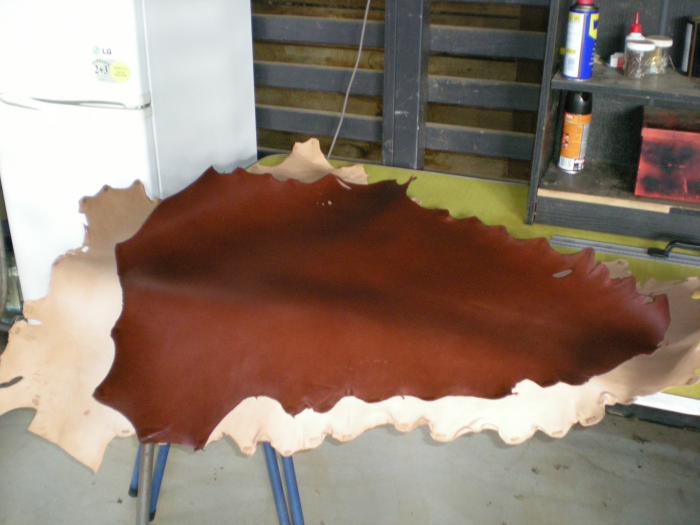
Step 1. Get some leather.
The choice is yours really. If you are only going to make a strop for yourself you probably just want to get hold of a nice single piece from a leather retailer (perhaps already cut to size and maybe a bit larger than you want - see below). I on the other hand want to make my strops out of Kangaroo, and as far as I know you cannot just buy a single piece. So I have bought a couple of hides - both veg tanned, one natural colouring and one dyed chocolate.
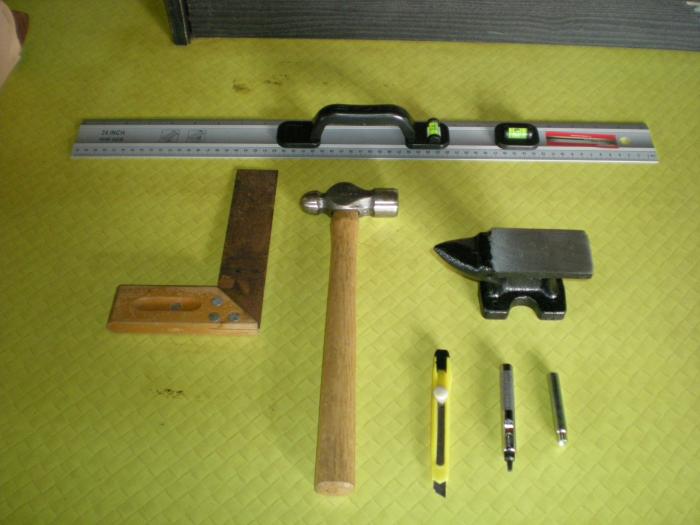
Step 2. Get the stuff.
- Straight edges: a metal ruler and a set square;
- A Stanley knife (for cutting with
 );
); - A hammer to really get those corners at right-angles with a gentle tap (just kidding - for punching holes and setting rivets);
- A small anvil (solid surface for hole punching and rivet setting);
- Leather punch of a size appropriate to your rivets;
- A rivet peener;
- Rivets;
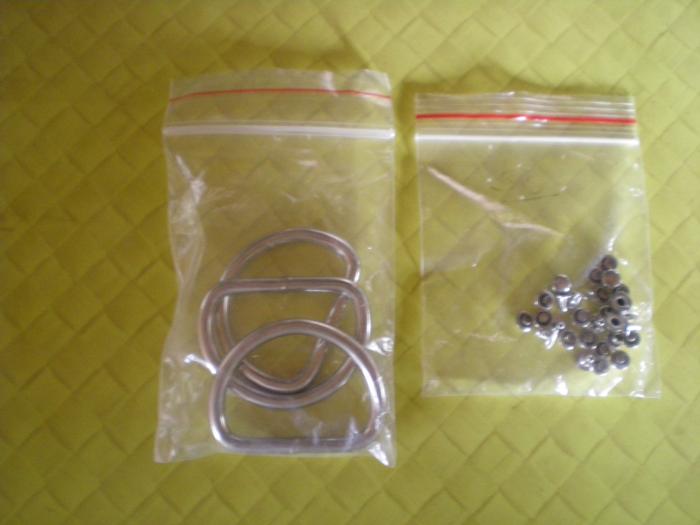
- Something with which to attach your strop to the wall, door etc (I use welded D-rings, but this is just one option).
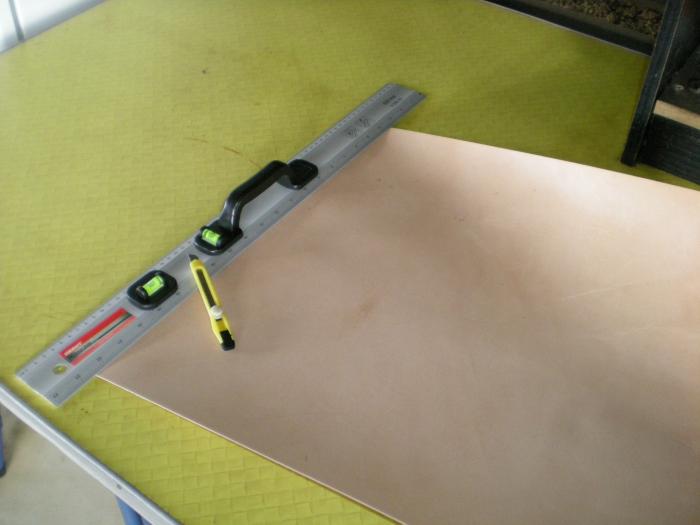
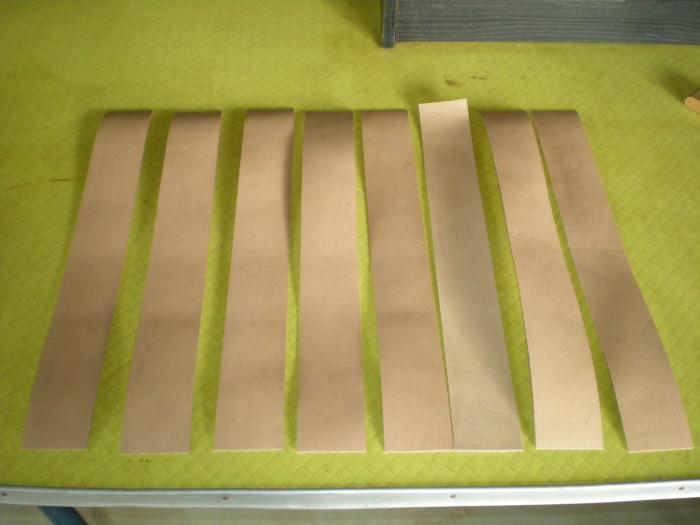
Step 3. Cut the Leather.
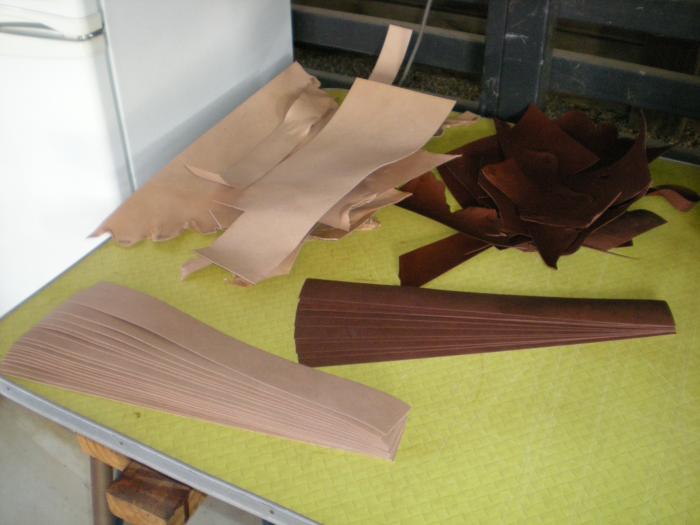
The size that you make your strop will be a personal choice. For ease, I make mine the width of the ruler (about 2.4") and approx 19" in length. A word of warning (gained through bitter, bitter experience): measure 5 times and cut once. Make sure you get the cut right the first time, because (unless you are a better man than I) going back to "trim it up" nearly always ends in wobbly edges and looks like rubbish. Make sure everything is square or again it will look like rubbish. Keep the leftover bits of leather, they can come in handy.
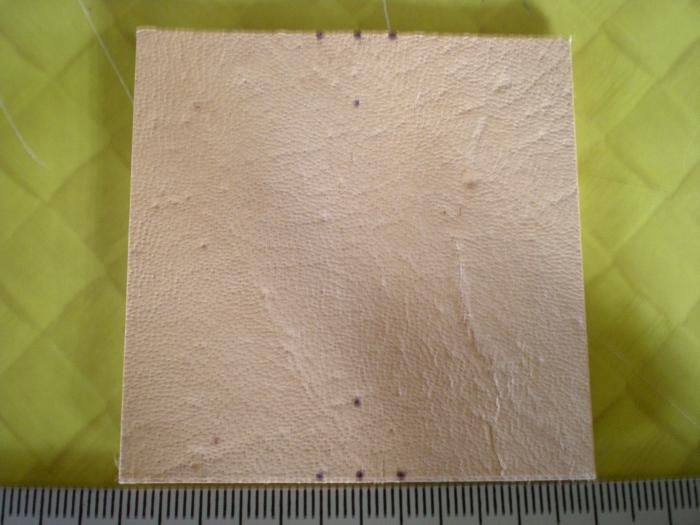
Step 4. Little Square bits.
In this step I cut the little square pieces (from the leftover leather) that I use to attach the D-ring, via rivets, to the main body of the strop. I try to make these the same width as the strop.
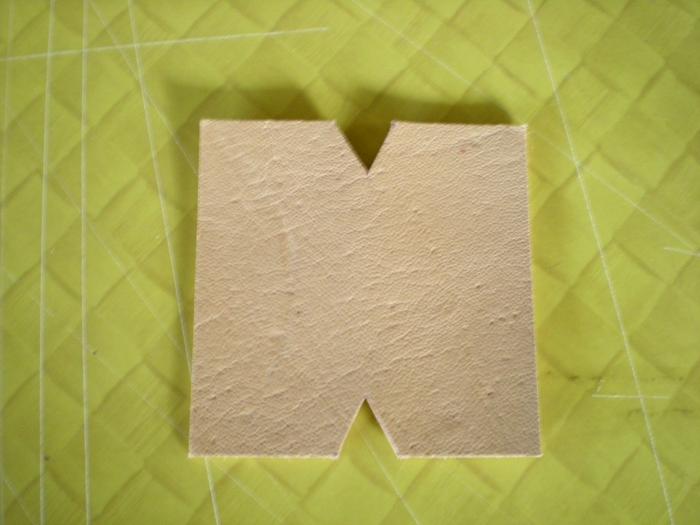
Step 5. Triangles in the little square bits.
My D-rings are narrower than the little square bits are wide. Therefore I need to cut triangles out of the leather so that the rings will fit properly. Measure this bit very carefully, as even a small misalignment can cause things to become crooked.
Measure the width of the straight part of the D-ring. Then, mark off the small piece of leather so that this space is centred (in both horizontal and vertical directions) after you cut out the triangular piece of leather from each side.
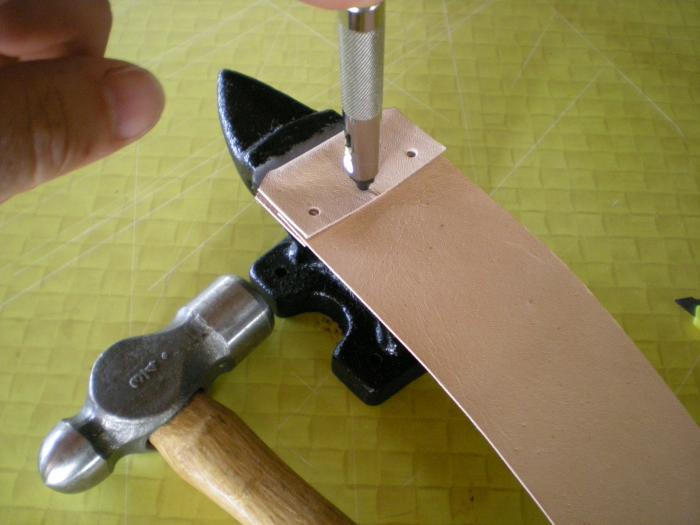
Step 6. Hole Punching
Now that you have the main strop body and the small piece of leather cut out, measure (I do not ) evenly the places where you want to rivet the two pieces of leather together and punch the holes with the leather punch. Again, be careful here because you cannot put the holes back if you misalign them.
James.Last edited by Jimbo; 05-07-2009 at 03:16 AM.
<This signature intentionally left blank>
-
The Following 22 Users Say Thank You to Jimbo For This Useful Post:
32t (03-07-2012), Alethephant (10-04-2010), BeBerlin (05-07-2009), Blistersteel (10-21-2014), Chevhead (01-12-2014), Dachsmith (04-22-2017), dgm237 (09-10-2012), dvoelfreeline (04-08-2014), DZEC (09-13-2019), elheisenberg (11-05-2013), Hillie (07-11-2009), Indesio (03-16-2012), Joed (05-09-2009), Johnny J (05-07-2009), markdfhr (01-15-2012), Martin103 (01-17-2012), Razorfeld (08-11-2013), Schieri (08-04-2014), Slur (08-11-2013), stvrol (02-24-2014), Themagicturtle (02-08-2013), williamc (08-12-2014)
-
05-07-2009, 03:09 AM #2There is no charge for Awesomeness
- Join Date
- Aug 2006
- Location
- Maleny, Australia
- Posts
- 7,977
- Blog Entries
- 3
Thanked: 1587 Part II
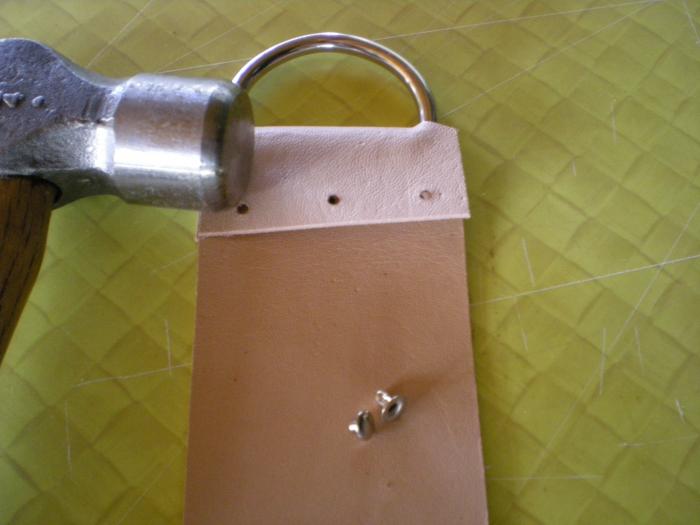
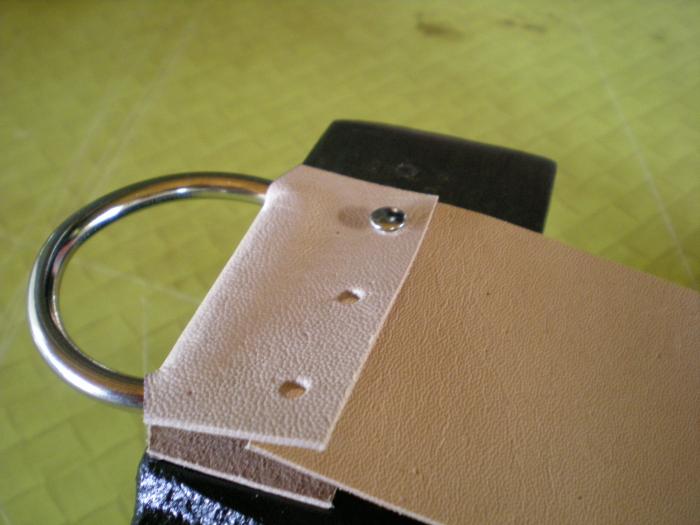
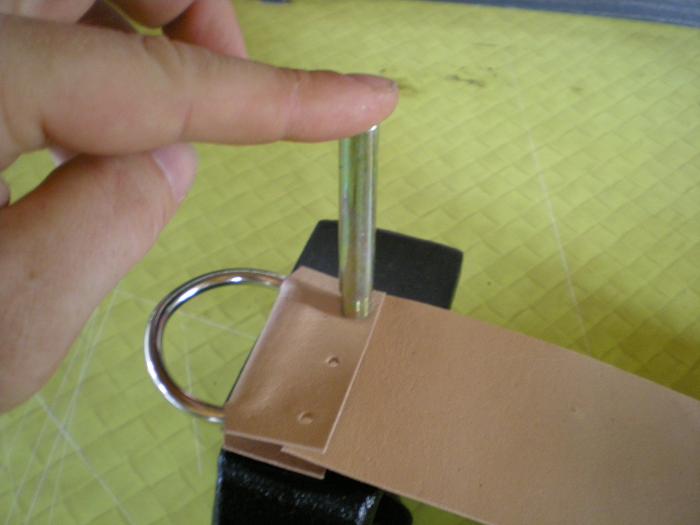
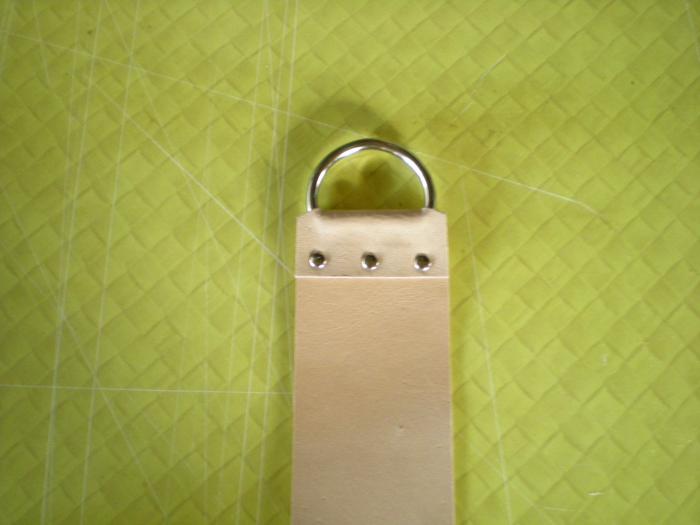
Step 7. Attach D-ring with Rivets.
Now all you have to do is put the D-ring onto the small bit of leather and attach that using the rivets. Rivets have two sides - it probably looks best if the domed head (female part) of the rivet is facing the treated side of the strop. Just whack in the male part, place the dome on top, get a nice secure surface, and use the rivet peening tool and hammer to gently but firmly secure the pieces.
Step 8. Sit back and admire your efforts.
That is it, all done. I attach a piece of kangaroo lace to the D-ring so that it is easier to attach the strop to things in the bathroom like towel racks and so forth.
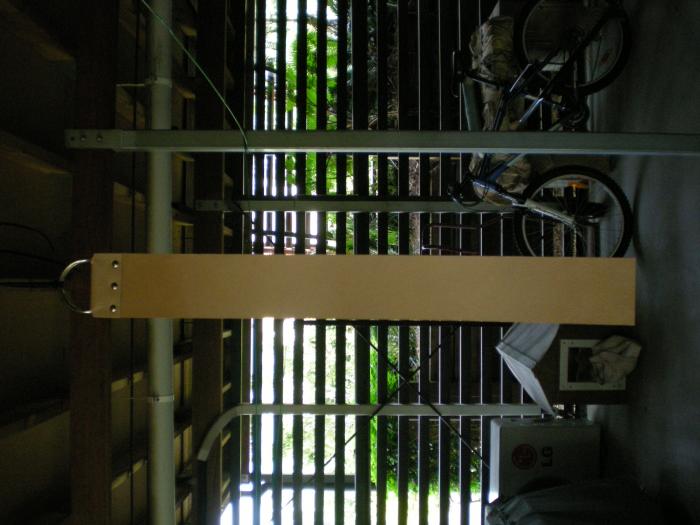
Now go forth and enjoy your new strop, with the relish that only comes when the fruits are borne from your own efforts!
James.<This signature intentionally left blank>
-
The Following 48 Users Say Thank You to Jimbo For This Useful Post:
32t (03-07-2012), 94Terp (12-14-2011), Alethephant (10-04-2010), Allen (05-07-2009), Annixter (07-08-2012), badboris (05-07-2009), Bart (05-08-2009), BeBerlin (05-07-2009), bruseth (04-04-2012), Carioca (05-07-2009), cariocarj01 (03-06-2014), Chevhead (02-15-2013), crankymoose (05-07-2009), Crshbrn84 (02-12-2012), Dachsmith (04-22-2017), dArtagnan (05-10-2012), DZEC (09-13-2019), Exile (08-02-2011), Geezer (11-09-2010), Grizzley1 (01-17-2012), Hillie (07-11-2009), hi_bud_gl (05-07-2009), Indesio (03-16-2012), ItalianJoe (02-24-2012), JimmyHAD (05-07-2009), JimR (05-07-2009), markdfhr (01-15-2012), Muguser (09-30-2010), nightbreed (07-06-2010), oldfat1 (05-07-2009), onimaru55 (05-08-2009), parkerskouson (07-08-2013), Pete_S (05-09-2009), pjrage (05-07-2009), randydance062449 (05-12-2009), Razorfeld (08-11-2013), rcavazos1922 (01-23-2013), Schieri (08-04-2014), Scipio (09-16-2010), sebell (05-07-2009), sinnfein (01-26-2013), Slartibartfast (05-07-2009), StubbleBuster (09-14-2010), Tam905 (05-08-2009), Themagicturtle (02-08-2013), TomSD (05-07-2009), Tonsor (05-08-2009), Utopian (05-07-2009)
-
05-07-2009, 03:15 AM #3illegitimum non carborundum


- Join Date
- Jan 2008
- Location
- Rochester, MN
- Posts
- 11,552
- Blog Entries
- 1
Thanked: 3795
Very nice presentation!
Do you do anything to prep your leather or was yours good to go when you got it?
-
The Following User Says Thank You to Utopian For This Useful Post:
Jimbo (05-07-2009)
-
05-07-2009, 03:22 AM #4There is no charge for Awesomeness
- Join Date
- Aug 2006
- Location
- Maleny, Australia
- Posts
- 7,977
- Blog Entries
- 3
Thanked: 1587
Thanks Utopian! Originally Posted by Utopian

No, it was all ready to go. However, because Kangaroos are not farmed but are killed in the wild, the leather can have lumps and bumps here and there from barbed-wire scars etc. It does not effect the stropping that I have noticed, but on some of these ones (particularly the ones off the big old natural fellow) I will most likely do a light sanding.
James.<This signature intentionally left blank>
-
05-07-2009, 03:16 AM #5
Sweet! Very effective and to the point. I like your style, young man!
How much does a Roo hide run you?
-
The Following User Says Thank You to JimR For This Useful Post:
Jimbo (05-07-2009)
-
05-07-2009, 03:27 AM #6There is no charge for Awesomeness
- Join Date
- Aug 2006
- Location
- Maleny, Australia
- Posts
- 7,977
- Blog Entries
- 3
Thanked: 1587
Thanks Jim! Originally Posted by JimR
At the moment a Roo hide over here costs 114 AUD per square meter. That natural hide in the first photo was a biggun at 1.3 square meters (must have been a large old Roo). Most Roo hides are smaller than the square meter - maybe 0.8-0.9 - at the place I buy them.
A word of warning if you want to use Roo hide (and this probably applies to other leather too). It is best, for the reasons I mentioned in my reply to Utopian, that you physically check the hides yourself. Some are very scarred and usesless for strops. Others have suffered damage in transit or at the tanners and have big scratches in them.
James.<This signature intentionally left blank>
-
05-07-2009, 03:49 AM #7illegitimum non carborundum
- Join Date
- Jan 2008
- Location
- Rochester, MN
- Posts
- 11,552
- Blog Entries
- 1
Thanked: 3795
Thanks for the warning Jimbo. The next time I find a road kill Roo here in Iowa, I will keep that in mind!
-
05-07-2009, 04:12 AM #8The Great & Powerful Oz


- Join Date
- May 2008
- Location
- Bodalla, NSW
- Posts
- 15,636
Thanked: 3751
Great tutorial there Jimbo.
Like that steel ruler. Perfect size & all The white gleam of swords, not the black ink of books, clears doubts and uncertainties and bleak outlooks.
-
The Following User Says Thank You to onimaru55 For This Useful Post:
Jimbo (05-07-2009)
-
05-07-2009, 09:06 PM #9Retired Developer
- Join Date
- Mar 2008
- Location
- Berlin
- Posts
- 3,490
Thanked: 1903
Thanks, Jimbo.
Gentlemen, this tutorial is now in the Wiki: Making a (very) home-made strop - Straight Razor Place Wiki.
And for those of you who have not noticed it yet, there is a review by (currently two) happy customers: http://straightrazorpalace.com/strop...-jimboroo.html.
-
The Following User Says Thank You to BeBerlin For This Useful Post:
Jimbo (05-07-2009)
-
05-07-2009, 09:29 PM #10There is no charge for Awesomeness
- Join Date
- Aug 2006
- Location
- Maleny, Australia
- Posts
- 7,977
- Blog Entries
- 3
Thanked: 1587
Thanks Robin!!
I should just say that each and every one of these strops already has a home. If for some reason any are spare, I will let you know.
James.<This signature intentionally left blank>


 Reply With Quote

