Results 1 to 6 of 6
 7Likes
Thread: Restore Damaged Blonde Horn Scales
-
02-21-2016, 09:29 AM #1
 Restore Damaged Blonde Horn Scales
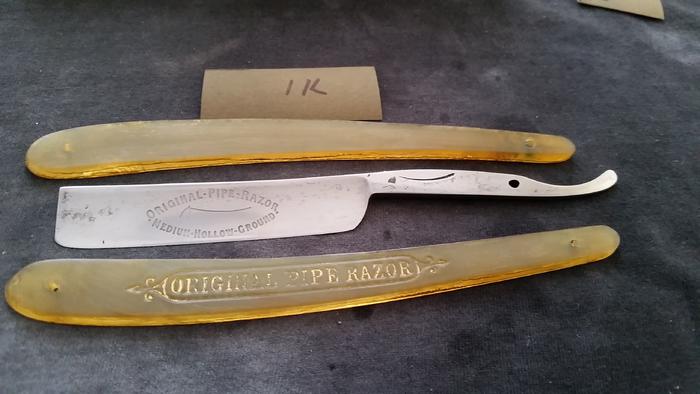
I have recently started restoring a Wolstenholm Pipe razor, about 5/8 wide. While the blade looks like it be fine the scales are a problem. They are a Blonde horn material with some cracks around the pivot pin area, and the more serious problem is what looks like splitting along the edges of the scales. I have soaked them in Neatsfoot oil for several days and tried sanding a small area to see if I can work past the cracking - but it seems to go quite deep into the scales.
Questions for the experienced restorers:
Is it possible to repair or seal the splitting on the scales?
Would this step lose too uch material to get a good looking scale result?
I am hoping I don't have to scrap the scales as there is a Wolstenholm Pipe logo on the front scale.
Worst case scenario I have some blonde horn on order, but it may be a couple of weeks before it gets here. Of course I would lose the logo as well but have a great looking set of scales.
What do the more experienced members think? In the photo the cracking/splitting can be clearly seen on the edges of the scales.
 RickyB
-
02-21-2016, 11:36 AM #2

The cracking along the edges of the honey horn is delamination and is common in honey horn. Actually it is common in all the old horn but is more visible in the clean honey horn. I was going to suggest using some clear epoxy on the edges and then sanding smooth if the edges have really opened up. Since you have already soaked the scales in neatsfoot oil I don't know if the epoxy will bond well with the horn. Repairs should be done prior to soaking in neatsfoot oil. Go very light on any sanding over the pressed logo. In fact I'd stay away from it. You can use gold enamel paint on the logo. If you do a search on the forums you should come up with some how to help. As far as the cracks around the pivot if they are just on the surface I'd just re-pin the razor and not worry about them. Other than restoration wax do not try to seal the horn.
Let us know how the project progresses.
Regards,
Karl
-
The Following 2 Users Say Thank You to karlej For This Useful Post:
MW76 (05-21-2016), RickyBeeroun222 (02-22-2016)
-
02-21-2016, 01:34 PM #3Senior Member


- Join Date
- Jun 2013
- Location
- Pompano Beach, FL
- Posts
- 4,020
Thanked: 631
Try cleaning the area with alcohol and then fill with layers of super glue. When completely filled, sand smooth and polish.
-
The Following User Says Thank You to bouschie For This Useful Post:
RickyBeeroun222 (02-22-2016)
-
02-21-2016, 01:38 PM #4Senior Member


- Join Date
- Mar 2012
- Location
- Thunder Bay, Ontario, Canada
- Posts
- 17,251
Thanked: 3222
-
The Following 2 Users Say Thank You to BobH For This Useful Post:
HCpawpaw (07-16-2017), RickyBeeroun222 (02-22-2016)
-
02-21-2016, 03:12 PM #5

I have also used superglue in similar situations with success. Loctite, and I'm sure others, make a gel superglue that is much more manageable than the thin, runny normal superglue. You could also try a little 5min. epoxy.
Good luck!
Pete <:-}"Life is short, Break the Rules. Forgive quickly, Kiss Slowly,
Love truly, Laugh uncontrollably, And never regret ANYTHING
That makes you smile." - Mark Twain
-
The Following User Says Thank You to petercp4e For This Useful Post:
RickyBeeroun222 (02-22-2016)
-
02-22-2016, 10:11 AM #6

Thanks for your tips and thoughts gents. I'm going to try the Superglue filling method, and see how it works out.
RickyB


 LinkBack URL
 About LinkBacks


 Reply With Quote

