
Results 1 to 10 of 40
 90Likes
 LinkBack URL
 About LinkBacks
-
08-20-2019, 04:09 PM #1Senior Member

- Join Date
- Sep 2009
- Location
- Plymouth, UK
- Posts
- 313
Thanked: 19 Observations and request for pointers on hand sanding
I had a go at hand-sanding a blade, and I'm curious about the views of the board members on this topic.
I used this guide as a roadmap: https://shavelibrary.com/w/Hand_sanding_a_blade
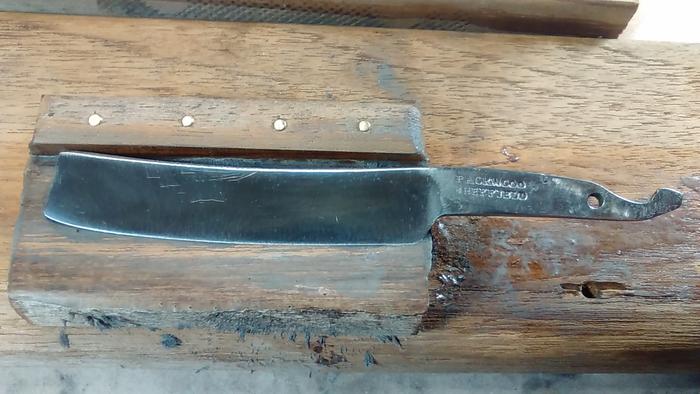
This is where we started, I experimented with a generic blade of no particular value:
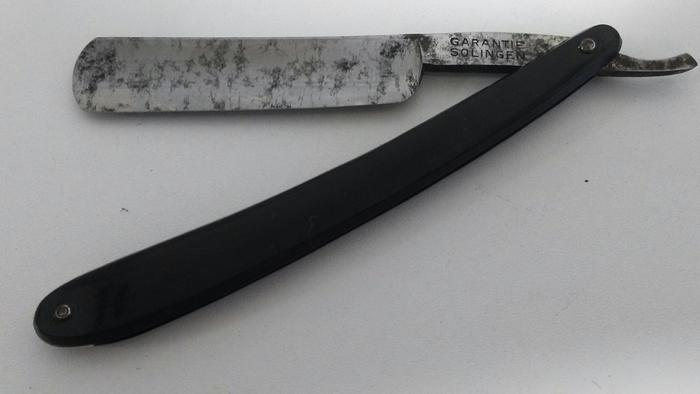
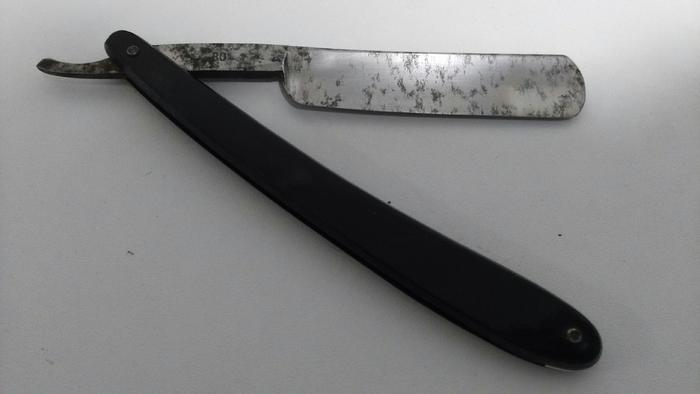
The blade looked quite badly stained, but pretty solid, so I thought it was a reasonable candidate for sanding. More on that later...
There was an etching, but obviously that was going to disappear:
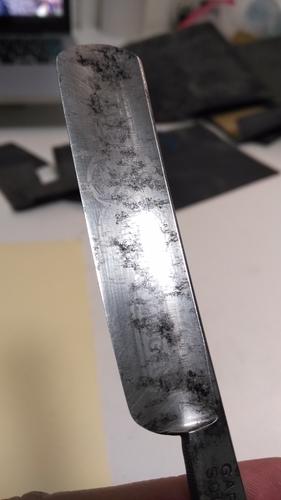
After many hours, this is the result:
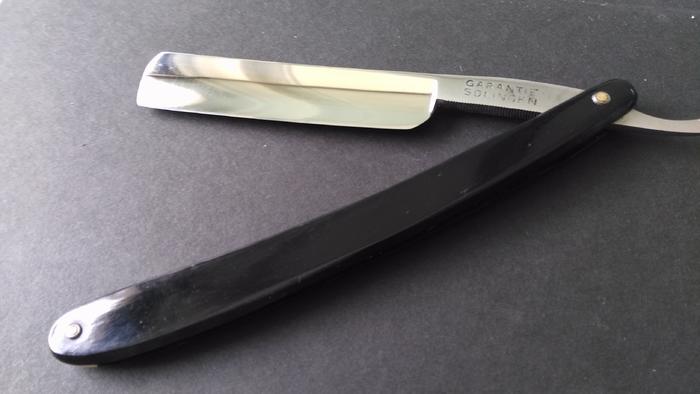
From a distance, it looks pretty good. First thing to say, damn, did it take a long time, at least 20+ hours. Those black stains covered pitting which just seemed to go down like rabbit holes. In the end, I decided it wasn't worth getting rid of absolutely all of the pitting, so there is still a tiny bit of visible pitting if you look very closely.
I used 120, 180, 240, 280, 320, 400, 600, (800), 1000, and 1200 grade wet and dry, and wrapped small pieces round an artificial wine cork. Even using 120 grit paper, some of the pitting wasn't budging at all, so I also resorted to an 80 grit flap wheel on the Dremel for the worst bits. I realised that though quick, this is a high-risk technique, and I would not use it on a razor of any value.
After sanding, I then polished with a green buffing compound on a felt Dremel wheel. This worked well, but after the first polish, I realised that I still had deep scratches, and went back to 400 grade paper and worked back up to 1200. Even so, there are still some visible scratches:
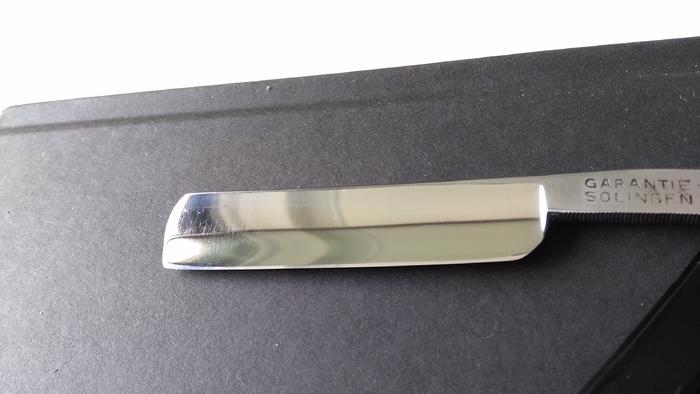
The razor looks reasonable, and so I didn't go back again to try to correct this. I also didn't sand the tang any further, I was starting to lose the lettering and the pitting was still very obvious, so I left it as was, and left the tang with a sanded unpolished finish.
I do have a few questions floating in my mind on which I'd appreciate the views of the members.
Firstly, how do you judge when to move on to the next grade of paper? Especially in the early stages, if you move on too early, you can get right to the end and realise that quite a few hours work have been in vain.
Secondly, to what extent do the members sand along the blade? The Wiki talks about this technique, and I used it with the heavier grades of abrasive, but it took forever to get the lengthwise scratches out. In the wiki, the author talks about alternating sanding lengthwise and across to make sure that you are ready to move to the next grit; I didn't do this, but might try it next time. How do others do it?
Thirdly, how do you deal with the jimps? I used a triangular needle file to remove the worst of the rust, then polished with the Dremel, but this did not clean the jimps perfectly.
And lastly, maybe the most important question, and the one with the most scope for discussion, when do you sand a blade, and when do you just clean it up and use it as is?
Many thanks!
-
The Following User Says Thank You to Montgomery For This Useful Post:
ScoutHikerDad (08-21-2019)
-
08-20-2019, 06:02 PM #2Senior Member

- Join Date
- Jun 2013
- Location
- Pompano Beach, FL
- Posts
- 4,048
Thanked: 636
I clean jimps with CLR and a brass brush.
As for sanding, I go thru the range of grits from course to fine. If I don't like the look I repeat until I am satisfied. Then I polish with Mother's. If still not satisfied I may sand again. I wrap sand paper around wine cork. Sand length of blade. Then top to bottom. Then circles and diagonals. Keep changing directions as I go thru range of grits.outback likes this.
-
The Following User Says Thank You to bouschie For This Useful Post:
Montgomery (08-20-2019)
-
08-20-2019, 07:48 PM #3Senior Member


- Join Date
- Feb 2013
- Location
- Haida Gwaii, British Columbia, Canada
- Posts
- 14,457
Thanked: 4830
It’s a lengthy topic with many many opinions and many many differing but all correct answers. I evaluated each razor on its own and decide how far to go. I am not opposed to steel wool and polish and leaving the pits. For a hard luck case like you started with it is a ton of sanding. I cannot say enough how important my dorklord visor is. I do alternate directions with each grit. I try to end verticals. WD-40 is super helpful in the grit of 400 and up. What to do with each blade is a strong question. Often I clean it first with steel wool and WD-40 and then make a plan from what is revealed. What are you working on is a great thread for getting advice on what you are working on as you are progressing. It looks intimidating because of its size but there is a ton of banter in it. Just jump in at the end and skim back as you have time and curiousity.
It's not what you know, it's who you take fishing!
-
The Following User Says Thank You to RezDog For This Useful Post:
Montgomery (08-20-2019)
-
08-20-2019, 08:02 PM #4Member
- Join Date
- Feb 2016
- Posts
- 32
Thanked: 15
Respekt, sehr schönes Ergebnis!
I wish I had the patience sometimes.Montgomery likes this.
-
The Following User Says Thank You to schwabenchris For This Useful Post:
Montgomery (08-21-2019)
-
08-20-2019, 09:58 PM #5Senior Member

- Join Date
- Dec 2018
- Location
- Gainesville, FL
- Posts
- 6,856
Thanked: 682

Ahhhh grasshopper you ask a difficult question. This is like asking what the meaning of life is. As Rezdog said I go about it differently for each one on a case by case basis. Normally I use either steel wool and WD-40 or 2k wet/dry to knock down the big stuff at the beginning before I decide how to proceed. The synthetic cork works well. Stick with that. I also use a brass tube. It depends on if I am trying to save an.etching or engraving.
On the question of when to go to the next grade I use as a rule of thumb: just before I think I am almost there. As you go through the grades the pits and stains will diminish. I usually don't go as far back as what the article mentions. I usually start at 320. If it is really bad I'll go back to 220 but seldom further than that. I find the grits lower than that leave.too many deep scratches that are very hard to get out as you have discovered. I will go down the grits fairly quickly then go back many times if necessary. I also alternate directions. It makes the scratches.seem not to appear as much.
It looks pretty good but you have discovered the problem. You will find yourself saying "I'm sanding and I can't stop!" You sort.of have to figure it out as you go.how far is enough... hopefully.before.turning it into foil. We've all done it.
Good luck with it and keep us posted.Last edited by PaulFLUS; 08-21-2019 at 12:56 AM.
Iron by iron is sharpened, And a man sharpens the face of his friend. PR 27:17
-
The Following User Says Thank You to PaulFLUS For This Useful Post:
Montgomery (08-20-2019)
-
08-21-2019, 12:00 AM #6Senior Member

- Join Date
- Jul 2012
- Location
- Mooresville NC
- Posts
- 746
Thanked: 133
I'm usually pretty lazy and just do like 800, 1200, then 2000 if that. Big question that should always be asked though are these.
How long will it take to get to the condition I want?
Am I enjoying this or is it a chore (If it is a chore, how much value does it add to the razor. Say it takes me 5 hours to take a 100$ razor and it turns into a 130$ razor, I would just rather pick up 5 hours of OT at work and buy a 150$+ razor instead. Time is money, but I don't mind putting time in on a razor I know in will love.
Usually the blades I'm interested will be good to go after 1200 then 2000 grit sandpaper (sometimes 800) and finished up with mothers polish. It is good to practice on unimportant razors though before you try and restore a collectors blade and ruin it.Montgomery and RezDog like this.
-
The Following User Says Thank You to Christian1 For This Useful Post:
Montgomery (08-22-2019)
-
08-21-2019, 10:33 AM #7Senior Member
- Join Date
- Sep 2009
- Location
- Plymouth, UK
- Posts
- 313
Thanked: 19
Many thanks for the comments. What is CLR, a polish? Originally Posted by bouschie

-
08-21-2019, 10:44 AM #8Senior Member
- Join Date
- Sep 2009
- Location
- Plymouth, UK
- Posts
- 313
Thanked: 19
Many thanks for the comments. I do browse the 'what are you working on' thread from time to time. And I will post specific queries there, thank you for the suggestion. I note your comments, especially concerning WD40, and also how to assess the blade. What is a 'dorklord visor'? Originally Posted by RezDog
-
08-21-2019, 10:48 AM #9Senior Member
- Join Date
- Sep 2009
- Location
- Plymouth, UK
- Posts
- 313
Thanked: 19
Very useful information, many thanks. Do I assume correctly that the brass tube is more useful when you want to save an etching? Originally Posted by PaulFLUS
-
08-21-2019, 11:20 AM #10Senior Member

- Join Date
- Mar 2015
- Location
- Akron, Ohio
- Posts
- 12,118
Thanked: 4316
I typically won't sand a full hollow. Instead I cut off the active rust with a single edge razor blade, then some 0000 steel wool and oil/ WD-40, then 3M metal restorer/ polish.
After cleaning up 50 or more razors, you'll be better at evaluating if a blade warrants sanding at all. Most aren't.!
1/4 hollow and wedges are the only blades that can withstand heavy sanding. I also don't go any lower in grit, than 400, only on great occasions do I drop to 320.
Making a magnetic blade holding jig is a must, for hand sanding. Let's you use both hands while sanding, and lessens the fatigue .

 Mike
Mike
-
The Following 2 Users Say Thank You to outback For This Useful Post:
Montgomery (08-21-2019), ScoutHikerDad (08-22-2019)


 Reply With Quote