
Results 11 to 20 of 25
 41Likes
Thread: Second project choices?
 LinkBack URL
 About LinkBacks
-
06-10-2021, 02:24 PM #11Senior Member


- Join Date
- Feb 2013
- Location
- Haida Gwaii, British Columbia, Canada
- Posts
- 14,454
Thanked: 4830
You can use a dark colour for contrast or get it in a bone colour to blend it. Outback Mike has a very good epoxy he uses. I would PM him for product details.
It's not what you know, it's who you take fishing!
-
06-10-2021, 02:30 PM #12Senior Member

- Join Date
- Mar 2021
- Location
- Cranston, RI
- Posts
- 336
Thanked: 7
I will shoot him a PM. I was thinking of using u-40 Rod Bond I use it for gluing reel seats and handles to fishing rod blanks. Good bonding and flexibility. Originally Posted by RezDog

-
06-10-2021, 03:06 PM #13Senior Member
- Join Date
- Feb 2013
- Location
- Haida Gwaii, British Columbia, Canada
- Posts
- 14,454
Thanked: 4830
I am not familiar with the product. Mike uses a structural epoxy and has had great results using it. The hardware store variety syringe glue that I have access to is sub par.
Audels1 likes this.It's not what you know, it's who you take fishing!
-
06-10-2021, 04:33 PM #14Senior Member
- Join Date
- Mar 2021
- Location
- Cranston, RI
- Posts
- 336
Thanked: 7
hardware store variety syringe glue usually is. LOL I will definitely shoot mike a massage to see what he is using but I am going to give the U-40 I have a try just to see wow it works out. I even found a piece of white G-10 in my shop. Originally Posted by RezDog
I couldn't choose just one so I cleaned them all...LOL
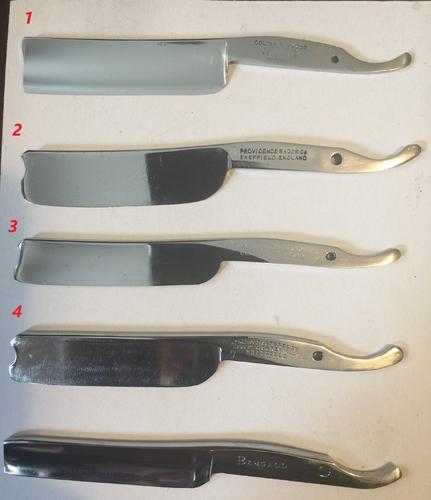
The Bengall on the bottom is not the same one as in the OP
Last edited by Audels1; 06-10-2021 at 04:44 PM.
-
06-10-2021, 05:24 PM #15Senior Member
- Join Date
- Feb 2013
- Location
- Haida Gwaii, British Columbia, Canada
- Posts
- 14,454
Thanked: 4830
That’s is a pretty nice stack of clean blades. Extra hollow blades I rarely do much with. A good scrub with 0000 and WD-40 is about it. The 1/4 hollows can be reground and made pretty pristine. Karl Johnson and Job do amazing regrinds. I haven’t played with it too much. You can basically do a regrind by hand, but it takes time and you have to be aware of the pitfalls but I’ve seen some stellar handwork around here.
It's not what you know, it's who you take fishing!
-
06-10-2021, 05:53 PM #16Senior Member
- Join Date
- Mar 2021
- Location
- Cranston, RI
- Posts
- 336
Thanked: 7
I don't think #1,#3 and the bengall need any more done to them aside from reassembly and honing #2 and #4 are full or near wedge and I don't know how to proceed with them so thy are going to be set aside until I can go at them with some confidence in what I am doing..
RezDog likes this.
-
06-10-2021, 07:18 PM #17Senior Member
- Join Date
- Feb 2013
- Location
- Haida Gwaii, British Columbia, Canada
- Posts
- 14,454
Thanked: 4830
If you have not yet, reading through the what are you working on thread can glee so,e how to tie bits as well as the workshop stickies.
Audels1 likes this.It's not what you know, it's who you take fishing!
-
06-10-2021, 09:06 PM #18Senior Member

- Join Date
- Dec 2018
- Location
- Gainesville, FL
- Posts
- 6,683
Thanked: 675
Oh man, I hope you didn't sand the etching of Washington off of that #4 razor. That was very savable.
Iron by iron is sharpened, And a man sharpens the face of his friend. PR 27:17
-
06-10-2021, 10:19 PM #19Senior Member
- Join Date
- Mar 2021
- Location
- Cranston, RI
- Posts
- 336
Thanked: 7
. Originally Posted by PaulFLUS
I can still see it but not as visible. even before started the head and shoulders was mostly not there.Last edited by Audels1; 06-10-2021 at 10:24 PM.
-
06-10-2021, 10:35 PM #20Senior Member
- Join Date
- Dec 2018
- Location
- Gainesville, FL
- Posts
- 6,683
Thanked: 675
Start out with 3M Marine Metal Polish and Restorer and a rag. Polish it until it's clean then (if necessary) darken with gun blue or black then relieve the high part back to shiny with lapping film around a dowel.
I'll try to find and link back to some threads on it. I did one or two and Richard (Geezer) has done some also.Audels1 likes this.Iron by iron is sharpened, And a man sharpens the face of his friend. PR 27:17
-
The Following User Says Thank You to PaulFLUS For This Useful Post:
Audels1 (06-10-2021)


 Reply With Quote