
Results 1 to 10 of 10
 4Likes
 LinkBack URL
 About LinkBacks
-
07-31-2011, 08:58 PM #1Senior Member

- Join Date
- Mar 2011
- Location
- Washington DC Metro Area
- Posts
- 468
Thanked: 114 Lessons learned from my first restoration
I’ve removed pivot pins on a few razors followed by light cleaning, but I never completely broke down a razor and attempted to bring it to show condition. This was my first attempt.
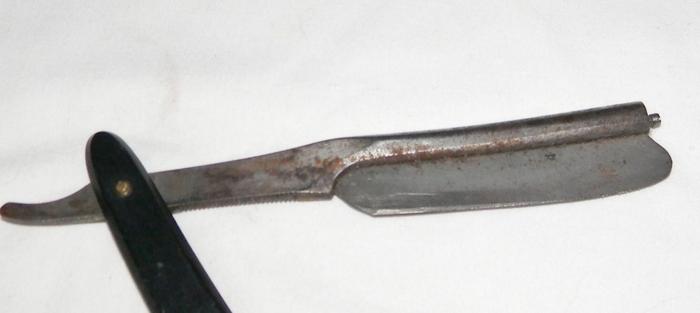
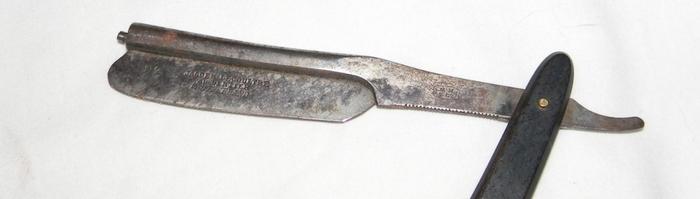
The “victim” in this case was a well used Swiss Lecoultre frameback that I picked up on ebay. As the photos show, she’d been around the block a few times.
DISSEMBLY - This was my first try at removing washerless pins and it was a bit more difficult than I hoped. My drill bit kept walking on me. I ultimately found it easier to cut the pins with a hacksaw after the pins were loose enough to get the saw blade on the inside of the scales.
BUFFING - Once dissembled, I ran the razor sections (body and blade processed separately) through the following 11 compounds:
Eastwood 80, 120, 220, 320
Caswell 400, 600
Ryobi emery, stainless, white
Caswell blue
Chromium oxide
All the above were used on 4" inch sewn wheels at 3600 rpm.
I was targeting a perfect mirror finish, but the pitting was excessive on the face of the blade (the only place, really, where the pitting could not be removed – a huge disappointment). I ended up leaving the pitting and some discoloration in the blade. Overall, I still was able to produce a satisfactory shine.
REPINNING - I reassembled the razor, but the #0 washers looked odd given the slightly countersunk holes in the scales (a feature of washerless pins, I guess). In any event I decided to double the washers, stacking #0’s on top of #0W’s.
HONING - Honing was a chore. It was quite dull to start with. I did eventually get her to shave readiness but it took a long while (one day I’ll post a separate thread on my honing procedure). I was rewarded for my efforts with a smooth shaver. The razor shaves better than I thought it would (I give it a B+/A- in the shaveability department).
LESSONS LEARNED:
1. Using a split point bit would have prevented the walking I experienced at the drill press.
2. When unpinning standard pins (one’s with washers), I use a piece of sheet metal with a hole punched in it to cover the washer when filing the pinhead away. It occurred after the fact that such device could be used when drilling out pins to protect the scale from wandering drill bits???
3. Next time I’ll probably skip the 400 grit greaseless compound. I didn’t notice that much different than the 320 (as odd as it sounds, the Caswell 400 might actually be a step backwards from the Eastwood 320).
4. I’d probably skip the white compound and the chromium oxide too. I think the Caswell blue produces a great final finish. (Who has the patience to run razors through 11 compounds anyways?)
UNIQUE FEATURES I LEARNED ABOUT FRAMEBACKS
1. One neat feature of the two piece frameback is that hone wear can be easily removed. After honing the razor, I detached the blade and did some light buffing to remove the hone wear. On a standard razor I would not have tried this for fear of dulling the edge.
2. Related to the previous point, a drawback for this razor is that it produced more swarf than my other razors do. The body of the razor must be tempered softer than the blade itself??? Over time – a long period of time, of course – I’d expect this razor to wear faster than my other razors.
3. A benefit to the two piece design is that my young kids were able to help with the restoration. They are always asking to help with various projects and until now have been largely excluded from all the razor restoration fun for obvious reasons. But with the blade detached, I let my children buff the razor body. They loved it!
(My kids also loved helping taking the pictures. The Swiss cheese to go with the Swiss razor was their idea, and having the mouse steal the cheese was a fun addition. Guillotining the thief in the end was my idea, however. )
)
Anyhow, thanks for reading.Last edited by diyguy; 08-01-2011 at 01:23 PM.
-
07-31-2011, 09:25 PM #2Senior Member
- Join Date
- Mar 2011
- Location
- Corcoran, Minnesota
- Posts
- 665
Thanked: 170
A very nice piece of work. Thanks for posting the process.
-
08-01-2011, 01:43 AM #3
You did very well and the razor is good for another few generations! I like it!
Str8Shooter likes this.Be yourself; everyone else is already taken.
- Oscar Wilde
-
08-01-2011, 03:25 AM #4Senior Member

- Join Date
- Jun 2010
- Location
- Andalusia, Alabama
- Posts
- 577
Thanked: 125
Awesome job...looks great!
Sent from my DROIDX using TapatalkLast night, I shot an elephant in my pajamas..........
-
08-01-2011, 05:52 AM #5'tis but a scratch!


- Join Date
- Oct 2010
- Location
- Durango, Colorado
- Posts
- 2,080
- Blog Entries
- 2
Thanked: 443
Nice work. I love the idea of the sheet metal shield for working on the pins... will make one of those tomorrow!
And this answers a question I posted elsewhere a few weeks ago... yes, there ARE Swiss razors. I just wasn't willing to believe there weren't. Thank you very much."These aren't the droids you're looking for." "These aren't the droids we're looking for." "He can go about his business." "You can go about your business."
-
08-01-2011, 06:19 AM #6This is not my actual head.


- Join Date
- Nov 2009
- Location
- Middle of nowhere, Minnesota
- Posts
- 4,624
- Blog Entries
- 2
Thanked: 1371
I think the pitting that's left just adds character.
It turned out really nice.
Strange women lying in ponds distributing swords is no basis for a system of government.
-
08-01-2011, 10:56 AM #7Lookin like a crim


- Join Date
- Apr 2009
- Location
- Coffs Harbour Australia, Home of the Big Banana
- Posts
- 2,706
Thanked: 1072
Very well done, sounds like you learnt a lot with that one. Its a sweet looking blade too BTW.
"I aint like that no more...my wife, she cured me of drinking and wickedness"
Clint Eastwood as William Munny in Unforgiven
-
08-01-2011, 04:41 PM #8< Banned User >
- Join Date
- Jul 2011
- Posts
- 117
Thanked: 12
That turned out great. neat old razor. why does the blade come out? was it meant to be replacable?
-
08-01-2011, 04:47 PM #9Senior Member
- Join Date
- Mar 2011
- Location
- Washington DC Metro Area
- Posts
- 468
Thanked: 114
I don't know much about the history of this razor (or framebacks in general). The blade on this particular model is held in by a set screw. The blade drops out easily when the screw is removed. Pretty neat actually. Originally Posted by savalis1971

-
08-01-2011, 06:29 PM #10'tis but a scratch!
- Join Date
- Oct 2010
- Location
- Durango, Colorado
- Posts
- 2,080
- Blog Entries
- 2
Thanked: 443
There was a similar razor in a thread a few months ago. It was a 7-day set of blades that you swapped in and out of the frame.
Here's an old thread with pictures."These aren't the droids you're looking for." "These aren't the droids we're looking for." "He can go about his business." "You can go about your business."


 Reply With Quote


