
Results 1 to 10 of 13
 2Likes
 LinkBack URL
 About LinkBacks
-
01-29-2012, 02:58 AM #1Captain ARAD.


- Join Date
- May 2011
- Location
- Pacifica, CA
- Posts
- 2,474
Thanked: 2227 So it's come to this: Building my own tools.
There's been so much stuff going on lately I've had time to shave and pretty much nothing else razor-related. Which means this old Wostenholm has been sitting around on my desk in pieces.
It's got the old-style domed washers. I got it mostly back together today, but I needed some kind of receiver for tamping down the edges of the domes (I used washers underneath to put more even stress on the scales).
This lead me to thinking, which is always dangerous.
Zak, I thinks to myself, what you need is custom razor peening anvil!
The idea is as follows (I'll build it tomorrow when I've got good light):
I drill a hole in a short piece of wood and epoxy in a nut. I've got 4 different screws, each of those will get a different treatment. I'll start with just a simple concave and flat (both polished). Then I wrap the wood in non-skid mat, sand it all nice and smooth and bingo! I can adjust the depth of the receiving end so that when I hold the razor against the wood the pin gets supported at exactly the depth I want.
Cost? $4 and some time.
I also got a doming kit and a die-cutting kit, plus some brass stock to cut out both washers for doming and the super-thin washers to go between blade and scale.
Tomorrow there shall be pictures!JP5 likes this.-Zak Jarvis. Writer. Artist. Bon vivant.
-
The Following User Says Thank You to Voidmonster For This Useful Post:
JP5 (09-08-2015)
-
01-29-2012, 03:03 AM #2the deepest roots


- Join Date
- Feb 2011
- Location
- Seattle
- Posts
- 1,221
Thanked: 169
I need a sketch because I can't visualize what you're doing... Yes I am "special"
-
01-29-2012, 05:13 AM #3Senior Member

- Join Date
- Jul 2010
- Location
- Michigan
- Posts
- 735
Thanked: 104
Yep, not understanding the concept of a wooden anvil?
Show us please!
-
01-29-2012, 08:05 AM #4Captain ARAD.
- Join Date
- May 2011
- Location
- Pacifica, CA
- Posts
- 2,474
Thanked: 2227
Heh. Yeah... It'll be easier for me to just build it in the morning and take pictures.

The basic idea, though, is that the tip of a threaded screw is the 'anvil' for peening. Basically, a receiver that I can change the height on.
All will be clear once I've made it!-Zak Jarvis. Writer. Artist. Bon vivant.
-
01-29-2012, 08:31 AM #5Senior Member
- Join Date
- Sep 2011
- Location
- West-Flanders, Belgium
- Posts
- 171
Thanked: 14
I think I know what you're getting at.. Not quite sure if the screws 'l survive long, and if the nut isn't going to either work loose or bury itself deeper into the wood though :/
won't know until you try!
-
01-29-2012, 01:48 PM #6Hones & Honing


- Join Date
- May 2005
- Location
- Saint Paul, Minnesota, United States
- Posts
- 8,023
- Blog Entries
- 1
Thanked: 2209
This sounds interesting. I will follow this thread.
Randolph Tuttle, a SRP Mentor for residents of Minnesota & western Wisconsin
-
The Following User Says Thank You to randydance062449 For This Useful Post:
Voidmonster (01-29-2012)
-
01-29-2012, 02:42 PM #7Senior Member

- Join Date
- Oct 2011
- Location
- Festus, MO
- Posts
- 377
Thanked: 113
Along the same lines a sturdier set up might be to drill and tap a 1/2" block of steel or brass and use a cup faced set screw.
A lot of knifemakers also use a cup faced punch in a drill press and spin the dome on there pins. Might be another option for you.
RayVoidmonster likes this.
-
The Following User Says Thank You to RayCover For This Useful Post:
Voidmonster (01-29-2012)
-
01-29-2012, 08:47 PM #8Captain ARAD.
- Join Date
- May 2011
- Location
- Pacifica, CA
- Posts
- 2,474
Thanked: 2227
If this el-cheapo version works out, I'll probably do exactly what you're talking about. I don't have any of the equipment handy to tap a chunk of steel (or, for that matter, any 1/2" blocks of steel!). But I do have light-duty woodworking bits and epoxy! Originally Posted by RayCover

That drill press idea is real interesting. Are there any particular drill-presses better suited to that? I haven't sprung for one yet. I'd rather spend more for something lasting and versatile.-Zak Jarvis. Writer. Artist. Bon vivant.
-
01-29-2012, 08:54 PM #9Captain ARAD.
- Join Date
- May 2011
- Location
- Pacifica, CA
- Posts
- 2,474
Thanked: 2227
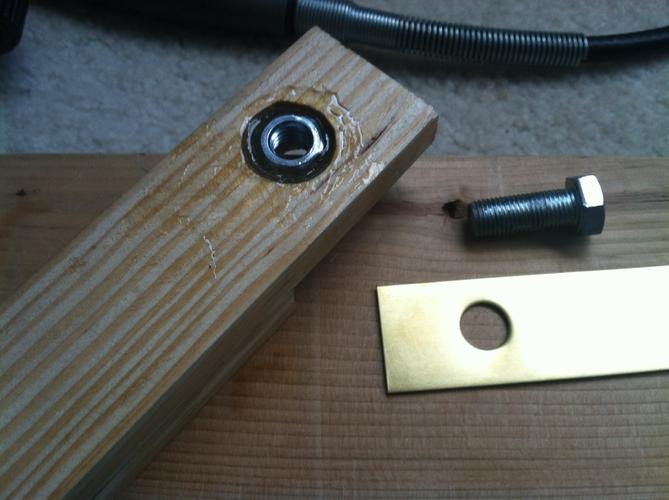
Here's the beginning of the build. I've drilled out two holes in the wood. One large enough for the bolt and another large enough for the nut, leaving about 1/4th inch of wood lip for the nut to rest on.
I epoxied in the nut (and I'll add a bit more once that's set) with minor accidents.
I've also got a thick band of brass sheet. I punched a hole in that larger than the bolt.
Once the nut is well and truly set into the wood I'll epoxy down the brass over the top of the nut.
The brass side will be the work surface, and the bolt, screwed in from the bottom, will have the flat screw-end poke up out of the brass to be my very tiny anvil.
I also intend to cover the work surface with leather.
The idea here is that I've got a working surface for peening razors that doesn't mark up the scales and lets me dial in surface height for the pins. I'll be wrapping the bolt threads with plumbers tape to make the movement smoother and less susceptible to vibration.
This oughta be a bit better than using the polished side of a hammer head.
Edited to add
That part above 'with minor accidents'? I got epoxy on the threads of the nut, so I had to take it out and put in the spare. The spare, of course, has the wrong threads. I didn't notice until after it had set. It's for different bolts than the ones I've got. This is what I get for letting the clerk at the hardware store package it up without inspecting the parts. So I guess I'll get some new bolts.Last edited by Voidmonster; 01-29-2012 at 09:19 PM. Reason: Ha ha, the universe is hilarious.
-Zak Jarvis. Writer. Artist. Bon vivant.
-
01-29-2012, 09:55 PM #10Senior Member
- Join Date
- Mar 2011
- Location
- Corcoran, Minnesota
- Posts
- 665
Thanked: 170
You could use a Tee nut, which gets tapped in from the back side of your wood, and you wouldn't have to mess with the epoxy. Takes a round hole. The wood would have to be the same thickness as the Tee nut. Take a look at one next time you are in a hardware store. I still like the 1/2 steel and allen set screw idea better.


 Reply With Quote