Results 1 to 8 of 8
Like Tree17Likes
  • 11 Post By JSmith1983
  • 1 Post By BobH
  • 5 Post By JSmith1983

Thread: Wire Inlay

  1. #1
    Senior Member JSmith1983's Avatar
    Join Date
    Feb 2012
    Location
    Menominee,MI
    Posts
    1,624
    Thanked: 325

    Default Wire Inlay

    I was reading some articles about wire inlays in knife scales and gun stocks and thought that looked pretty easy to do so I decided to take a piece of redheart that I had lying around and figured I would give it a go. I roughed out a scale shape and thought I would experiment. Well since I didn't have any small chisels or anything I took a really small screw driver and used that. Well needless to say it wasn't as easy as I thought. The dull screw driver made it alot harder to make smooth straight lines and it was a "PITA" to get the wire to go where I wanted to go. It was a fun learning experience however. I now know that I need something sharper to make the lines and got some good ideas on how to guide the wire to do what I want it to. Glad I tried it first before making a nice set of scales and having them ruined by not knowing what I was doing. To the people that do wire inlays in knives and stocks kudos. This is how it turned out. Bare in mind this was my practice piece. You can see what inexperience can do to something you think might be easy. Actually looking forward to trying this again and again till I get it the way I want it. It looks better in the picture than it does in person.
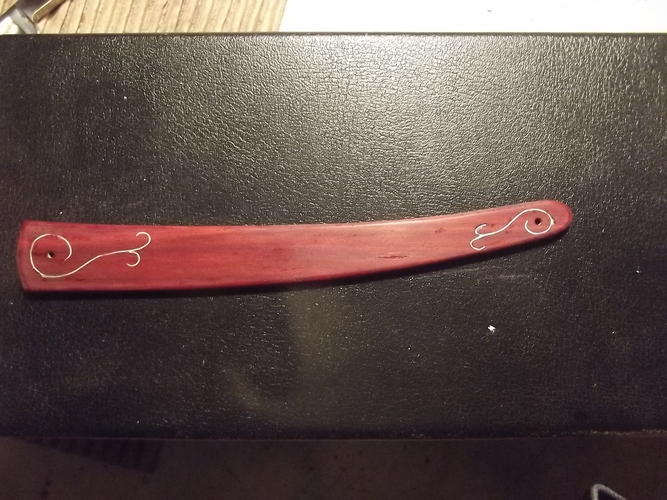
    Name:  DSCF7645.jpg
Views: 583
Size:  61.0 KB

  2. The Following 3 Users Say Thank You to JSmith1983 For This Useful Post:

    Geezer (02-27-2013), maddafinga (03-06-2013), spazola (02-26-2013)

  3. #2
    Senior Member blabbermouth Chevhead's Avatar
    Join Date
    Feb 2013
    Location
    Upstate, New York
    Posts
    2,751
    Thanked: 708
    Blog Entries
    4

    Default

    Looks pretty good to me...

  4. #3
    Senior Member Lemur's Avatar
    Join Date
    Jan 2008
    Location
    Sweden, Gotland, Visby
    Posts
    1,888
    Thanked: 222

    Default

    Training training, you'll get there!
    Sharp tools, never ever cut with your other hand behind the work piece and slightly under cut.
    A flattened wire will only want to bend in one plane so it's easier to get it down.
    Hur Svenska stålet biter kom låt oss pröfva på.

  5. #4
    Senior Member blabbermouth
    Join Date
    Mar 2012
    Location
    Thunder Bay, Ontario, Canada
    Posts
    17,251
    Thanked: 3222

    Default

    I'd say you are on the right track for sure. Not bad at all for the first attempt. Been meaning to try this too, thanks for the incentive to do so.

    Bob
    Geezer likes this.
    Life is a terminal illness in the end

  6. #5
    Senior Member JSmith1983's Avatar
    Join Date
    Feb 2012
    Location
    Menominee,MI
    Posts
    1,624
    Thanked: 325

    Default

    Well I decided to try something else. I used sterling silver round wire instead of bezel wire cause I wanted to try and match the calligraphy writing as much as possible and found it harder to do with bezel. I flattened the wire in the spots to match the thicker writing. Before I did anything I took a piece of scrap ebony and flatten part of a piece of wire while leaving some of it round and since ebony has a tendency to chip and flack thought I would just hammer the wire into the wood and make an indentation. It worked well on the practice piece, but when I went to do it on the scales I couldn't get it to make an indentation so I just thought I would glue it to the top. I really don't like it like that cause then I would have to give it some sort of poly finish. I think doing a CA finish would be quite hard since it would be hard sanding in between the letters. I would rather have it 50/50 in the wood and sticking out. I managed to rip off part of the lettering and lose it. Not sure yet if I will leave it or just remove the lettering and try something else. Kind of fun experimenting with different ideas. Gives me some more practice to get it the way I want. You can still see the glue smeared in places. I didn't remove it yet or finish the wood. I was just trying to see what it would look like since it didn't work as I had planned. Atleast this will keep me busy for awhile messing with different ideas on what to do.

    Name:  DSCF7650.jpg
Views: 632
Size:  30.5 KB
    Last edited by JSmith1983; 03-06-2013 at 07:28 PM.

  7. #6
    Just a guy with free time.
    Join Date
    Oct 2011
    Location
    Mid state Illinois
    Posts
    1,448
    Thanked: 247

    Default

    See?!! You're already getting better! That S is PERFECT! I have some gold wire I've been saving for this. Enough about me though. YOU are the one doing it, and it looks to me like you're doing it very well. Ofc practice will make perfect. Thanks for posting!

  8. #7
    Senior Member blabbermouth RezDog's Avatar
    Join Date
    Feb 2013
    Location
    Haida Gwaii, British Columbia, Canada
    Posts
    14,405
    Thanked: 4823

    Default

    nice. I was planning to do some wire on some box lids. very inspiring.

  9. #8
    Senior Member
    Join Date
    Mar 2009
    Posts
    1,211
    Thanked: 202

    Default

    Funny enough. A friend of mine was asking if I do not know anything about wire inlay in wood. Now I know where to send him. Great job.

Posting Permissions

  • You may not post new threads
  • You may not post replies
  • You may not post attachments
  • You may not edit your posts
  •