
Results 1 to 10 of 15
 15Likes
Thread: Knot replacement
 LinkBack URL
 About LinkBacks
-
01-16-2014, 04:09 AM #1No that's not me in the picture


- Join Date
- May 2013
- Location
- Los Angeles South Bay
- Posts
- 1,340
Thanked: 284 Knot replacement
Well I got this older Crabtree & Evelyn brush cause I really dug the handle. However the bristles seemed to be coming out at a fairly good rate so I decided to try and replace it.
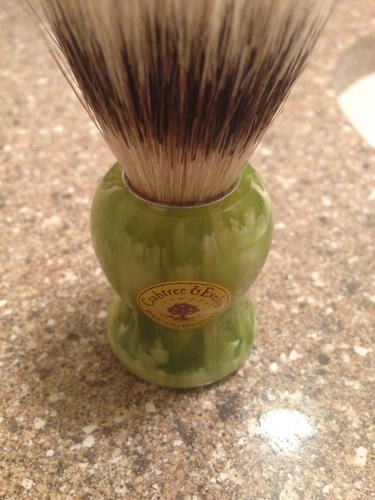
From the way the bristles were coming out I was hoping the base would pop right out - wrong!!
So I went ahead with drilling out with a forstner bit. I put some foam in the vice to try to even out the pressure on the handle a little better.
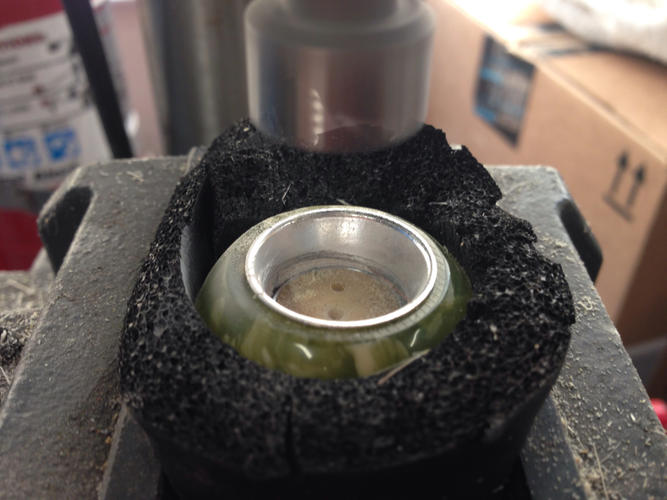
I guessed keeping that metal sleeve was a pipe dream, and yeah that tore out pretty quickly, even though I was using an undersized bit.
Got down to where I think I needed to be for the loft.
(There's one more drilling operation with the next size bit to clean out the hole that I forgot to take a picture of).
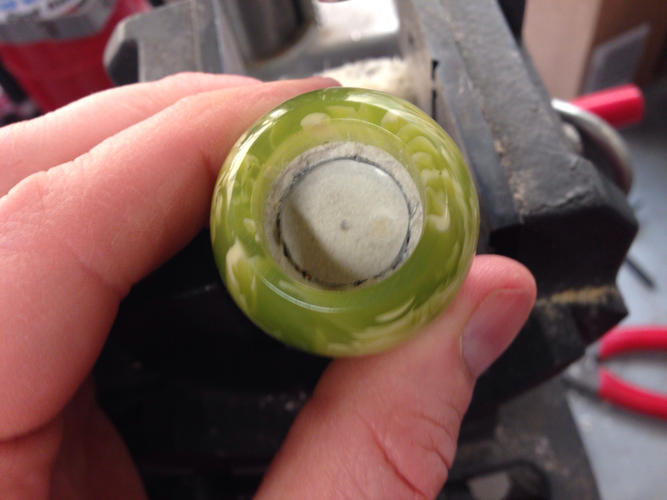
Set the new knot with marine epoxy. I'm not sure if I went deep enough. Oh well we'll find out!
Not sure if this is how everyone else does this, but thought I'd share how I attempted it anyway
Knot is 18mm 2 band finest (TGN)
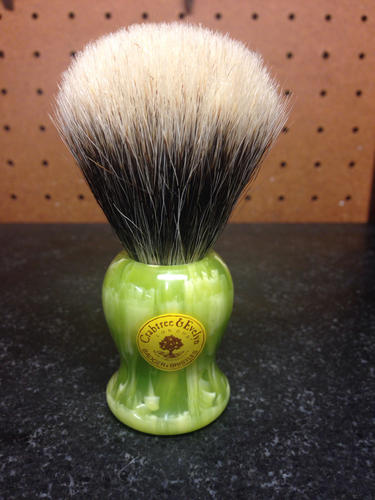
Happy shaving!I love living in the past...
-
The Following 2 Users Say Thank You to RoyalCake For This Useful Post:
Euclid440 (01-16-2014), Rockabillyhelge (01-16-2014)
-
01-16-2014, 11:13 AM #2I love Burls....... and Acrylic


- Join Date
- Mar 2012
- Location
- Baden, Ontario
- Posts
- 5,475
Thanked: 2284
If it were me I may have set it a bit deeper, but I like my brushes a bit stiffer. Looks like this one may be a bit floppy, but that's not necessarily bad. I do have 2 brushes that are floppy, and they whip up cream like a boss. Post a pic when you use it a couple times so we can see the bloom. Nice job you did on removing the old knot!
Burls, Girls, and all things that Swirl....
-
The Following User Says Thank You to HARRYWALLY For This Useful Post:
RoyalCake (01-16-2014)
-
01-16-2014, 03:21 PM #3No that's not me in the picture
- Join Date
- May 2013
- Location
- Los Angeles South Bay
- Posts
- 1,340
Thanked: 284
Yeah I think you're right. I'll give it a go and see how it does. I probably should have copied the loft on another brush just to be safe... Originally Posted by HARRYWALLY
 I love living in the past...
-
01-16-2014, 03:42 PM #4Senior Member

- Join Date
- Jan 2011
- Location
- Roseville,Kali
- Posts
- 10,432
Thanked: 2027
What is the loft??,sometimes re-knots can be far more difficult than people realize.
RoyalCake likes this.CAUTION
Dangerous within 1 Mile
-
01-16-2014, 03:56 PM #5No that's not me in the picture
- Join Date
- May 2013
- Location
- Los Angeles South Bay
- Posts
- 1,340
Thanked: 284
The loft is sitting right at 53mm...
I love living in the past...
-
01-16-2014, 04:11 PM #6Senior Member
- Join Date
- Apr 2012
- Location
- Diamond Bar, CA
- Posts
- 6,553
Thanked: 3215
Wow, that came out nice. Showed the photos to Liz and she is so jealous, that is a great looking brush, never seen one like it.
Should bloom huge, thanks for posting your process.
-
The Following User Says Thank You to Euclid440 For This Useful Post:
RoyalCake (01-16-2014)
-
01-16-2014, 04:20 PM #7Senior Member
- Join Date
- Jan 2011
- Location
- Roseville,Kali
- Posts
- 10,432
Thanked: 2027
That should work out fine. Originally Posted by RoyalCake
CAUTION
Dangerous within 1 Mile
-
01-16-2014, 04:21 PM #8No that's not me in the picture
- Join Date
- May 2013
- Location
- Los Angeles South Bay
- Posts
- 1,340
Thanked: 284
Thanks. Oh and this is the knot that the glue sits pretty high into the bristles, so it's a little stiffer than usual. Originally Posted by pixelfixed
I love living in the past...
-
01-16-2014, 04:24 PM #9No that's not me in the picture
- Join Date
- May 2013
- Location
- Los Angeles South Bay
- Posts
- 1,340
Thanked: 284
Thanks - I got motivated to get this done after seeing your collection Originally Posted by Euclid440
Euclid440 likes this.I love living in the past...
-
01-16-2014, 10:02 PM #10Always Thinkun

- Join Date
- Nov 2012
- Location
- Grain Valley, Missouri
- Posts
- 818
Thanked: 348
Looks very well done!
You are now well on your way to being a profesional shavingbrushknotrepacementalist!!!
Well done!!
Ray
-
The Following User Says Thank You to walleyeman For This Useful Post:
RoyalCake (01-18-2014)


 Reply With Quote