
Results 1 to 10 of 12
 31Likes
Thread: A baker's first brush
 LinkBack URL
 About LinkBacks
-
03-26-2014, 09:14 PM #1Junior Member


- Join Date
- Mar 2014
- Location
- Montreal, Qc
- Posts
- 8
Thanked: 0 A baker's first brush
Hi everyone, I've been using Srp for quite some time but never really had anything to say. Now that I've made my first brush I thought it would be nice to get some feedback from the Pros.
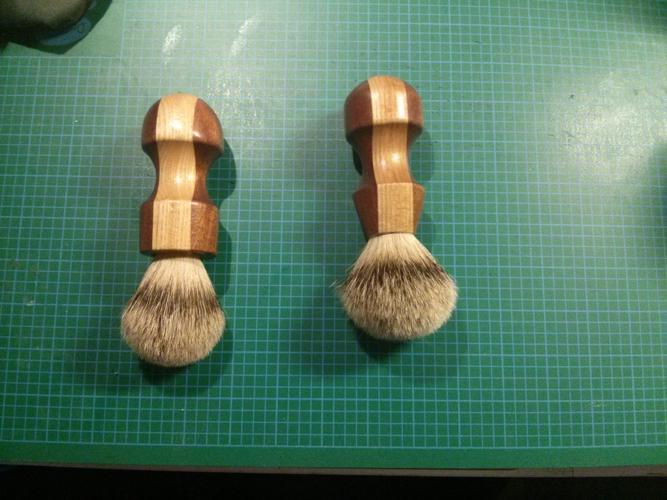
These brushes (I've made one for a friend as well as the one for myself) are made from ash wood and sapelli. Keep in mind that I'm a baker (not exactly a professional wood worker) and I'm working without a lathe (though I'd love to get one some day). The knot is 24mm super badger hair. It's a fairly big handle, but I've custom made it for my big hands. It feels really comfortable but I have yet to use it. Can't wait though.
As I said, I'd enjoy some constructive feedback. Do you see big flaws? What would you have done differently? That sort of thing.
-
03-26-2014, 09:50 PM #2aka shooter74743


- Join Date
- Sep 2009
- Location
- SE Oklahoma/NE Texas
- Posts
- 7,285
- Blog Entries
- 4
Thanked: 1936
Many of us like long handles to keep the fingers out of the lather. They look pretty good to me, especially the one on the right.
Southeastern Oklahoma/Northeastern Texas helper. Please don't hesitate to contact me.
Thank you and God Bless, Scott
-
The Following User Says Thank You to ScottGoodman For This Useful Post:
johng1337 (03-27-2014)
-
03-27-2014, 02:27 AM #3Always Thinkun

- Join Date
- Nov 2012
- Location
- Grain Valley, Missouri
- Posts
- 818
Thanked: 348
The only problem i see is I am not holding one of those babys!!
Awesome job!!
Rayrolodave likes this.
-
The Following User Says Thank You to walleyeman For This Useful Post:
johng1337 (03-27-2014)
-
03-27-2014, 02:34 AM #4Incidere in dimidium


- Join Date
- Mar 2012
- Location
- Val des Monts, Quebec
- Posts
- 4,070
Thanked: 1440
I think they look great. I'm a fan of the long handled brush too as I use a pretty deep scuttle to lather most days.
Do you and your friend have hangers for the brushes? The only suggestion I would offer is a flat end on the handle for standing the brush up. But if you can hang them, that's not really an issue.
I love the design on the right as well but might be a *bit* concerned by how thin the walls look around the knot. If the wood contracts or the knot base expands, there might be potential for cracks. That happened with one of mine. I just filled the crack with CA, and it works just fine.
*However* as I said I think they look great!
In the absence of a lathe, how did you shape them?
It was in original condition, faded red, well-worn, but nice.
This was and still is my favorite combination; beautiful, original, and worn.
-Neil Young
-
The Following User Says Thank You to Cangooner For This Useful Post:
johng1337 (03-27-2014)
-
03-27-2014, 03:07 AM #5Senior Member

- Join Date
- Jan 2011
- Location
- Roseville,Kali
- Posts
- 10,432
Thanked: 2027
No flaws at all, they should serve you well.
CAUTION
Dangerous within 1 Mile
-
The Following User Says Thank You to pixelfixed For This Useful Post:
johng1337 (03-27-2014)
-
03-27-2014, 04:12 AM #6Senior Member
- Join Date
- Nov 2010
- Location
- Pequea, Pennsylvania
- Posts
- 2,290
Thanked: 375
Look real good I would use them for sure!! What was your process since you didn't use a lathe? I'll add... keep this in mind it's just my opinion, at the base of the brush I personally like to angle that area so water runs off instead of sitting on a shelf and collecting around the knot. Definitely like the style of both, they look like they'd fit in the palm well and have a nice area for your fingers to grip.
CHRIS
-
The Following User Says Thank You to Trimmy72 For This Useful Post:
johng1337 (03-27-2014)
-
03-27-2014, 04:24 AM #7 Speaking of Pros
May your loaves never brick
-
The Following User Says Thank You to pinklather For This Useful Post:
johng1337 (03-27-2014)
-
03-27-2014, 10:48 PM #8Junior Member
- Join Date
- Mar 2014
- Location
- Montreal, Qc
- Posts
- 8
Thanked: 0
Thank you very much everyone. It's nice to hear you guys like them.
I'll just quickly explain my process, but it's nothing fancy. I glue 3 pieces of wood together (that much is fairly obvious) in a cube shape. From that, cutting every corner on the bench saw made an octagon. I then made a V cut for the inside curve )( and cut the end corners on the band saw. After i had the basic shape, it involved a lot of sanding, with a disc sander and a cylindrical sanding thingy attached to a drill press.
Cangooner, I do have a brush and razor stand I also made (with the same woods), I'm not so sure for my friend though, I'll have to ask. As for the walls, I have to admit it didn't occur to me that they could crack. They are about 2 mm thick, so I guess all i can do now is hope. Worse case scenario I'll have to make new ones
-
03-28-2014, 01:32 AM #9Incidere in dimidium
- Join Date
- Mar 2012
- Location
- Val des Monts, Quebec
- Posts
- 4,070
Thanked: 1440
If it does crack don't despair as it may well be fixable, and those beauts are worth fighting to keep.
When that happened with mine, I got my CA (two kinds: really runny and the medium thickness 'normal' CA that behaves like your normal superglue. Use the runny stuff to seal the cracked surface. It may also run in between the brush handle and the knot depending how it was glued in. Take care that the CA doesn't run up into the hair via capillary action as that can completely ruin the knot. In other words, use sparingly! Once that has cured, use the thicker stuff to build up like filler in the crack itself. If it cracks wide, cut a fine sliver of the same wood, and CA that in place. More thinner layers is probably better than fewer thick ones. Keep doing that until the crack is filled, sand it flush, and you might end up with a very inconspicuous repair.
So if it happens, it's well worth a shot to save. But here's hoping that's a shot you don't have to take.
johng1337 likes this.
It was in original condition, faded red, well-worn, but nice.
This was and still is my favorite combination; beautiful, original, and worn.
-Neil Young
-
03-28-2014, 02:41 AM #10Senior Member

- Join Date
- Jan 2012
- Location
- Milwaukee, Wisconsin
- Posts
- 162
Thanked: 45
Now you know you've done well, when Pixelfixed, himself a master brush maker, pays you a compliment. Originally Posted by pixelfixed

They look beautiful. How did you shape them? On a drill press? Maybe you could fill us in on how you made them?
Keep up the good work!EAGLESKADU and johng1337 like this.bruseth
Kenny


 Reply With Quote
