
Results 1 to 10 of 15
 26Likes
 LinkBack URL
 About LinkBacks
-
09-21-2014, 01:48 AM #1Senior Member


- Join Date
- Dec 2013
- Location
- Riverview, FL
- Posts
- 787
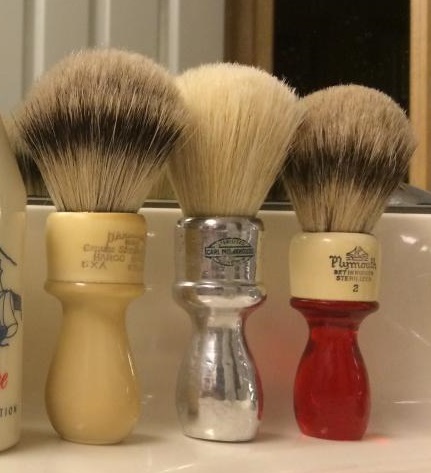
Thanked: 202 First brush re-knots...Hey, this is pretty simple!
After tinkering with straights for a bit it occurred to me I should do some brushes to experience the joy of a whole new set of complications

Sadly mistaken was I, when I discovered the whole process to be dead simple and very "nuts and bolts". The trick seems to be extracting the old cruddy knot without destroying what may be a fragile old brush. Easily managed with a little care.
As I'm a bowl latherer, I sought out a few old nice long handled brushes. Gutted them according to procedures gleaned from this forum, cleaned them up and epoxied in new knots from TGN. A piece of cake.
Anyone who's looking for a fun way to get a bit more hands-on with their hobby is going to find this a relatively inexpensive (I've got about 19 bucks into that C-Mon), simple and rewarding way to do so.
 !! Enjoy the exquisite taste sharpening sharpening taste exquisite smooth. Please taste the taste enough to ride cutlery.
Mike
-
The Following User Says Thank You to entropy1049 For This Useful Post:
sharptonn (09-21-2014)
-
09-21-2014, 01:59 AM #2Razor Vulture


- Join Date
- Oct 2010
- Location
- Lone Star State
- Posts
- 26,121
Thanked: 8612
Good work, Mike! They look fabulous! I like restoring old brushes as well. Only issues I come across sometimes is getting the knots down low enough to my specs. I have a few which I reknotted that have o-rings at the handle to accomplish it, but there are some lower-loft knots I may try if I do another. You did good!
"Don't be stubborn. You are missing out."
I rest my case.
-
The Following User Says Thank You to sharptonn For This Useful Post:
entropy1049 (09-21-2014)
-
09-21-2014, 03:05 AM #3I love Burls....... and Acrylic

- Join Date
- Mar 2012
- Location
- Baden, Ontario
- Posts
- 5,475
Thanked: 2284
Lookin good!!!
 Burls, Girls, and all things that Swirl....
-
The Following User Says Thank You to HARRYWALLY For This Useful Post:
entropy1049 (09-21-2014)
-
09-21-2014, 03:49 AM #4Senior Member
- Join Date
- Dec 2013
- Location
- Riverview, FL
- Posts
- 787
Thanked: 202
As I'd pretty thoroughly gutted the cavity created by removing all the old epoxy and knot material, I did some shimming with some wooden nickle type slugs (various diameter sizes right next to the corks in the hardware section of my local Lowe's store) to get the height of the knots about where I wanted them. Flooded said cavity with epoxy upon setting the knot. Lots of it. Not quite overflowing the bounds of the brush wall. I pity the poor bastid who decides it's time to replace them in a 75 years or so. Originally Posted by sharptonn

Again, terribly painless and satisfying!!! Enjoy the exquisite taste sharpening sharpening taste exquisite smooth. Please taste the taste enough to ride cutlery.
Mike
-
09-21-2014, 03:54 AM #5Senior Member


- Join Date
- Feb 2013
- Location
- Haida Gwaii, British Columbia, Canada
- Posts
- 14,443
Thanked: 4828
I've often considered it when looking at sad old brushes on evil bay. Perhaps I may join in on the festivities.
HARRYWALLY and entropy1049 like this.It's not what you know, it's who you take fishing!
-
09-21-2014, 04:10 AM #6I love Burls....... and Acrylic
- Join Date
- Mar 2012
- Location
- Baden, Ontario
- Posts
- 5,475
Thanked: 2284
It really is quite easy getting the old knots out. If you can destroy things with a little finesse, the hardest part is done. One of my favorite brushes is a reknot, in a handle I paid $3 for with a budget no name, 2 band knot. I find myself using it more than my others that a worth far more.I've often considered it when looking at sad old brushes on evil bay. Perhaps I may join in on the festivities.
RezDog, you could handle it no prob.entropy1049 likes this.Burls, Girls, and all things that Swirl....
-
09-21-2014, 04:12 AM #7No that's not me in the picture

- Join Date
- May 2013
- Location
- Los Angeles South Bay
- Posts
- 1,340
Thanked: 284
Lookin good there! It is satisfying, isn't it. So what's your trick to getting the knots out without damage to the handle? IME some come out easier than others. Some on the other hand can be a pain...
entropy1049 likes this.I love living in the past...
-
09-21-2014, 04:20 AM #8I love Burls....... and Acrylic
- Join Date
- Mar 2012
- Location
- Baden, Ontario
- Posts
- 5,475
Thanked: 2284
I do the cordless drill and a pair of pliers method. Cut the hairs off low, and start drilling. But don't go too deep, just want to break up that epoxy enough until you can pull it out. 10pups has a good vid on the tube on how to do it with a bench vice. It's a good vid. I believe it's called, "knot out, knot in."
Burls, Girls, and all things that Swirl....
-
-
09-21-2014, 06:34 AM #9Senior Member
- Join Date
- Dec 2013
- Location
- Riverview, FL
- Posts
- 787
Thanked: 202
As HARRYWALLY says, I didn't muck about with finesse. Cut the old bristles flat, and drilled three or four 3/16" holes down through the flush surface of the knot and just through the old epoxy. Commenced digging out guts with needle nose pliers and various scraping tools. Once the bulk of the old material was out, I used a Dremel with various attachments to extract the really stubborn chunks and then I kind of cleaned up and "uniformed" my newly made orifice. Gauged how far down into the brush I wanted to recess the knot, dremeled more where necessary, in two cases built the bottom of the inside of the orifice up with flat solid wooden washer "wood nickel" looking thingies I found at Lowes while on a quest for cork stoppers for some ED Pinaud bottles I'd just scored. Apply obscene amounts of epoxy just to the point of overflowing over the sides of my seated knot, made some mai fun, and they were ready to make lather. Originally Posted by RoyalCake
Easy-Peasy!!! Enjoy the exquisite taste sharpening sharpening taste exquisite smooth. Please taste the taste enough to ride cutlery.
Mike
-
The Following User Says Thank You to entropy1049 For This Useful Post:
RoyalCake (09-21-2014)
-
09-22-2014, 10:06 PM #10
Same here! Some have come out with ease by squeezing them in a vise but others are a pain! Originally Posted by RoyalCake
entropy1049 likes this.


 Reply With Quote

