
Results 11 to 12 of 12
 18Likes
Thread: Craftsman 37" older lathe
 LinkBack URL
 About LinkBacks
-
10-04-2014, 03:37 PM #11Str8Faced Gent.


- Join Date
- Aug 2013
- Location
- Orangeville, Ontario
- Posts
- 8,455
- Blog Entries
- 1
Thanked: 4207
A and M it was indeed Andrew. Thanks for the tip about them in the summer.
great spot, smells incredible in there.
I picked up, as seen in the pic from left to right:
sapele, Amboyna burl, tulipwood, and a slice of mottled ebony.
the tulipwood is gorgeous and will probably turn into twosets of one piece scales, the ebony will be practice wood or wedges.
The others have a few turnings in them and will be my first brush handle attempts once I figure out if I need face plates, or different chucks for this lathe.
I hear lee valley calling me now to come look at lathe accessories. The chucks and faceplates I've seen seem to indicate my craftsman is likely a morse1 and is a 1x8tpi thread.
forgot my thread gauge at work so will not be getting much beyond basic set up this weekend. Maybe I can practice on the, as supplied, live centers.
Promised the wife a lovely pen out of the deal, so will be practicing on lots of small pieces, relearning my lathe strokes and such. Been almost 30 years since I've tried my hand at wood turning..
cant wait.
cheers.
-
10-04-2014, 04:23 PM #12I love Burls....... and Acrylic

- Join Date
- Mar 2012
- Location
- Baden, Ontario
- Posts
- 5,475
Thanked: 2284
I freakin love that place Mike! As you said, the smell!!!! That golden Amboyna is gorgeous stuff. Throw some oil on it when you have it all sanded up and it'll turn a vibrant orange/gold and will make everything pop.
Here's how I use to turn my handles with just a basic face plate, screws and a glue block (scrap wood, 2x4 hunk.) but you can use anything really.
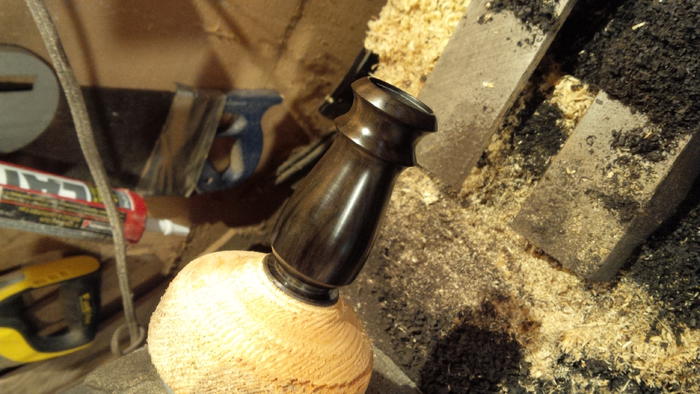
Hot glue, or CA with an accelerator works great to bond them. Just make sure both face are really clean. As you see in my pic, once you have it turned, and sanded, just take a parting tool and cut it of, leaving a bit of extra wood. You can do this also on the band sand too, but is a little more tricky. A sharp blade helps. Then just lay some sand paper on a machined flat surface (table saw bed) and sand that extra wood off until it's flat. Back and forth sanding will sometimes create two flat areas due to rocking. If that happens just use a pulling motion instead of a push pull technique.
Hope that helps a bit with your first couple attempts.Last edited by HARRYWALLY; 10-04-2014 at 04:26 PM.
Burls, Girls, and all things that Swirl....
-
The Following 2 Users Say Thank You to HARRYWALLY For This Useful Post:
Mcbladescar (10-05-2014), MikeB52 (10-04-2014)


 Reply With Quote