Results 11 to 20 of 21
Thread: Ever-Ready Restore
-
03-28-2015, 12:18 AM #11Senior Member


- Join Date
- Jan 2011
- Location
- Roseville,Kali
- Posts
- 10,432
Thanked: 2027
BAck in the day, when those old brushs were made,they did not use epoxys,they used alipethic glues or plasters.
you need to get in there with a forstner bit.CAUTION
Dangerous within 1 Mile
-
03-28-2015, 12:31 AM #12I love Burls....... and Acrylic


- Join Date
- Mar 2012
- Location
- Baden, Ontario
- Posts
- 5,475
Thanked: 2284 Agreed......you need to get in there with a forstner bit.
What you did on the bottom to the letters looks great!Burls, Girls, and all things that Swirl....
-
03-28-2015, 12:43 AM #13Senior Member


- Join Date
- Nov 2012
- Location
- Across the street from Mickey Mouse in Calif.
- Posts
- 5,320
Thanked: 1184
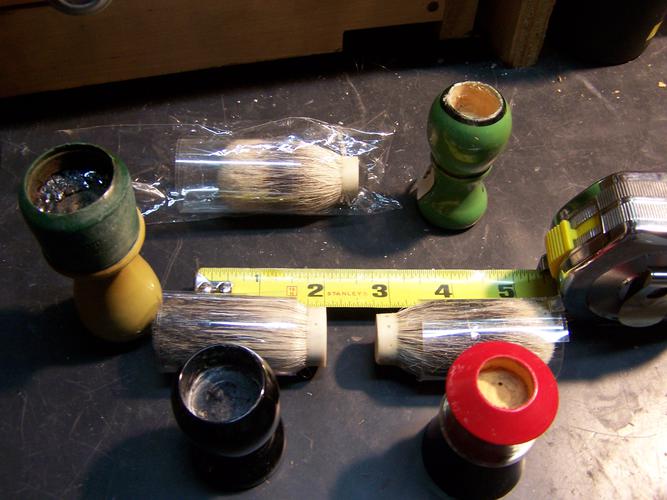
Yeah , the bottom of the bigger bit hole looks more like "rock bottom" :<0)
Here are a few I have out. 3/8" will just cover the bottom of a knot. Those knots are 22mm to 18mm but you can see the new glue is about the same depth.
In the handles you can see all the epoxy out.
 Good judgment comes from experience, and experience....well that comes from poor judgment.
-
03-28-2015, 03:44 AM #14Senior Member

- Join Date
- Mar 2015
- Location
- Southern California
- Posts
- 114
Thanked: 20
-
03-28-2015, 04:10 AM #15

With most of the plastic handled brushes I've dealt with, I usually clean out the entire inside, drilling all the way through the plaster. Then as was mentioned earlier, build a new shelf using pennies, washers, spacers, wine cork, whatever you want.
After you've completely cleared out the inside, I would also take some sandpaper to the outer edge of the opening and smooth it out, looks a little flaky.
Don't give up, you're almost there!
*edit - any two part marine epoxy will work, just make sure you mix them correctly or your knot will eventually break free and flip out of the handle when you're shaking the water out... ask me how I know.
-
03-28-2015, 01:02 PM #16He of the unconventional nature.


- Join Date
- Jul 2013
- Location
- San Joaquin County, CA
- Posts
- 58
Thanked: 5
I have an old ever-ready brush that I got free with a vintage scuttle. The bristles are nylon or some similar material and its performanceis not much to speak of. I've thrown it into my travel bag since I'm not afraid to lose it. This thread has inspired me to rebuild it anew with a nice badger knot. Thank you gentlemen, for the inspiration.
You don't have to be insane to do the things that I do, but it helps.
-
03-28-2015, 01:47 PM #17Senior Member

- Join Date
- Mar 2015
- Location
- Southern California
- Posts
- 114
Thanked: 20
Good for you sir. Be sure to post pics as you go!
-
03-28-2015, 01:55 PM #18

Yes that is looking better..Detail supply? I worked at Gene's Import Auto Body in Sand City, CA as a post paint detailer...We called the nubs and nibs 'fresh out of the booth'...Then I would bartend at night. Anyway, yes that looks much better! I use P&S Clearcut II to polish off the specks. Touch up that little speck on the zero, on the bottom of the brush
 And by the 'L'...
  What Are you gonna Knot it with?
-
03-28-2015, 02:36 PM #19Senior Member

- Join Date
- Mar 2015
- Location
- Southern California
- Posts
- 114
Thanked: 20
I am thinking on going with Boar since it already says pure bristle at the bottom.
Yep polished my fair share of cars too! I sell Mark V products and Pro Products for the most part with some boutique products from USA and Germany as well.
-
03-28-2015, 02:59 PM #20

I dont care what anyone says...my boar hair brush has NEVER failed me.


 17Likes
 LinkBack URL
 About LinkBacks


 Reply With Quote

