
Results 1 to 10 of 18
 51Likes
Thread: Stocking Up on Wood Blanks
 LinkBack URL
 About LinkBacks
-
07-15-2020, 08:56 PM #1Senior Member


- Join Date
- May 2010
- Location
- Upstate South Carolina
- Posts
- 3,308
Thanked: 987 Stocking Up on Wood Blanks
So Cook Woods had a sale (famous last words). I couldn't resist stocking up on some tropical hardwoods. My rough plan is to make razor scale blanks off of one half of the 2x2x12 blanks, and turn brushes off the other half, and hopefully end up with some matched sets.
From left to right: Black and White Ebony, Bhilwara, Bocote and Bolivian Rosewood.
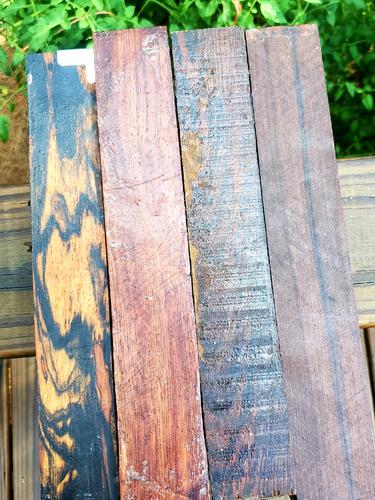
I've been drooling over their B/W Ebony especially for a long time. I may try to see what I can spin from it this evening. Once I have some scraps for stacking, I have seen some brushes with contrasting rosewood/cocobolo/bocote with various ebonies that are just stunning-I look forward to trying that too.
Speaking of stacking, do you turners just cut and square up your pieces, and then epoxy them together?Last edited by ScoutHikerDad; 07-15-2020 at 09:01 PM.
There are many roads to sharp.
-
07-16-2020, 12:18 AM #2Senior Member
- Join Date
- May 2010
- Location
- Upstate South Carolina
- Posts
- 3,308
Thanked: 987
One of my guiding philosophies in life is, if I fear something, I do it so that I have one less thing to fear. With that in mind, I threw caution to the wind and centered/chucked up a chunk of that ebony with a rough design in mind (knowing that the sensible thing to do would have been to practice on a few more pieces of poplar, but where's the fun in that?). Funny how that redheart was soft as butter, whereas this ebony is much harder and higher on the Janka scale (especially the black parts are much harder, which makes it kind of tricky). Nevertheless, I got it round pretty easily.Drilling out the recess took a minute-I kept having to stop and let things cool. I'll probably have to sharpen that bit tomorrow.
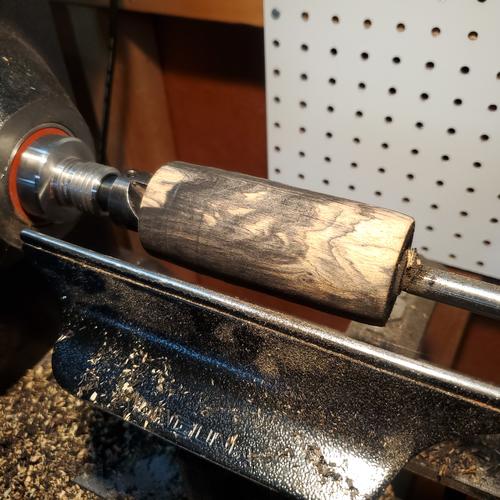
Taking a break while I re-sharpen my tools and stew on it a bit. I'm quickly finding that the Holy Grail of turning skills for me right now is chasing those blasted lines out of my coves especially. I'm hoping that my all-day class in a couple of weeks will help with that. I may go back to it tonight, or maybe sleep on it.
As you can see, it's wanting to chip where the black runs out. That white part under it is soft as particle boards, I swear. Maybe I should have tried pure black ebony instead. Oh, well, I'll fix it in the morning (I hope).
I'll post the finished piece if I don't screw it up.Last edited by ScoutHikerDad; 07-16-2020 at 01:00 AM.
There are many roads to sharp.
-
07-16-2020, 12:50 AM #3Skeptical Member


- Join Date
- Nov 2016
- Location
- Colorado Springs
- Posts
- 10,547
Thanked: 2194
Your pics didnt post up Aaron.
It's just Sharpening, right?
Jerry...
-
07-16-2020, 12:59 AM #4Senior Member
- Join Date
- May 2010
- Location
- Upstate South Carolina
- Posts
- 3,308
Thanked: 987
I fixed it-at least they show up on my end.
Gasman likes this.There are many roads to sharp.
-
07-16-2020, 01:48 AM #5Senior Member

- Join Date
- Dec 2018
- Location
- Gainesville, FL
- Posts
- 6,545
Thanked: 663
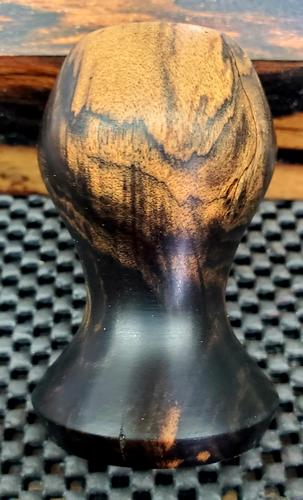
Yep, they're showing now. Beautiful angles to that piece
Iron by iron is sharpened, And a man sharpens the face of his friend. PR 27:17
-
07-16-2020, 08:13 AM #6www.edge-dynamics.com

- Join Date
- Feb 2013
- Location
- London
- Posts
- 3,066
Thanked: 512
Looks good..Maybe you can fill the chipped parts when finished ?
-
07-16-2020, 10:47 AM #7Senior Member

- Join Date
- Mar 2015
- Location
- Akron, Ohio
- Posts
- 12,071
Thanked: 4312
The B&W ebony makes some nice scales, Aaron.
The blocks I picked up were stabilized...yours.?
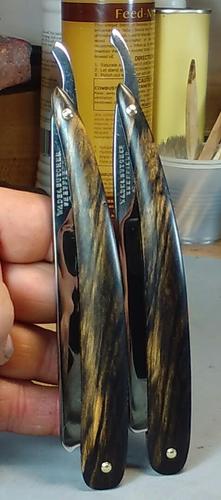
No finish needed, just sand to high grit and polish.Mike
-
07-16-2020, 11:45 AM #8Senior Member
- Join Date
- May 2010
- Location
- Upstate South Carolina
- Posts
- 3,308
Thanked: 987
Yeah, Mike, that pair of beauties you posted is what originally put me on the scent of this bewitching, beautiful wood. And no, CookWoods doesn't do stabilizing, so these are not stabilized. I actually have a stabilizing tank and vacum pump that I got in a trade, but still haven't used. At this point, I will probably have to sell plasma to save up for the hundred dollars a gallon of the Cactus Juice resin costs; the lathe truly is the cheapest part of turning-I was warned. Anyway, I would think woods as dense as ebony would be hard to get them to take up the resin (at least that's what I've heard).
I sort of had in mind for a finish a friction polish of a beeswax and BLO mixture I have on hand.
And Joseph-Thanks for the tip. I hope I don't have to try that. I imagine a post-turn repair like that would be a neon sign flashing "You screwed up." About to go out and see what I can to smooth it out.Last edited by ScoutHikerDad; 07-16-2020 at 11:47 AM.
There are many roads to sharp.
-
07-16-2020, 02:40 PM #9Skeptical Member
- Join Date
- Nov 2016
- Location
- Colorado Springs
- Posts
- 10,547
Thanked: 2194
Very nice shape Aaron.
It's just Sharpening, right?
Jerry...
-
The Following User Says Thank You to Gasman For This Useful Post:
ScoutHikerDad (07-16-2020)
-
07-16-2020, 07:58 PM #10Senior Member
- Join Date
- May 2010
- Location
- Upstate South Carolina
- Posts
- 3,308
Thanked: 987
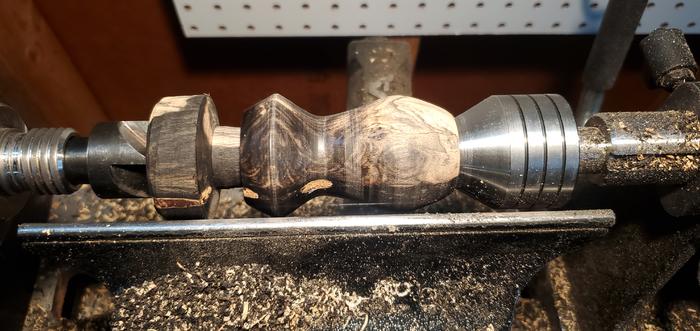
So I finished it, I guess. Here it is on the lathe, sanded to 600 before I parted it and flipped it around to finish off the bottom:
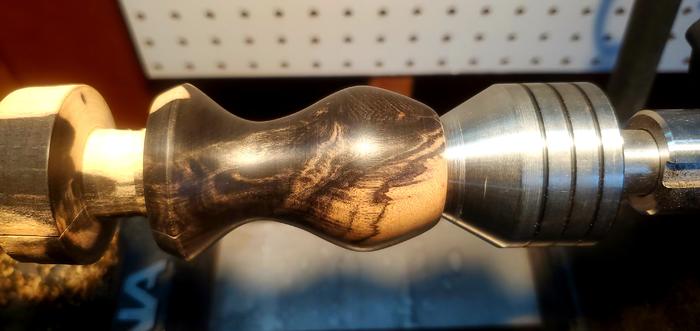
I managed to get out all but the faintest lines-still working on that. You can see the crack on the rim at the bottom-it looks much worse blown up in a photo than in person. I then turned in about 8 coats of BLO/beeswax mixture as a friction polish and burnished it in with an old t-shirt at about 2000 rpm. Those orange spots are not chips, just where I worked it below the black part. It took on a nice semi-gloss glow exactly like I wanted.
Overall, I'm pleased considering it's my 3rd brush. My rounds need to be more round, and the bottom grip is too wide. The ebony is a joy to work, as advertised, though the transition between colors/grains was tricky and led to some chips and "redesigns"-there were actually some voids behind the black that seemed to be filled with orange sawdust-never seen that!
I may try Tin-Tin's face-plate/dowel technique next time. The 20mm jaws ride a fine line between holding and cracking, and the dove-tail doesn't hold that well to begin with. Oh, well, lessons learned for next time. We're leaving Saturday for 10 days in a mountain cabin, so I'll hopefully doing more trout-fishing than brush-turning.There are many roads to sharp.


 Reply With Quote