Page 3 of 4 FirstFirst 1234 LastLast
Results 21 to 30 of 31
  1. #21
    JMS
    JMS is offline
    Usagi Yojimbo JMS's Avatar
    Join Date
    Jan 2007
    Location
    Ramona California
    Posts
    6,858
    Thanked: 792

    Default

    Quote Originally Posted by crazycliff200843 View Post
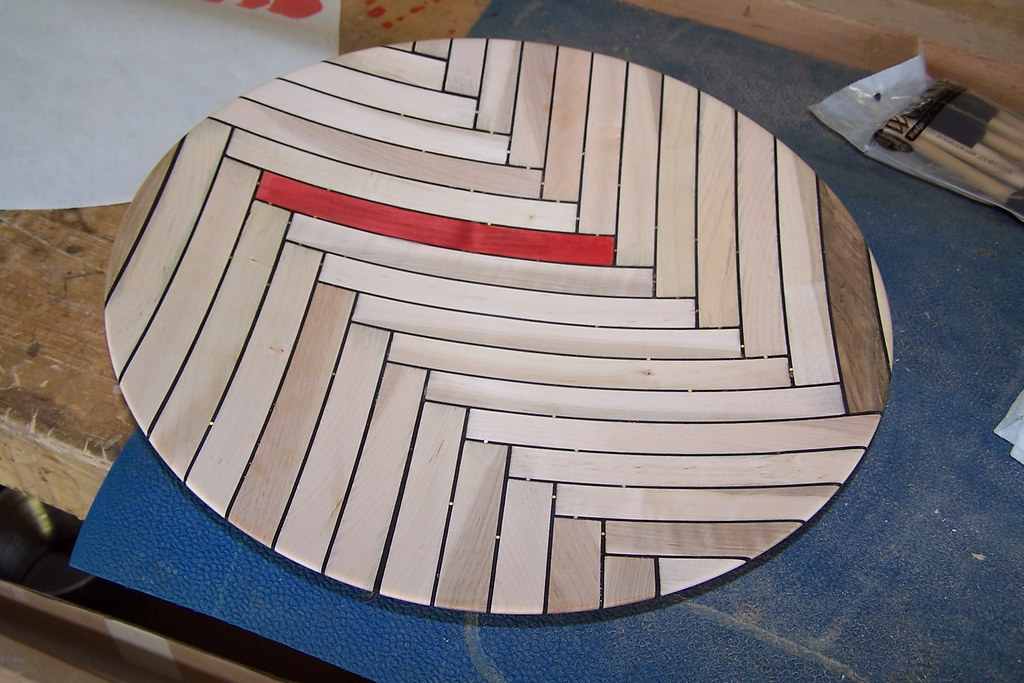
    I see where the red came from. That looks like a nice piece of work. I can't really tell, but it looks like the curves are all nice and even/smooth. How do you keep a nice, even, consistent curve? Some kind of depth guage? Did you have any problems with the epoxy swelling or shrinking with all the heat that was involved? Again, nice work.
    I am betting it's all by eye and experience.

    You are quite the artist Brad! It would be an insult to call you anything less!

    Mark Avery

  2. The Following User Says Thank You to JMS For This Useful Post:

    icedog (03-20-2009)

  3. #22
    < Banned User >
    Join Date
    Apr 2008
    Location
    Newtown, CT
    Posts
    2,153
    Thanked: 586

    Default

    Quote Originally Posted by jmueller8 View Post
    Awesome! It is really the most unique bowl I've ever seen and your use of the brass pins is ingenious. What gave you the idea to build it like this and will you continue to apply different stains to each peace; which by the way makes the design contrast all the more brilliant!

    Hands and knees
    Thanks! The idea came from the brick floor in Philip Johnson's Glass House. Sandy, the young woman for whom this bowl was designed was working there. The maple was actually a pile of scraps left from a few hundred little cutting boards I designed and made for the grand opening Gala for the Glass House. I had a choice to come up with a way to use hundreds of little bits of clear maple, put it in the dumpster or wait until winter and throw it in my stove. Regarding the stains, I have a funny quirk that has become a sort of trademark. I put some red into every piece I make. The rest of the boards are natural. I selected the lightest board and stained it red. At first I looked at it and wondered if I screwed up but it grew on me. Sandy and Dante loved it as soon as they saw it.

    Quote Originally Posted by crazycliff200843 View Post
    I see where the red came from. That looks like a nice piece of work. I can't really tell, but it looks like the curves are all nice and even/smooth. How do you keep a nice, even, consistent curve? Some kind of depth guage? Did you have any problems with the epoxy swelling or shrinking with all the heat that was involved? Again, nice work.
    Mark is partly correct. I have a good eye. I can stand back at look at a piece and very quickly determine an inconsistency in a radius of curvature. That however is not possible with the inside. I use only my hands. I run my entire hands over the work, one inside, one outside. I don't just use my fingertips. I use my entire hand and I can pick up any bumps or dips or radius changes. Usingboth hands simultaneously I can also determine inconsistencies in wall thickness. I think it's a thing all people can do. Try it. Close your eyes and move your hands so that your palms are say an inch apart. Open your eyes and see how you did. Try it again, this time a half inch. Try again. You'll find that you can train yourself, calibrate your hands to work with your mind instead of your eyes.

    Any trouble with the epoxy and heat? Not that I noticed. The epoxy is more flexible than the maple so it actually absorbed any funny vibrations, contractions or expansions.

    Oh Kanahmal, here's a bit about Basil: http://straightrazorpalace.com/finer...dog-basil.html

    Thank you again for the compliments but thanks more for the interest. More than anything I hate to be boring. Now back to the lesson:

    If you go back and look at the last pictures, you can see the pattern is about an eigth inch off center. Well, technically the center is about an eight inch off pattern. It didn't drive me crazy. Here's a tip I got from the late, great Julia Childs (and when I am face to face with my students I say it in a very silly Julia Childs impersonation), "Never apologize for your cooking. Most people don't know what it's supposed to taste like anyway." And this goes for any creative project. You have been working intimately with the piece for god know how long. Every little detail is a part of you. When you look at it, you look imediatley at the things you wish weren't there. When someone else looks at it, they see the entire piece. Don't do what everyone always does. When someone says, "Wow that is beautiful. You must be very pleased." Do not respond with, "Yeah, I love it, except this little bit right here where I F'd up."


    Now, back to our program. This is where my method differs from those chuck users:
    Once I am finished with the outside, sanded too, I remove the bowl from the lathe. I take the screws out, take it off the faceplate and set it aside. I get a chunk of poplar (I'm sure other clear, soft woods will work but II like poplar and it's cheap) about an inch and a half thick and four or five inches square and center it on the faceplate. Use the same screws to secure it as you did the bowl. This is called a wasteblock. The faceplate goes back on the machine and the wasteblock gets turned round and faced off so it's nice and flat. That, using a pair of dividers, measure the inside diameter of the bowl's foot. Transfer that measurement to the wasteblock. Then, taking your time, use a parting tool to cut away the surface of the block leaving a tenon that will fit snugly into the foot on the bowl. Test it often and if you remove too much, cut off the tenon and start again. It doesn't have to be very long. Iin fact too long and it will bottom out against the bowl which is very bad. You want the foot of the bowl to press over the tenon and rest against the flat area around the tenon.

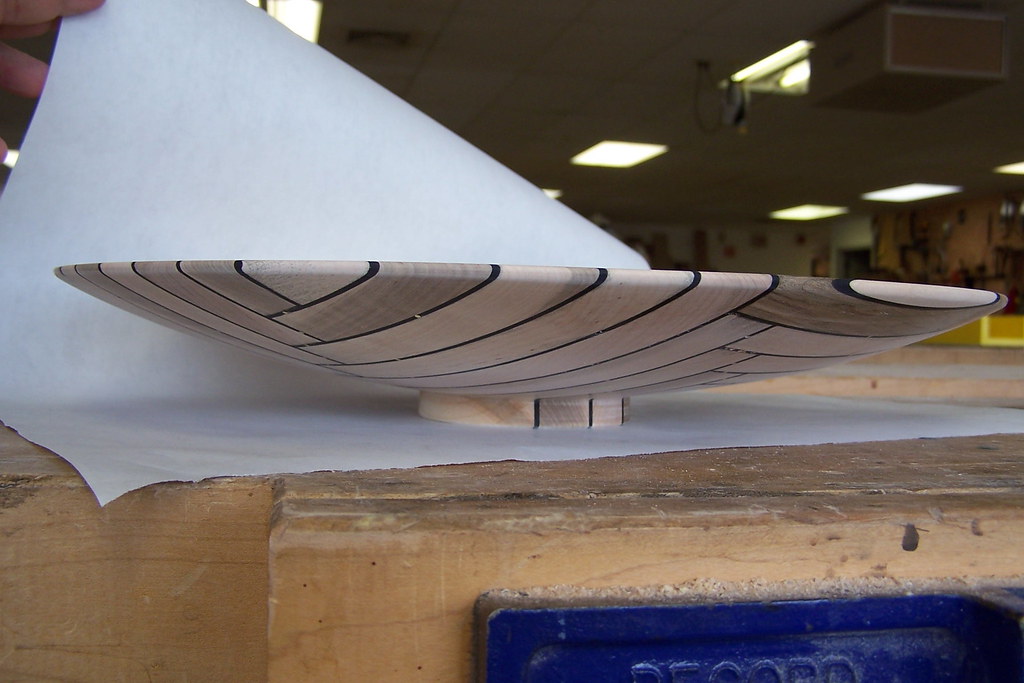
    Put a bead of thick (gap filling) cyano acrylate glue around the base of the foot. Do not get glue inside the foot, only on the flat part that contacts the table when the bowl is at rest. Spray accelerator on the area of the wasteblock where the glue is going to press. Then, very quickly, place the bowl onto the wasteblock tenon and press it hard toward the headstock. After ten seconds or so you can relax. If done right, the bowl is very secure and on the exact center of rotation it was when you cut the outside. It will look like this:

    Look at this picture. You can see the bowl and the wasteblock (the wood that is not bowl). Understand that there is a round post on the waste block that is pressed into the foot of the bowl and the bottom of the foot is glued to the block. This will hold that bowl strong enough to turn the inside. Trust it. The wood will break long before the glue joint fails.

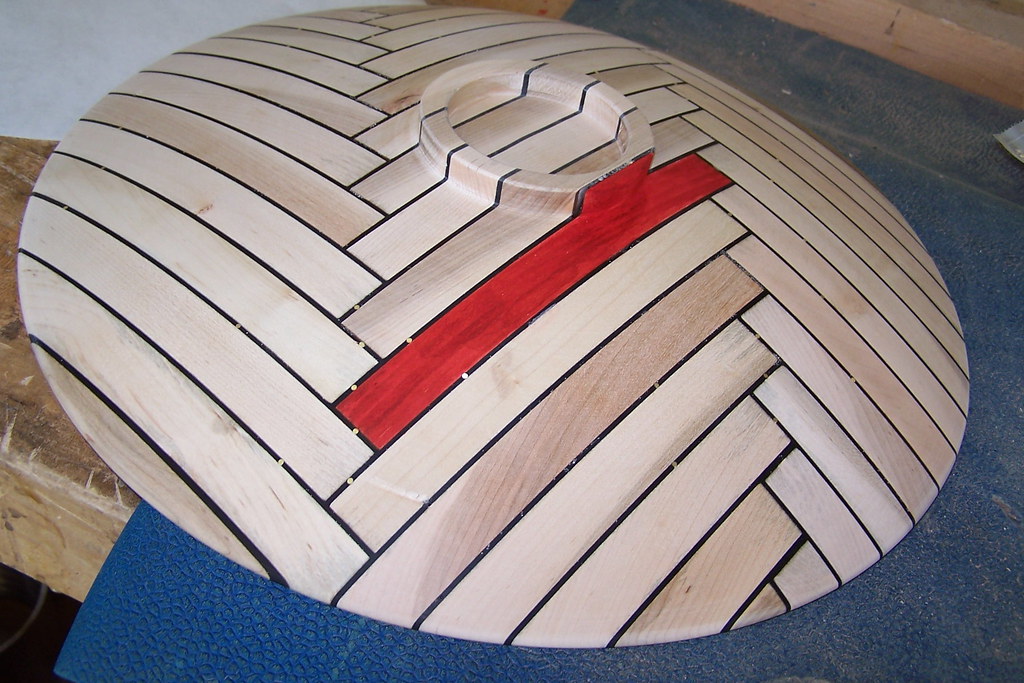
    Next you hollow the bowl. I made the wall an eigth inch thick. I like things to feel impossibly light when folks pick them up. Here's a picture of how it looked as I cut away the inside:

    There was the masonite on which I assembled the blanks. I didn't show what it was like cutting that crap away. It was Hell. Everyone's heard of MDF. That stands for Medium Density Fiberboard. Low Density Fiberboard is also know as particle board or chip board. Masonite is High Density Fiberboard. One never quite understands just how truly dense High Density is until one tries to turn it on the lathe.

    Here's the anticlimactic part. Now you just cut away the inside until it approximates what you want. For me that meant too make the entire bowl one continuous radius (I guess that would have measured at about a meter). The wall was about an eigth inch thick. This bowl looks like someone sliced a piece off a big wooden ball. Interestingy, while you would think this construction of wood and thiick lines of epoxy was limber, maybe even flimsy, it wasn't. The rigidity of this thing was surprising. The epoxy is very strong , stronger than the subsrtate and the wood, while being cut very thin, changes direction constantly so there are no weak directions. It also turned much easier than a solid piece of maple would have. It went very quickly.

    Once you get the inside close to what you like, sand, sand, sand. Begin with a coarse grit, 80 or 100 and with the machine at around 800 rpm, sand the inside until it is uniform. Then go down to the next grit, 100 or 120 and sand until the 80 or 100 scratches are gone. Next grit 120 or 150 and sand until the previous scratches are gone, etc until you get down to 400 grit paper. This is usually acceptable but hey, they make sandpaper down into the microns. You can sand it until 20,000 iif you'd like. Just be sure you have sanded enough with on grit before progressing. It is one of the great disappointments in life to get to 400 or 600 and believe you are just about done when you notice a scratch left behind by 100 grit paper. If that happens? Back you go to 100 grit and begin again. You will be there alot longer trying to remove a 100 grit scratch with 600 grit paper then if you just go back and begin again. My lathe lets me reverse direction of motor rotation. I fiind the sanding goes alot faster if you alternate directions with each grit paper. You should move to the other side of the machine when it rotates in reverse. The sandpaper should be held agaist the work piece on the bottom so the wood is moving away from you as you sand. It is easy to jam your fingers (or worse) when the wood is travelling toward you.

    Once sanding is completed, put the tool rest in position and using a parting tool, cut the waste block away from under the bowl. Be careful, go slow and when you think you have cut away all the poplar that is was in contact with the bottom of the foot, stop the machine and try to gently pop the bowl off the tenon. Once you understand this method of bowl tuurning, you may never use a chuck again.

    I finished this bowl by sanding to 400 then I took it off the lathe and buffed it with progressively finer buffing compounds and finished with pure carnauba wax and polished it to a high sheen.

    Somehwere I have pictures of a cute little pedestal I made for this piece and I'll look for them. But it's not important. I hope this helps someone try something new. Any questions?

    Brad

  4. #23
    Member
    Join Date
    Jan 2007
    Location
    Belgium
    Posts
    67
    Thanked: 5

    Default

    Quote Originally Posted by icedog View Post
    Holy crap! Here I am trying to help people learn to make something rare and beautiful, something they might otherwise never even imagine and someone has to start whining about something they know nothing about. Don't be a drag. Wood grows on trees.
    I thought I congratulated you first. Must've been mistaken, to get this thrown at me.

    I was just saying I find it a shame that a lot of good, usable material gets turned to scraps and dust. Just wishing there was a way to remove that before going to the lathe.

    No need to start swearing at me.

    I'll keep the rest of my remarks for myself. Even if they're positive. No stepping on anyone's toes then...

  5. #24
    < Banned User >
    Join Date
    Apr 2008
    Location
    Newtown, CT
    Posts
    2,153
    Thanked: 586

    Default

    Quote Originally Posted by Zwaplat View Post
    No need to start swearing at me.

    I'll keep the rest of my remarks for myself. Even if they're positive. No stepping on anyone's toes then...

    If I were swearing at you, you'd know it.

  6. #25
    JMS
    JMS is offline
    Usagi Yojimbo JMS's Avatar
    Join Date
    Jan 2007
    Location
    Ramona California
    Posts
    6,858
    Thanked: 792

    Default

    Quote Originally Posted by Zwaplat View Post
    I thought I congratulated you first. Must've been mistaken, to get this thrown at me.

    I was just saying I find it a shame that a lot of good, usable material gets turned to scraps and dust. Just wishing there was a way to remove that before going to the lathe.

    No need to start swearing at me.

    I'll keep the rest of my remarks for myself. Even if they're positive. No stepping on anyone's toes then...
    The scraps and dust can be used for tinder to start a nice fire in the winter time. you can make paper out of it, put on a garden bed or put it in the compost or use it for other art projects! I don't see any waste personally.

    Back to your regularly scheduled topic

  7. #26
    < Banned User >
    Join Date
    Apr 2008
    Location
    Newtown, CT
    Posts
    2,153
    Thanked: 586

    Default

    Turning generats alot of chips. When you stand at the lathe and the chips are piling up (so deep my dog sleeps in them) you think, "Wow there's way more than a bowlful of chips in a bowl." there are gimmicks that allow you to cut multiple bowls out of a blank. The problem is that all the bowls are then the exact same thing over and over again. If one were to start with a solid chunk of a log there'd be more waste then I made here because you can't use the center part of the tree, it splits apart.

  8. #27
    Senior Member denmason's Avatar
    Join Date
    Jul 2007
    Location
    Tracy, Ca
    Posts
    512
    Thanked: 122

    Default

    Very nice work Icedog. Kinda got me wanting to head for the workshop and make some saw dust.

  9. The Following User Says Thank You to denmason For This Useful Post:

    icedog (03-22-2009)

  10. #28
    Ooo Shiny cannonfodder's Avatar
    Join Date
    Jan 2008
    Location
    Downingtown, Pa
    Posts
    1,658
    Thanked: 390
    Blog Entries
    1

    Default

    Didn't the brass take a tole on your gouge? I would think hitting that brass would jerk/chatter your tool on the rest which leads to some baaaad things. Not to mention having to stop to sharpen your tools all the time. I would have never thought of using black epoxy. I would have resawed and sanded down some Ebony and glued it up to the maple before I riped and crosscut it, but that would have taken a lot more time, and money. Ebony is expensive.

    My bowl turning is limited and I am still learning but I have found that I can pickup thickness changes in the bowl by the pitch as the tool cuts. I can usually get it darn close before I run my hands along the inner/outer to feel for changes. I still like my fancy chuck. I will turn the outer first, take my base plate off and chuck the base. I have a thin profile parting tool, about 1/16, I will use that to part off the waste end of the base.

    I have turned trunnions before for a friction fit on small things but have had mixed results. Never used the glue though. Ever tried turners tape? I have taped up a blank or two on some wasteblock instead of glue, never had it let go.

    Nice bowl by the way. I cant get even close to that on my little Delta. Those Nova's are sweet lathes. I like the rotating head. You can swivel that thing around and turn a huge blank. Maybe one day...practice practice and more practice.

  11. The Following User Says Thank You to cannonfodder For This Useful Post:

    icedog (03-23-2009)

  12. #29
    < Banned User >
    Join Date
    Apr 2008
    Location
    Newtown, CT
    Posts
    2,153
    Thanked: 586

    Default

    Quote Originally Posted by cannonfodder View Post
    Didn't the brass take a tole on your gouge? I would think hitting that brass would jerk/chatter your tool on the rest which leads to some baaaad things. Not to mention having to stop to sharpen your tools all the time. I would have never thought of using black epoxy. I would have resawed and sanded down some Ebony and glued it up to the maple before I riped and crosscut it, but that would have taken a lot more time, and money. Ebony is expensive.
    Thanks!

    The high speed steel gouge is much harder than brass and at 1500 rpm you never feel the brass pins hit the gouge. I think the maple did as much dulling of the tool as any of the three materials. Beside that, I stop and sharpen my tools all the time anyway. It is much easier to touch up a gouge every few minutes than to use it until it's dull and work to restore the edge.

    I thought about contrasting woods to make this project. I don't like using too much rain forest stuff when our North American stuff is so readily available. Beside the environmental and cost issue of ebony, the whole idea of guing up a large blank in a herringbone pattern baffled me. I didn't think I'd be able to get decent glue joints. I couldn't figure out how to apply clamp pressure in such a complex assembly. As I was copying the pattern brom a brick floor I thought about how the floor was laid. I ran a test on a couple blocks to see if the epoxy would make a decent mortar material and it passed.
    Last edited by icedog; 03-23-2009 at 10:51 AM.

  13. #30
    Ooo Shiny cannonfodder's Avatar
    Join Date
    Jan 2008
    Location
    Downingtown, Pa
    Posts
    1,658
    Thanked: 390
    Blog Entries
    1

    Default

    Interesting, I would have thought the brass, while softer than HSS would still make a noticeable knock when the gouge hit it. Seems like I am constantly sharpening my tools but turning stuff like Nara, Cocobolo, Ebony, Zebra etc... will take a tole very quickly. I use a one inc strip sander with a 220 aluminum oxide belt. One quick pass and they are super sharp again.


    Turned a set of portafilter handles and control knobs for an friends espresso machine a week ago. Did a set in Bacote for my machine, another with tapered beads in zebra wood for another and have some very nice figured Asian satinwood that is heading for another set for someone else.
    Attached Images Attached Images  

Page 3 of 4 FirstFirst 1234 LastLast

Posting Permissions

  • You may not post new threads
  • You may not post replies
  • You may not post attachments
  • You may not edit your posts
  •