Results 1 to 10 of 38
Thread: Did he carve them? If so, how?
-
11-10-2013, 04:35 AM #1
 Did he carve them? If so, how?
In response to many inquiries and posts I figured I'd respond with what I have on hand as to how I built the Ivory scales for the Elliot "Chinese Razor" I posted recently.
Being a full time wood carver I have quite a selection of tools at hand but many can be easily duplicated. The primary tool I used for these is what is commonly called a micro motor. Basically a dental drill made by NSK . I have two and another back up made by Ram. These are basically high tech versions of Dremels. They are computer controlled to maintain a constant RPM regardless of the load placed on them ( The Ram doesn't do this )
The bits I used are micro ( think dental bits,, as I've gotten some from my dentist ) and some which are on the market. I also use diamond cutters. Now many sets of diamond bits are readily available in sets of 10 or so for $20.00 or thereabouts. They work but not well or for long. The ones I use run in the neighborhood of $10.00 ea. and perform much better and much longer. The nickel the diamond bits are imbedded in is a much higher quality and the diamonds are a much more uniform in cutting performance. But it's the difference between 120 grit sandpaper and 180 grit. The scratches that one leaves can easily be overcome.
The other tools necessary are some skew type chisels sharpened to a high degree. The ivory SEEMS to have no grain but it really does. The chisels don't so much carve material as they do scrape it away. In some tight corners I was able to stop cut and pare into the cut to relieve material and make a clean cut but the majority of the time they were used as scrapers to remove the scratches left by the diamond or burr cutters and clean up the surfaces.
Scraping in and of itself leaves a beautiful surface. In my profession cabinet scrapers will leave a smoother surface than sandpapers. The same holds true here as well. Ripples, scratches etc. left can be removed using a scraping method with very sharp chisels just on a very small surface.
For final polishing I use heavily modified felt bobs. I load these with a variety of polishing compounds, ( most guys use them for polishing blades ) as well as automotive polishes and waxes
The design itself just fell off the end of my pencil. I do these designs on a daily basis and this was no different except on a smaller scale. The way I transferred the design to the stock was using simple carbon paper.
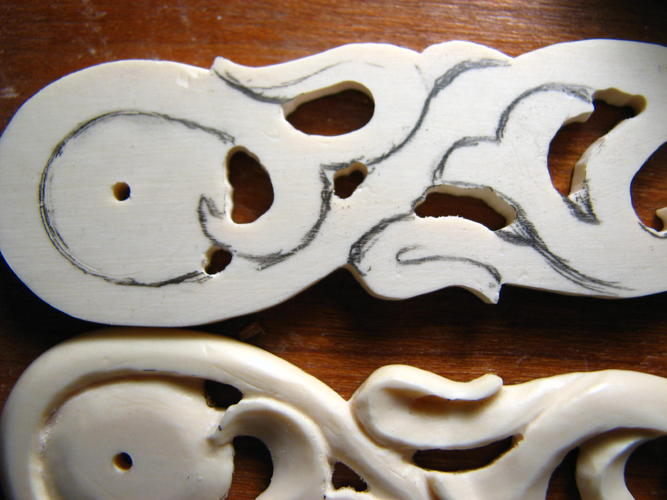
Once I transferred the design I used a tungsten scribe to scratch the lines into the stock ( leaving just carbon was too large a line and it easily rubbed off ) This gave me a super fine line to follow as I carved the design into the stock. At this point I was basically following a Scrimshaw design left on the flat stock. Speaking of which,, I'm planning on doing some scrimshaw designs as well. It's not as difficult as it may appear.
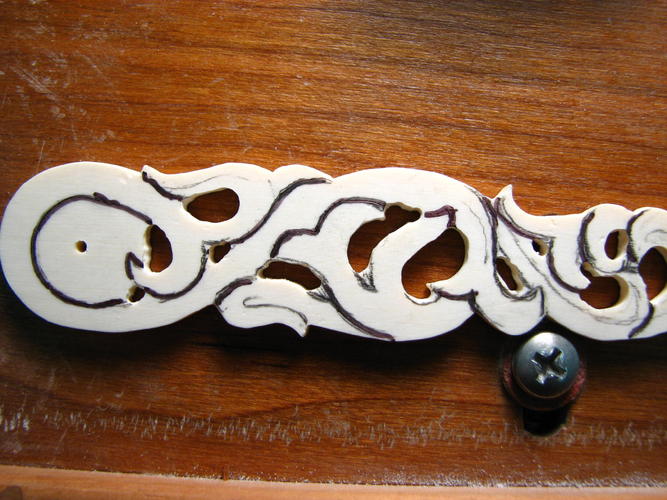
Once the lines were scratched into the surface I went over them with a Sharpie marker, ( just as in Scrimshaw) and then sanded away an trace of carbon and the broad Sharpie line leaving me with the fine scratched line.
Once that was done it was just a matter of using the various burrs and diamond cutters to sculpt the leaf design out of the stock.
Now one method of removing waste is to drill a hole, insert a fine saw blade affixed to a coping type saw and cut out the inner waste. Being that it's relatively small in area I just drilled holes where the stock was to be removed , chucked a straight burr and hogged out the waste.
Well that's about it save for some photos that might help make some sense of it all.
Thanks again for the kind words about my scales and I hope you enjoy the process.
Oh,, and one more thing.
Many have a knee jerk response once they hear the word "Ivory" . Rest assured after all the articles I've read in National Geographic about the horrors of Ivory harvesting,, the senseless killing and poaching etc. I was the last to consider using it. Pre ban ivory, Mammoth Ivory etc. are legal and readily available and approved for sale in the US. No laws were broken in building my scales. What got me started was restoring some scales on a 7 day , beautifully boxed set of Drew razors. Having a bit of extra stock on hand led me to try carving it into something other than plain flat slabs.
It's relatively easy to work and has a feel and look that can't be equaled.
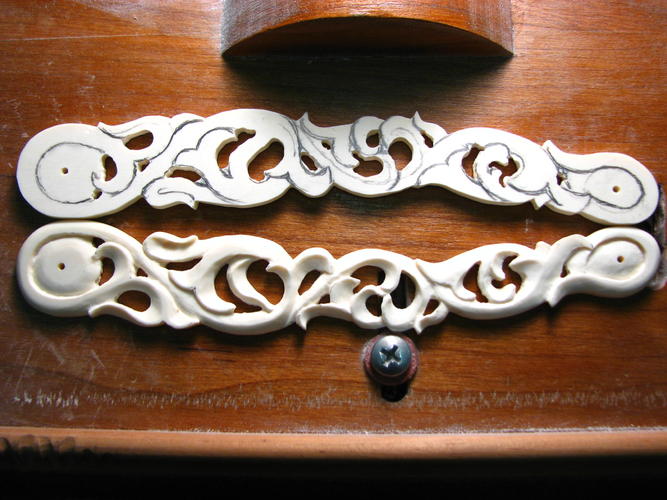
The following shots show the initial design on paper which was transferred to the stock using simple carbon paper. Then I scribed the design and went over it with the sharpie and sanded the surface to reveal a very fine line. Once I had the line it was a matter of drilling relief holes and opening them up to the scribed line and then I began outlining the design with relief cuts.
-
-
11-10-2013, 04:41 AM #2

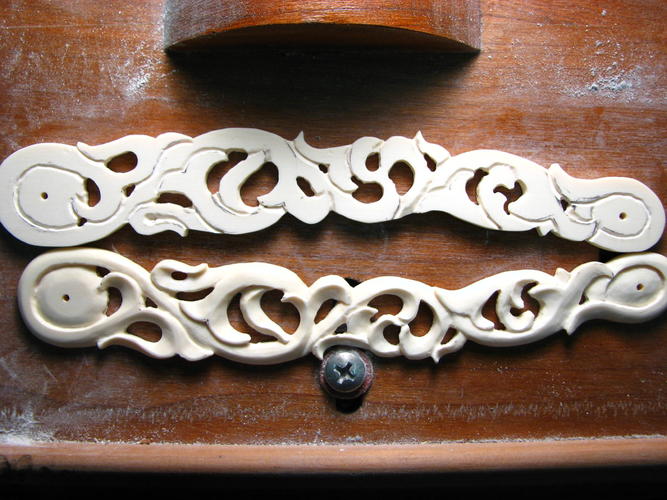
Now granted , some shots are out of sequence but you'll get the idea. Keeping the stock as full as possible and once the majority of the waste relieved is when I bandsawed out the profile of the scale. In other shots you can see comparisons from the left to the right scale. Granted you can 't see both sides at the same time but I wanted them as much mirror image as I could achieve. Once the majority of the rough out work was done it was time to start caressing them to even out the lumps and bumps, clean up the edges etc. and get them ready for polishing.
The last pic shows one scale getting close to being polished and the other still in the sanding/ scraping stage.
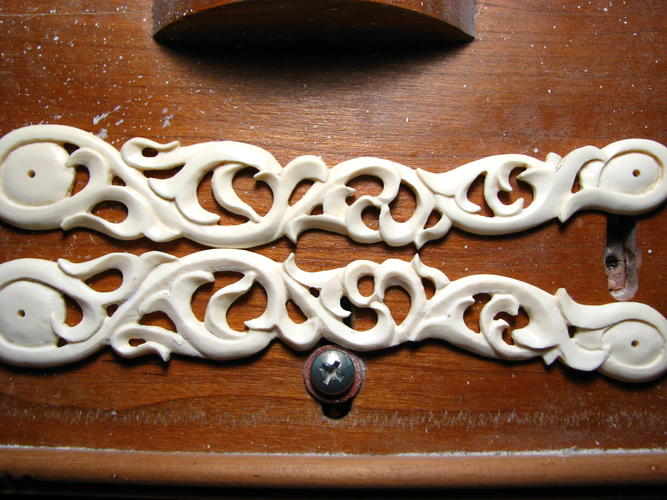
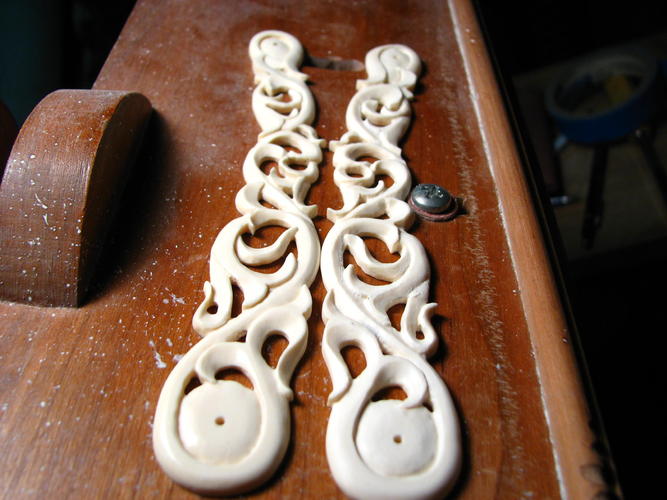
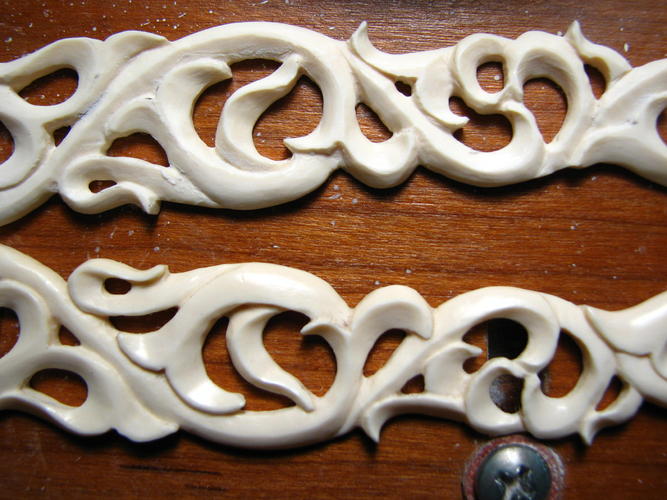
-
11-10-2013, 04:44 AM #3

Here are a couple of the burrs as well as the chisels I used . One of the racks of diamond bits in 3/32 and 1/8 shanks,,, burrs next to a .5mm pencil point ,,, and a couple of skew chisels next to a regular pencil.
I was painting the inside of a closet today hence the white paint on my fingers.
And for what it's worth I have actually shaved with my chisels. Not these particular ones but I shaved my upper lip with one to show you don't need a narrow razor to effectively shave this area. My chisels are maybe 9" long. They work. And they're sharp.Last edited by mycarver; 11-10-2013 at 04:51 AM.
-
The Following User Says Thank You to mycarver For This Useful Post:
Thaeris (02-07-2015)
-
11-10-2013, 04:47 AM #4

and of course the finished product.The next ones will be better I'm sure. This was really a test run and I don't think this design works well with this razor.
I'm thinking Cherry Blossoms along some branches with the pin areas being large blossoms with the pins in the center of the flowers .
Then too a large Pagoda , a Dragon, pr several other ideas may be more appropriate.Last edited by mycarver; 11-10-2013 at 05:41 AM.
-
The Following 25 Users Say Thank You to mycarver For This Useful Post:
25609289 (02-02-2015), Andy77 (01-26-2015), baldy (11-11-2013), Catrentshaving (11-10-2013), DarthLord (11-13-2013), Geezer (11-10-2013), HARRYWALLY (11-10-2013), Hayzee (11-13-2013), Hirlau (11-10-2013), JimBC (11-25-2013), Lemur (11-11-2013), lz6 (11-11-2013), MattCB (11-10-2013), Miner123 (11-12-2013), MJC (11-10-2013), MuskieMan33 (11-11-2013), nipper (11-11-2013), pfries (11-10-2013), Phrank (11-10-2013), PierreR (11-10-2013), pixelfixed (11-10-2013), RezDog (11-10-2013), ScienceGuy (11-11-2013), spazola (11-10-2013), Wolfpack34 (11-10-2013)
-
11-10-2013, 05:15 AM #5

I have been lucky to have had a chance to see many great artists at work - and having them break the process down in to steps.
And each time I am in awe when I see those with the gift at work.
Many years ago I had the chance to visit one of those famous decoy carvers on Smith Island, MD. He offered to teach me, and after giving me a block of wood nailed to a board (the head) and some tools he said: "now just cut away everything that does not look like a duck"
The look on my face made him (and everyone else in the shop) burst out laughing.
Thank you for sharing the process, truly amazing work.Support Movember!
Movember https://mobro.co/markcastellana?mc=1
SRP Team USA https://moteam.co/srp-usa?mc=1
-
11-10-2013, 05:26 AM #6

Ironically I started out carving nothing but decoys, song birds and birds of prey. I competed in contests up and down the East coast winning 2nd at the Ward World Championships and being the featured artist at many Ducks Unlimited events and art shows.
The expression of carving away everything that doesn't look like what it is you're carving was first spoken by none other than Michelangelo himself. Others have just hijacked it for their own use.
Here is an example of my regular work. See any similarities to my Ivory scales???
-
11-10-2013, 05:32 PM #7Senior Member

- Join Date
- Mar 2011
- Location
- Corcoran, Minnesota
- Posts
- 665
Thanked: 170
With many of the posts here, I can look at them and say, on a good day, I honestly think I could do that. With your work, never. It has taken you a lifetime of hard work and practice to achieve the level of skilled craft and artistry your work demonstrates. I am in absolute awe of your amazing work. Thank your for generously sharing the process.
Namaste.
-
11-10-2013, 05:47 PM #8

Oh my. I'm again at a loss for words! I am though very happy to know you enjoy my efforts. Being an artist I don't know if I'm ever truly happy with my results much of the time. Within a day or so I'm picking it apart and feel it's not worth showing to anyone. I see glitches all over the place. Just gives me the incentive to try harder next time. And wonderful comments such as yours inspires me to continue as well!
Thank you.
-
The Following User Says Thank You to mycarver For This Useful Post:
skipnord (11-10-2013)
-
11-10-2013, 06:25 PM #9Senior Member

- Join Date
- Mar 2011
- Location
- Corcoran, Minnesota
- Posts
- 665
Thanked: 170
I think what you said is true of most of the artists I am graced to know. They see all the what ifs and tiny imperfections in their work that the rest of us never notice. I'm not sure if this is a blessing or a curse. It does push them to do better next time. Maybe that is why in Plains Indian tradition, they always include an intentional mistake - a "Sioux bead" in their work, since only the Creator's work is perfect. Have an excellent day.
-
11-10-2013, 11:51 PM #10

thank you for the effort for this tutorial,
 !
!


 138Likes
 LinkBack URL
 About LinkBacks


 Reply With Quote


