
Results 1 to 7 of 7
 13Likes
 LinkBack URL
 About LinkBacks
-
03-02-2014, 08:31 PM #1Seeking Shaving Zen


- Join Date
- Aug 2012
- Location
- Yakima, WA
- Posts
- 825
Thanked: 132 From Fried To Functional... A W&B Wedge Faux Frameback's Journey...
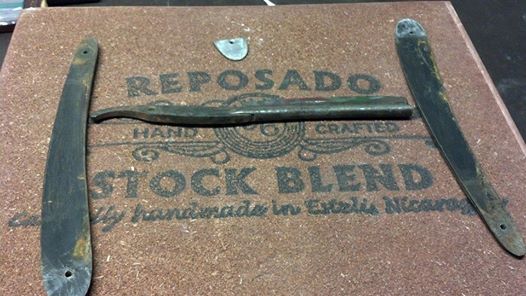
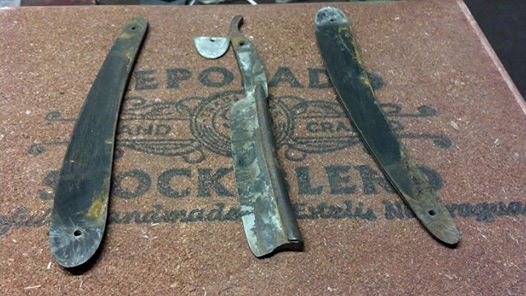
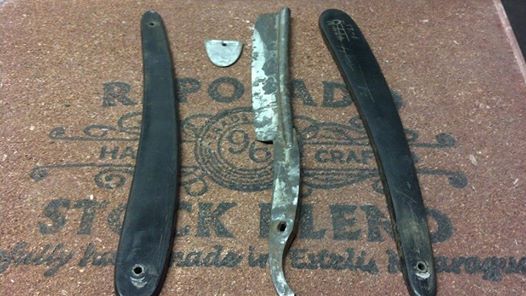
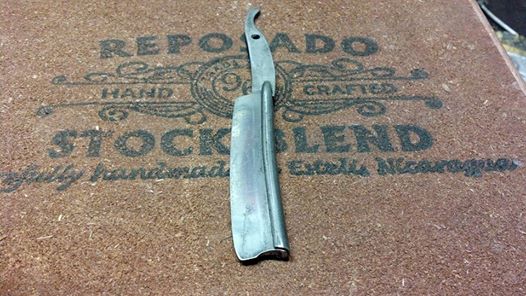
This is what I started with. A straight razor acquired in a bundle deal that was so corroded and rusty I didn’t know what would be left after restoration. By wiping things down a bit with a damp cloth I could see it was a Wade & Butcher so why not give it a chance?
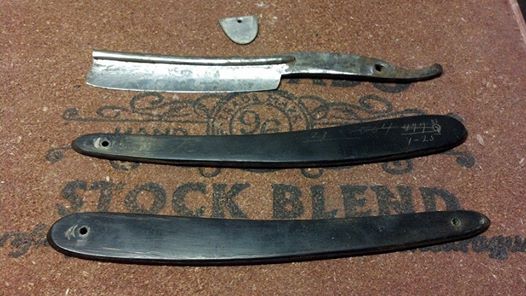
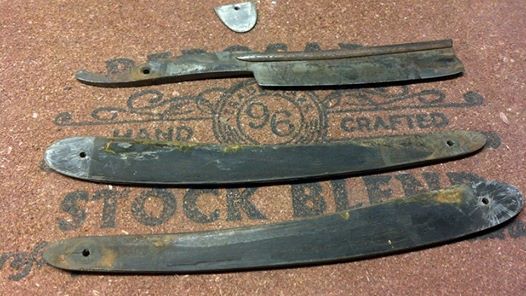
I try to do as much work by hand as possible to avoid damage from power tools but this one was going to be a challenge. However, seeing the horn scales and the faux frameback on top of being a Wedge as well as the Wade & Butcher stamp I could ‘mostly’ make out with magnification, I knew this one was worth a try.
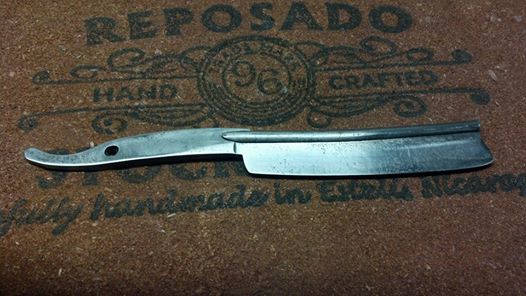
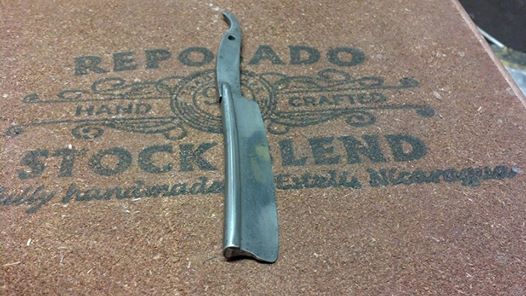
For the blade itself I started out with 600 grit sandpaper but quickly realized I was too high so dropped back to 400 grit and could tell I was getting somewhere. By switching hands a LOT I was able to start seeing some progress.
At about this point I knew I was not going to be able to restore it to a ‘beautiful’ state so starting to skew toward ‘function’. I ultimately ended up using a Dremel with a buffing wheel loaded with Flitz to make better progress… The deciding point on “More Power!” was when the razor twice demanded a blood sacrifice during hand-sanding with the second cut making a perfect “X” right through the first one. I actually glanced at my vice with evil thoughts when that happened but decided to hang in there after the Dremel showed some promise. Also, regarding the Dremel use... I did the standard with a cup of water dipping frequently... But, I started looking at my DMT and wondered if I could just put that in the freezer for a while then put it grit-down with a cloth over it and place the razor on top of that... I wonder if this may be a more efficient way to cool the steel without as many interruptions as the cold from the DMT (or any chunk of steel) would transfer into the lower side of the razor as you are working on the top. ?? That is still a theory for now.
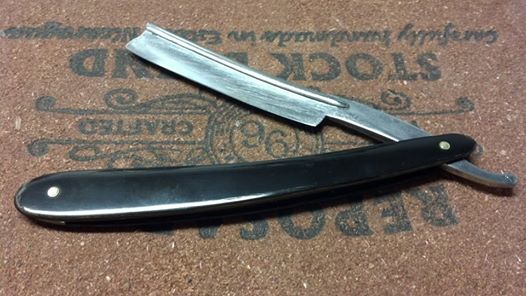
The horn scales had some delamination as well as some writing so for them I used Micro-Mesh on both the inside and outside. I knew my goal was a functional “survivor” look so did not want to take it to high-gloss perfect so ended up going deep enough to remove the writing but left some scratching and I took most of the delamination away but did leave some as it just seemed right. After they were shined up I coated them in Castor Oil to rehydrate. Why Castor Oil? It was what I had laying around and it worked perfectly!
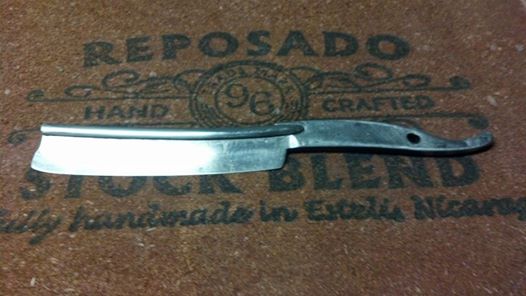
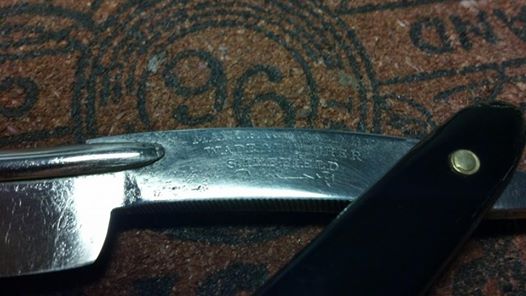
Note in the picture below that you can read the stamp much more easily than before and I actually stopped working this area earlier on as I noticed I was starting to remove the stamp and I wanted to avoid that.
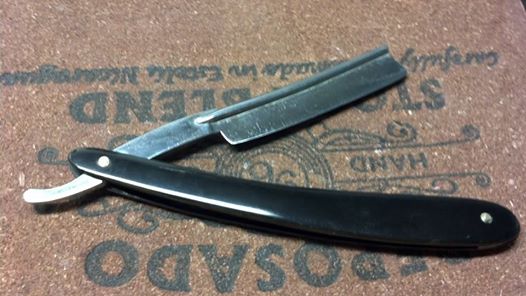
Once I had the steel as polished out as I could I took out my micro-fasteners and did a test/temporary pinning… Turns out with just one quick flick the blade was seating center without an issue so I knew this was going to turn out well. Sometimes razors just ‘speak’ to you in certain ways and I’m getting better at letting that intuition guide me. I used brass washers and pins and had trouble with the pivot so had to re-pin. During that process one of the washers got a little bent and as I was looking at it I noticed that matched the overall ‘look’ of the razor so played around with beating up the washers a bit and I scratched the pins up to get them to match as well and I think the result is quite appealing to the overall appearance of the razor.
Honing is always the big question mark with this much corrosion on steel but, having come this far, I was committed to go all the way. I spent a lot of time at the 1k level setting the bevel then looking under magnification for any large fissures from the corrosion and luckily enough it went fine. I went through my standard progression from there… Norton 4k/8k, Thuringian (MST), Naniwa Super Stone 12k and finished on a new stone I picked up that was described as a “Black Escher”. I’m not sure what it is but it improves the edge following 12k so works great for my progression. Frequently I would check under magnification and stay on areas if there were a fissure near the edge and, with diligence, it paid off. I took it through 25 laps on CrOx pasted felt then to a SRD Premium I Strop and finished on an SRD Roo Strop.
This razor project turned out great, shaves really well and is a perfect example of what can be done with a razor that initially looked to be in too poor shape to even attempt. It may not be to everyone’s taste but turning a rusty clunker sitting in a junk pile into a really nice shaving razor with this overall look at completion… I’d think most would call that a WIN!
Shawn
-----Last edited by Prahston; 03-02-2014 at 08:57 PM. Reason: Errors... Oh, so many errors! ;-)
-
The Following User Says Thank You to Prahston For This Useful Post:
mollzo (03-08-2014)
-
03-02-2014, 09:22 PM #2Member

- Join Date
- Dec 2013
- Location
- West central Alabama
- Posts
- 52
Thanked: 11
You got a winner. Great work!
Prahston likes this.
-
The Following User Says Thank You to rplunk43 For This Useful Post:
Prahston (03-02-2014)
-
03-02-2014, 10:40 PM #3
Nice Save!

Feels GOOD to accomplish something like this doesn't it!Prahston likes this.
Ed
-
The Following User Says Thank You to Chevhead For This Useful Post:
Prahston (03-02-2014)
-
03-02-2014, 10:55 PM #4Seeking Shaving Zen
- Join Date
- Aug 2012
- Location
- Yakima, WA
- Posts
- 825
Thanked: 132
Yeah, it really did feel good... Especially at the end! ;-) About halfway through I stalled thinking I was going to get to the assembly and it would not work out. But, when I did the test assembly that razor basically aligned itself... And, that's when the grinnin' started!
 Chevhead likes this.
-
03-03-2014, 01:21 AM #5'with that said'


- Join Date
- Aug 2010
- Location
- Walla Walla in WA State USA
- Posts
- 11,246
Thanked: 4237
Nothing Wrong With That Work Bubba!
 :
:
Good Job!
Prahston likes this.Our house is as Neil left it- an Aladdins cave of 'stuff'.
Kim X
-
The Following User Says Thank You to cudarunner For This Useful Post:
Prahston (03-03-2014)
-
03-03-2014, 01:54 AM #6Historically Inquisitive

- Join Date
- Aug 2011
- Location
- Upstate New York
- Posts
- 5,782
- Blog Entries
- 1
Thanked: 4249
Very nice description and pictures, Cool save! Enjoy!
Prahston likes this.
-
The Following User Says Thank You to Martin103 For This Useful Post:
Prahston (03-03-2014)
-
03-03-2014, 07:51 PM #7Seeking Shaving Zen
- Join Date
- Aug 2012
- Location
- Yakima, WA
- Posts
- 825
Thanked: 132
Here is some info on the Black Escher...
Testing Black an Escher stone
In the first post he is describing selling the stone and that was to me. I'm not sure I completely understand the back and forth in this thread but it is interesting. A few more reads and I'll come away with greater clarity. ;-)
Thought I'd share as I was doing a search for more information and found a thread about my exact transaction.
Shawn
-----


 Reply With Quote


