
Results 1 to 9 of 9
 13Likes
 LinkBack URL
 About LinkBacks
-
10-01-2014, 08:43 PM #1Senior Member

- Join Date
- May 2012
- Posts
- 128
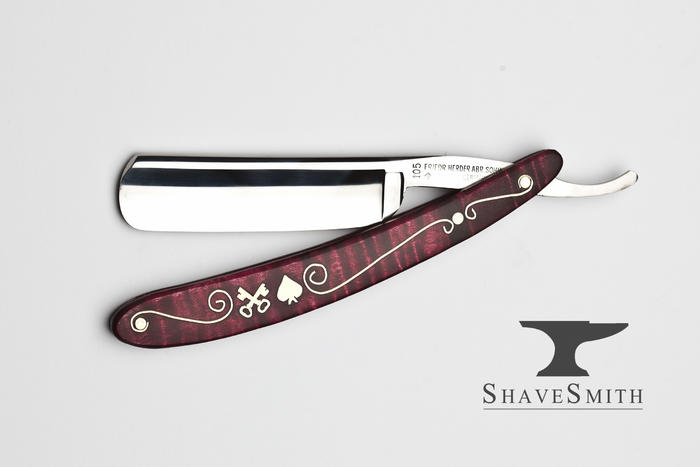
Thanked: 118 F. Herder 105 in curly maple wood with gold inlays by ShaveSmith
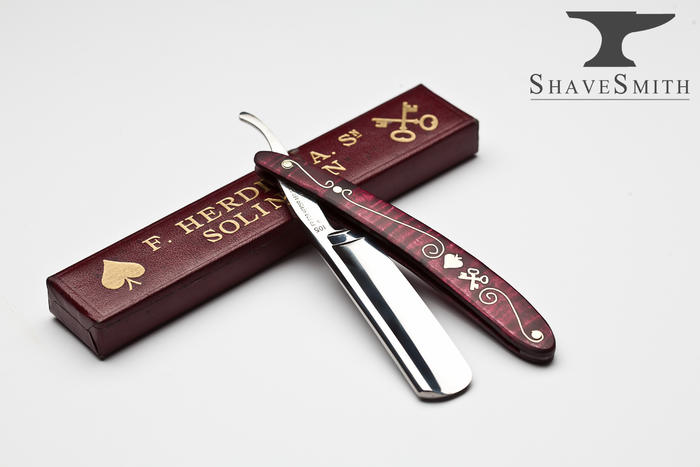
So I had this F. Herder 105 blade which for me is just the perfect razor... perfect weight and grind and shape, but it had the most plain white plastic scales ever. I felt it needed something special and I was very pleased with what ShaveSmith on Etsy did for me last time with my Rodgers Silver Steel. I commissioned him to make a masterpiece with wide latitude to the design but taking inspiration from the coffin box.
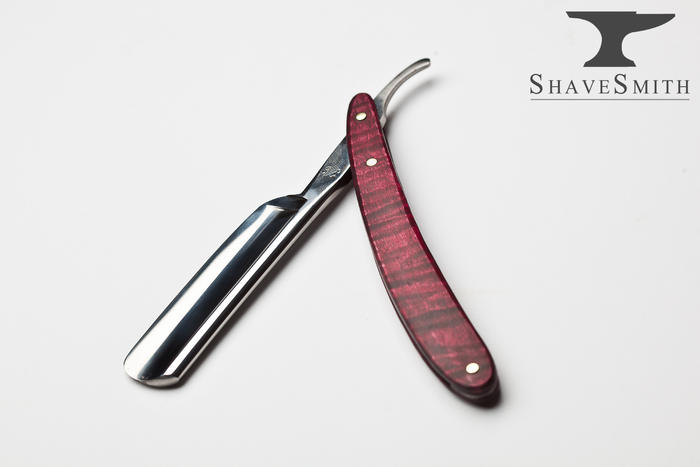
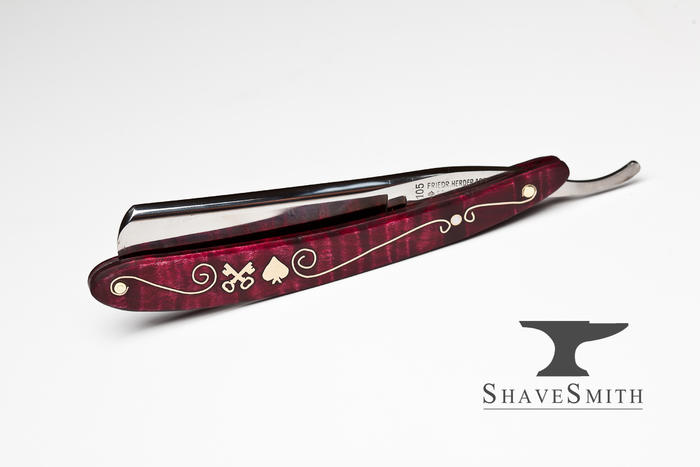
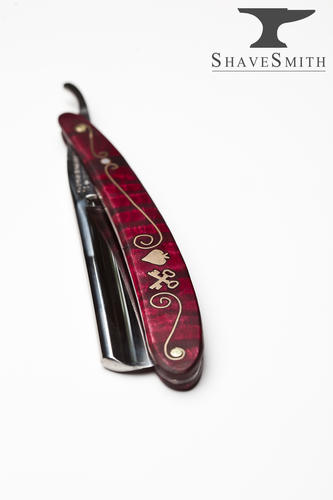
We had much discussion back and forth and he came up with what you see, curly maple wood scales dyed to match the box, with gold inlays fashioned after the spade and crossed keys trademarks, and all highlighted with gold wire inlays. If you look closely you can even see that the wedge has been etched with "Solingen" down the edge.
Here's what he had to say about the crafting:
You can see lots of other examples of his work on his Imgur page and patronize his work at his Etsy shop.Making The scales were pretty straight forward. Nice curly maple, and I used the original pair of herder scales for my design inspiration.
Next was the inlays pieces from gold. I practiced my jewelers sawing for months before getting to your piece. Cutting out the shapes, and refining them with needle files to make them look how I wanted. Im quite fond of this technique now, and the shapes look very nice. Doing this exposed me to a whole new set of tools that I now own, or have on my radar
Next, I carved out the cavities for the inlays using some micro chisels that I forged, then honed to very specific angles just like a straight razor. In the end the inlays fit so snug, they clicked into place, so it worked out nicely.
Then the tang rest. This was a well, hrmm moment. While I eagerly designed the tang rest, I failed to notice that the positioning of the tang hole in the blade is such that it pivots with less distance between the heel of the blade and the hole compared to the hole and the finger rest. So, with the pin in, the tang would bump against the pin, and not open. No matter where I put the rest, it would bump. Because of this, I kept true to the design, and made the pin decorative. I really like how the scrolls bump up against this. I think this was your idea, and I really like it.
I then traced out the scroll work, and pierced out the patterns with another little forged chisel. When they were completed, I used a rolling mill to turn the gold wire into flat wire of a thickness that looked good in the piece, and hammered it in. Coaxing the wire into the shapes I wanted was a huge challenge, and your piece looks very nice, being leaps ahead of the practice pieces I did in terms of fit and finish. So, Im happy with that progress, and eager to do another! The fit was so tight, glue was not needed, but I did do a small bead near the edges just in case.
The wedge was then shaped and carefully filed. I wanted a fit that was so close that the blade actually locks in like a folding knife. This is an advantage of a round tip blade, since the cutting edge is far from the wedge, but the tip can just barely kiss it. So I file the back of the wedge, test fit, file, test fit, until the fit was happy.
One tricky thing was getting the lettering on the wedge, but having the fit be nice and flush.
All the marking processes on the silver would have destroyed the wood if I etched the silver while flush in the scales, so It had to be a good fit, that I then disassembled put lettering on the wedge, and reassembled. So I made the wedge, keeping it very close to size, and then put a lithographic paste on the silver edge, let it dry, scribed in the lettering, and then soaked it in ferric nitrate. The lettering is light, and nuanced. With the etch done, I assembled everything, and noted that the wedge distracted from the overall design. It was silver, and the lettering was very pronounced. It argued with the inlays, so I needed to tone it down. I oxidized the silver with chemicals to get that nice antiquated look, and I became quite happy with it. Its a fun nuance that you notice when you really look at the piece.
Then I dyed the scales, and applied a finish that I developed over the year while working on wood. Its a mixture of linseed oils and others, and is hand rubbed on with a whole day between coats. I made this choice to increase its attraction as a collectors piece. Superglue turns wood to plastic, and an epoxy finish, which I thought about using, may yellow in decades and present long term problems to the inlays. So a historical and tested formula of natural hardening resins fit the piece nicely. The entire finishing process takes weeks, where every morning you apply a coat, wipe it off, and buff. Very rewarding ritual. Its water resistant, and the finish is based on formulas used in the gun collector world where silver inlayed gun handles needed to be finished and be preserved. This finish also allows you to reapply a coat and buff to get that just rolled out of the shop luster.
Everything was finished, and I needed to pin. I tried a new form of pining that I picked up from my jeweling studies. I formed the washers so after I pinned and I could filed down and have everything flush. Just another little bit to add. And running a rasp over soft, gold inlayed wood targeting a 1 mm washer is enough to give you a heart attack! On slip, and poof, months gone.
Full album with high res photos here.
-
10-01-2014, 09:17 PM #2Senior Member


- Join Date
- Jun 2013
- Location
- Gladstone QLD AUSTRALIA
- Posts
- 3,246
Thanked: 804
beautiful looking str8
the inlays look great with the wood colour & patern
very nicely doneSaved,
to shave another day.
-
10-01-2014, 09:53 PM #3Junior Member
- Join Date
- Jun 2014
- Location
- mackay queensland Australia
- Posts
- 12
Thanked: 1
Wow that's stunning
-
10-02-2014, 12:14 AM #4white lightning

- Join Date
- Oct 2013
- Location
- Vancouver
- Posts
- 194
Thanked: 33
your guy did a nice job. i can appreciate the work in that custom job.
instagram - @suckerpunch_daycare
-
10-02-2014, 12:26 AM #5Senior Member
- Join Date
- Jan 2011
- Location
- Roseville,Kali
- Posts
- 10,432
Thanked: 2027
Very Nice indeed
CAUTION
Dangerous within 1 Mile
-
10-02-2014, 01:14 AM #6Senior Member

- Join Date
- May 2014
- Location
- Bryan, TX
- Posts
- 1,251
Thanked: 228
What can I say? Woohoo!
Mike
-
10-02-2014, 01:50 AM #7Senior Member

- Join Date
- Feb 2012
- Location
- Menominee,MI
- Posts
- 1,624
Thanked: 325
Very nice. I tried something like that once, but never continued with it. After seeing this I might have to give it another go because that looks really nice.
-
10-02-2014, 07:04 PM #8Senior Member

- Join Date
- Apr 2013
- Location
- Slovenia
- Posts
- 489
Thanked: 83
GREAT work... congrats!!!
-
10-02-2014, 07:40 PM #9It's bloodletting with style! - Jim

- Join Date
- Jul 2011
- Location
- ~ California, USA ~ The state of denial!!!
- Posts
- 615
Thanked: 118
Absolutely gorgeous custom work. Thanks for sharing!
May your lather be moist and slick, the sweep of your razor sure, and your edge always keen!


 Reply With Quote