Page 1 of 2 12 LastLast
Results 1 to 10 of 11
Like Tree9Likes

Thread: Unknown Straight Razor Restoration WIP

  1. #1
    Junior Member
    Join Date
    Jan 2015
    Location
    Cape Town, South Africa
    Posts
    18
    Thanked: 0

    Default Unknown Straight Razor Restoration WIP

    Good day all!

    I'm new to these forums, but thought I would show the process of me doing a small restoration on an Unknown razor.

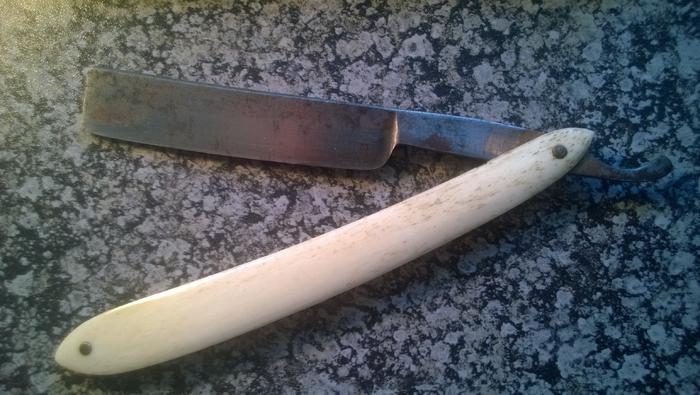
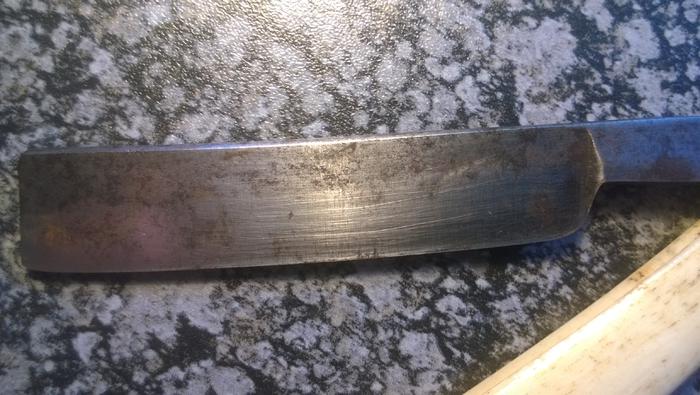
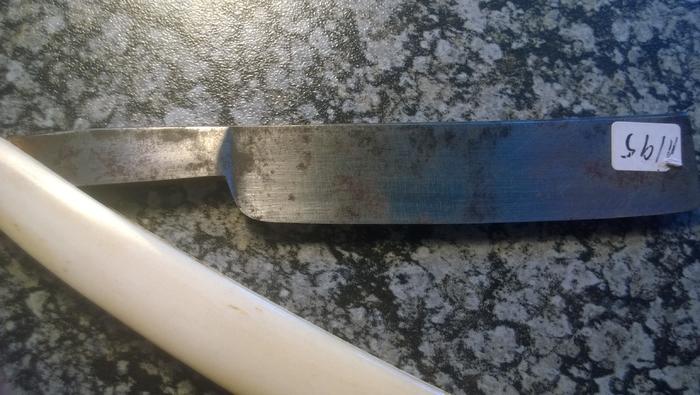
    It is a wedge ground smiling blade with a square toe and single stabilising shoulder(If I'm using the wrong terminology, please correct me ). It has bone scales and a wooden spacer with, what looks like, peened over brass pins and brass washers. It is quite badly stained, and has some light rust between the tang and the scales and some along the spine of the blade. Under the staining and the rust, the blade seems to be quite decent, but is scratched quite badly, probably due to bad honing and sharpening.

    I just bought this straight, and hope you enjoy the process as much as I will. I will update as and when I get a chance.

    enjoy!

    Brad

    Name:  4.4.jpg
Views: 491
Size:  54.3 KB
    Name:  4.5.jpg
Views: 463
Size:  56.0 KB
    Name:  4.6.jpg
Views: 473
Size:  50.3 KB
    Cantfindarazor likes this.

  2. #2
    Junior Member
    Join Date
    Jan 2015
    Location
    Cape Town, South Africa
    Posts
    18
    Thanked: 0

    Default

    Have started to remove rust and as much staining as I can with 1k Wet/dry paper on a glass board, so that I can see the state of the steel underneath. Pics to follow, when I can find the camera. I will remove the pins when I get home, but this is just to get a good rough idea as to what is needed.

    PS, any tips for polishing and cleaning out the finger hook at the end of the tang?

    Brad

  3. #3
    Senior Member blabbermouth RezDog's Avatar
    Join Date
    Feb 2013
    Location
    Haida Gwaii, British Columbia, Canada
    Posts
    14,389
    Thanked: 4821

    Default

    I always use old wine corks as a backer for my sandpaper. I also use WD-40 and wet dry sandpaper. 1K is a good starting point, I often start with steel wool and some mothers polish. Once it is clean and shiny I will decide on hoe far to go chasing the black rust. You never know how deep it will go. Sometimes all the black will come off with the steel wool and leave the pitting, and then I can decide how much of the pitting to chase. There is a sticky http://straightrazorpalace.com/works...wers-here.html You should look through it first as there are a few tips and tricks in there that might be good at this point.
    gooser and engine46 like this.
    It's not what you know, it's who you take fishing!

  4. The Following User Says Thank You to RezDog For This Useful Post:

    brussel (01-22-2015)

  5. #4
    Junior Member
    Join Date
    Jan 2015
    Location
    Cape Town, South Africa
    Posts
    18
    Thanked: 0

    Default

    Awesome! thanks!

    Have had a look at some of the hand sanding tips, and tricks, but alas some links no longer work.. But will keep looking through when I get home! thank you for the link.

    Brad

  6. #5
    Senior Member blabbermouth engine46's Avatar
    Join Date
    Feb 2014
    Location
    Republic of Texas
    Posts
    7,810
    Thanked: 1744
    Blog Entries
    2

    Default

    Brad
    I have a big box of different grit wet or dry sandpaper starting with 240 grit, then 280, 320, 400, 500, 600, 800, 1000, 1200, 1500, 1800, 2000, 2500 & 3000 to finish. It comes in handy & I have plenty of it so it will last me a very long time. I like RezDog's idea about the wine cork & that's not the first time I've seen him say that. It isn't too soft & it isn't too hard but just right for the application! You did good by starting with 1k as he stated & you can go from there. It's looking good so far & it takes some work to remove all the black rust but you can do it. You are getting in some good experience by starting on one that isn't so valuable & this will help you for later down the road when you do have a razor that has some potential to it. Keep up the good work.

  7. #6
    Senior Member blabbermouth Geezer's Avatar
    Join Date
    Jul 2010
    Location
    EauClaire,WI
    Posts
    7,685
    Thanked: 3825
    Blog Entries
    1
    Be yourself; everyone else is already taken.
    - Oscar Wilde

  8. The Following User Says Thank You to Geezer For This Useful Post:

    brussel (02-01-2015)

  9. #7
    Junior Member
    Join Date
    Jan 2015
    Location
    Cape Town, South Africa
    Posts
    18
    Thanked: 0

    Default

    Ok, well after finally getting around to it, I have disassembled the whole razor. I have noticed that the hole in the tang, is quite a lot bigger than the pin size (See Pics), Is this supposed to be this way?

    Will start polishing the tang tonight

    Name:  WP_20150201_001.jpg
Views: 281
Size:  21.4 KB

    Name:  WP_20150201_002.jpg
Views: 274
Size:  22.5 KB

    Name:  WP_20150201_003.jpg
Views: 282
Size:  23.0 KB

    Name:  WP_20150201_005.jpg
Views: 294
Size:  29.6 KB


    Thanks all

    Brad
    Geezer and engine46 like this.

  10. #8
    Senior Member blabbermouth Geezer's Avatar
    Join Date
    Jul 2010
    Location
    EauClaire,WI
    Posts
    7,685
    Thanked: 3825
    Blog Entries
    1

    Default

    Quote Originally Posted by brussel View Post
    Ok, well after finally getting around to it, I have disassembled the whole razor. I have noticed that the hole in the tang, is quite a lot bigger than the pin size (See Pics), Is this supposed to be this way?
    Thanks all Brad
    The hole were punched and sometimes they corroded. That razor may be left that way or you can make a thin sleeve to fit into the hole of brass tubing or an eyelet which you might find with a lady's help at a yard goods store.
    Name:  eyelets 2.jpg
Views: 291
Size:  2.6 KB
    Have fun, you are doing fine so far!
    ~Richard
    engine46 likes this.
    Be yourself; everyone else is already taken.
    - Oscar Wilde

  11. The Following User Says Thank You to Geezer For This Useful Post:

    brussel (02-01-2015)

  12. #9
    Junior Member
    Join Date
    Jan 2015
    Location
    Cape Town, South Africa
    Posts
    18
    Thanked: 0

    Default

    Thank you! i will see what i can find

    Brad

  13. #10
    Senior Member ferroburak's Avatar
    Join Date
    Apr 2010
    Posts
    430
    Thanked: 34

    Default

    Nice job on pin removal, nice scales.
    Geezer likes this.

Page 1 of 2 12 LastLast

Tags for this Thread

Posting Permissions

  • You may not post new threads
  • You may not post replies
  • You may not post attachments
  • You may not edit your posts
  •