
Results 21 to 30 of 34
 84Likes
 LinkBack URL
 About LinkBacks
-
03-08-2016, 04:29 AM #21I used Nakayamas for my house


- Join Date
- Aug 2009
- Location
- Des Moines
- Posts
- 8,664
- Blog Entries
- 1
Thanked: 2591 Blue, is not hard to get IME, an oven will work fine. I have done some on the stove top on high and a butane torch as a second source of heat. Another option is electro anodizing where all kinds of colors are possible. Blue is in the 25V range and that can be achieved with several batteries in parallel, the rest is very easy to do.
 Originally Posted by 10Pups

If you like shoot me a PM I have a set up for anodizing and can help you.Chevhead likes this.Stefan
-
The Following User Says Thank You to mainaman For This Useful Post:
10Pups (03-26-2016)
-
03-21-2016, 01:06 AM #22Senior Member


- Join Date
- Nov 2012
- Location
- Across the street from Mickey Mouse in Calif.
- Posts
- 5,320
Thanked: 1184
Wellll I started experimenting today with anodizing titanium. I watched all the tubes on both heat and electro and decided doing it my oven could wait. There is no scale for what temp makes what color with the heat method and I was looking for a blue. The oven seemed like an experiment in itself.
First I had to get a mirror polish so I went back to the belt sander and dressed up the edges and proceeded to go my usual route to mirror. 400g belt, to 600g belt to 800g belt. Then I go to compounds starting with black on sisal which does a great job on razor blades after grease-less , by the way. The green , white and blue to get everything perfect. Okay so first thing I noticed is flaws in the finish of titanium are very hard to see. Compounds or finger prints or the swipe of a towel leaves marks the look exactly like old grit scratches. In the end I called my finish "good enough" which is not my usual "perfect". I spent 4 times as long on these knowing full well titanium is abrasive resistant. It's one of it's better qualities. I had had enough, which goes against my patient nature but ,what can I say.
I hooked up 3 9v batteries in sequence (27v)
Used a piece of tool steel for the negative piece that goes in the jar. It was as long as the scales and just as wide so I figured that would do it. About 2 1/2 tablespoons (measured Rachel Ray style) of TSP for the electrolyte.
Now the test pieces were not clean or sanded or anything but I saw what I wanted to see. Purple comes quick with 3 batteries and dark blue with time. With 4 (36v) I got a nice light blue (less purple hue) better....quick. I did the square second piece to make sure I had it right.
The first was anodize over anodize and so that left a doubt.
So I made a little hanger out of copper wire to hold everything in the jar at once. My thinking was they would all come out the same that way. I left the scales together at the wedge end. I made sure everything was clean by wiping it down with denatured alcohol and dropped it all in. I hooked up the positive lead and watch the bubbles start coming up. Most of these were from the negative bar and the stainless steel screw I used to test pin the scales together at the wedge end. After what seemed like forever (after watching the you tubes) I pulled out the pieces to see not much color and mostly purple around the edges. I added another battery to the power supply and let things sit longer. Still not much color. 5th battery and walked away for a smoke and when I came back I got the purple and gold you see on the 3 pieces. The show side of course had some areas that looked like they were grey and not anodized. DANG. I took some Maas and wiped it down and a lot of the color disappeared. Hmmm not very good as far a longevity goes. I took it to the buffer and then hung it by some wire and went at it with a torch a couple of times.
This pic shows the final. Sort of. It does have a light blue hue to the whole piece with the spots showing much better.
This was the first torch experiment.
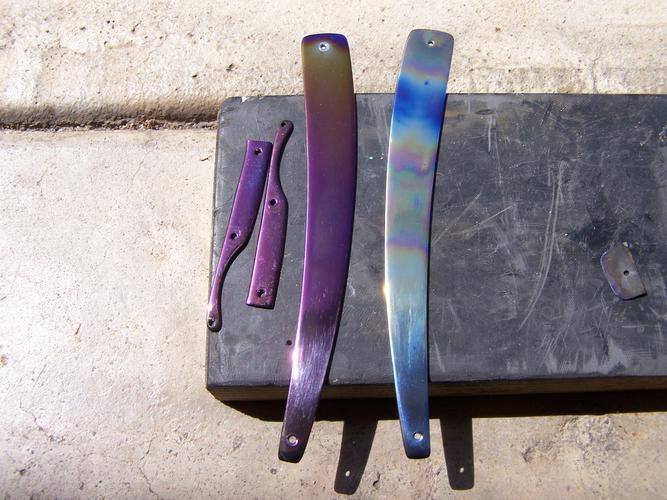
I loved the blue part that has the waves to it but good luck duplicating it. Maybe after doing a 100 scales I could get it down. After this first set I am not to anxious to get to the next set :<0)
More experiments to come until I am satisfied with the finish. May go to a satin finish and then color. Still haunted by the not so great mirror finish.Good judgment comes from experience, and experience....well that comes from poor judgment.
-
The Following 6 Users Say Thank You to 10Pups For This Useful Post:
Chevhead (03-21-2016), Geezer (03-21-2016), markbignosekelly (03-28-2016), RezDog (03-21-2016), sharptonn (03-21-2016), Wolfpack34 (03-28-2016)
-
03-21-2016, 01:27 AM #23I used Nakayamas for my house
- Join Date
- Aug 2009
- Location
- Des Moines
- Posts
- 8,664
- Blog Entries
- 1
Thanked: 2591
As I said in my PM , use a Ti wire, and make sure the scales are very clean. Your cathode may be good size but it may need to be bigger, you'll find out on your next run. Originally Posted by 10Pups
Stefan
-
The Following User Says Thank You to mainaman For This Useful Post:
10Pups (03-26-2016)
-
03-21-2016, 02:14 AM #24Fatty Boom Boom

- Join Date
- Jul 2012
- Location
- Rockville
- Posts
- 3,258
Thanked: 638
From another solar system but here are some guys that do some incredible things with anodizing titanium: Firefly Bicycles
celticcrusader likes this."Call me Ishmael"
CUTS LANE WOOL HAIR LIKE A Saus-AGE!
-
The Following 2 Users Say Thank You to WW243 For This Useful Post:
10Pups (03-26-2016), celticcrusader (03-26-2016)
-
03-21-2016, 03:35 AM #25Senior Member
- Join Date
- Nov 2012
- Location
- Across the street from Mickey Mouse in Calif.
- Posts
- 5,320
Thanked: 1184
Very cool bikes ! Originally Posted by WW243
I haven't done any TIG welding in a long time. Way long time. I used to weld .025 SS to .005 inconel. encapsulating rotors and stators for pumps used on ships carrying liquid gases like oxygen, nitrogen, ammonia, etc.Good judgment comes from experience, and experience....well that comes from poor judgment.
-
03-21-2016, 03:44 AM #26Razor Vulture


- Join Date
- Oct 2010
- Location
- Lone Star State
- Posts
- 26,128
Thanked: 8612

Thinking you should just pin that up! I think it is cool! "Don't be stubborn. You are missing out."
I rest my case.
-
The Following User Says Thank You to sharptonn For This Useful Post:
10Pups (03-26-2016)
-
03-21-2016, 04:33 AM #27Senior Member
- Join Date
- Nov 2012
- Location
- Across the street from Mickey Mouse in Calif.
- Posts
- 5,320
Thanked: 1184
I would have Tom but the show side had some major flaws. I don't know why but big grey spots like contamination of some kind. I cleaned the heck out of everything too. When I tried the flame method I started with polished piece and little spots showed up on it twice in different places. It's very hard to get pics of this stuff as the direction of light changes everything.
The burnt purple was looking cool and as you can see it looks kinda gold in different shades of light. Fun stuff :<0|Good judgment comes from experience, and experience....well that comes from poor judgment.
-
03-26-2016, 04:20 AM #28Senior Member
- Join Date
- Jul 2013
- Location
- Shreve, Ohio
- Posts
- 229
Thanked: 68
I'll double down on this, your cathode needs to be at absolute minimum the same size as the piece you're working on, so if it was the size of one scale (if I read it correctly) and you put both in. Then its probably about 3 times too small. Interested to see your further experiments though. Another note though, titanium is (relatively) easily cut with a fine tooth hacksaw blade, it's much easier than cut off wheels, and as you've discover, any moderate to high speed saw will destroy itself. Originally Posted by mainaman
-
The Following User Says Thank You to wynndow For This Useful Post:
10Pups (03-26-2016)
-
03-26-2016, 04:32 AM #29Senior Member
- Join Date
- Nov 2012
- Location
- Across the street from Mickey Mouse in Calif.
- Posts
- 5,320
Thanked: 1184
I am searching out some titanium wire for the next run for sure. Got a list going for other stuff too. Maybe do a vid next time. Like I said I just took a shot this time to see what I could get away with. Too lazy to go to the store and my storage building for better set up. The only thing I can't seem to improve on will be the power set up. I just don't have anything DC besides batteries.
Do appreciate the help here. Watched tons of vids of guys with nice DC converters and set ups but I am not going into the anodizing business. I found the 4 1/2" grinder cuts my shapes good enough for a 2x72 50 grit belt to finish the shaping easy enough. And once agian I don't think I am going to be using titanium much right away. Having fun though. Love doing something different.Good judgment comes from experience, and experience....well that comes from poor judgment.
-
03-28-2016, 07:01 PM #30Senior Member

- Join Date
- Jan 2012
- Location
- Waukesha, Wisconsin
- Posts
- 1,943
Thanked: 390
Here's some ideas for sourcing parts. You could look into scavenging parts from heat sources (ie space heaters/hot plates). Some of the simpler ones just convert DC current to a wire/rod to heat it up. They usually have the added benefit of a dial, which may/may not control the heat with current/voltage control depending on the construction. Secondly, Ti wire is getting popular in the ecig industry, many places are starting to carry 22g to 32g wire. Whether it is the proper wire for you set-up....

-
The Following User Says Thank You to dinnermint For This Useful Post:
10Pups (03-28-2016)


 Reply With Quote